- PURPOSE
- SCOPE
- APPLICABLE DOCUMENTS
- RESPONSIBILITY
- MANPOWER
- TOOLS & EQUIPMENT
- METHODS / PROCEDURE
- QUALITY CONTROL
- SAFETY PRECAUTION
- ATTACHMENTS
1.0 PURPOSE
1.1. This method statement shall provide minimum guidelines to carry out the bolt torqueing & tensioning activities, procedures for Plants and Buildings. In accordance with contract scope of work and project specification.
2.0 SCOPE
2.1. This Method Statement covers the procedure of bolt torqueing and tensioning.
3.0 APPLICABLE DOCUMENTS
3.1. Project Specification and Standard
Specification for piping Construction Work in Field
Bolt Tightening Procedure
3.2. Saudi Aramco Standard
3.2.1. SAES-L-109 Selection of Flanges, Stud Bolts and Gaskets
3.2.2. SAES-L-350 Construction of Plant Piping
3.2.3. SAEP-351 Bolted Flange Joint Assembly
3.3 Industry Codes Standards
3.3.1 ASME B31.3 Process Piping
3.3.2 Saudi Aramco Construction Safety Manual
3.4 Applicable SATIP/SAIC/SATR
3.4.1 SAIC-L-2014 Inspection of bolted flange joint assembly
3.4.2 SAIC-L-2002 Review Procedure-Flange Joint Assembly & Gasket Installation.
3.4.3 SATIP-L-350-02 Piping Tie-in Installation of Plant Piping.
3.4.4 SATR-L-2001 Flange Joint Tightening Inspection Report
4.0 RESPONSIBILITY
4.1. Site Manager Responsibility for HSE shall implement, analyze and schedule all construction activities with his department to include manpower and equipment line up as well as other possible resources required for the successful implementation of the construction work activities. He shall study all aspects of work procedure as per Technical Scope of Work.
4.2. Piping Superintendent shall implement and review all necessary documents for the installation works to include, technical scope of work, specification, bill of quantities, planned milestone dates and construction procedure in support to his supervisor. He shall monitor the availability of materials in accordance with construction schedules. He shall directly report to Construction Manager
4.3. Piping Supervisor shall directly report to the Piping Superintendent and responsible in the implementation and control of all site activities per technical Scope of work and latest approved construction drawings. He shall coordinate with other discipline to visualize possible conflicts in the drawing as well as in the schedules to provide proper options in preventing unnecessary delay & obstructions.
4.4. QC Piping Inspector shall be responsible for inspection and monitoring of the work and ensure that the works is performed and properly documented in accordance with Project requirements.
4.5. Safety Supervisor shall be responsible for monitoring safety aspects and ensuring that the work is done in accordance with Safety Standard Procedure. He shall discuss to the Supervisor’s the characteristics of related materials and status of work area giving reminders as an additional point to work safely.
5.0 MANPOWER
5.1. The Piping Superintendent shall control the overall activities of Bolt torqueing & tensioning works. The basic manpower under him shall consists but not limited to the following:
5.1.1. Piping Supervisor
5.1.2. Piping Foreman
5.1.3. Pipe Fitters
5.1.4. Millwright
5.1.5. Technician/Bolt Tightening Crew
5.1.6. Certified Scaffolders
5.1.7. Permit Receiver
5.1.8. Helpers
5.2. Safety Engineer/Officer
6.0 TOOLS AND EQUIPMENT
6.1. Tools and equipment needed should be in good condition and must be checked by Piping Supervisor / Safety Officer prior to use. These includes but not limited to:
6.1.1. Tools & Equipment
6.1.1.1 Bolt Tensioning Assembly (Calibrated)
6.1.1.2 Torque Wrench (Calibrated by Third Party)
6.1.1.3 Air Supply Pump (60 cfm. At 90 psi)
6.1.1.4 Skid More Calibrator
6.1.1.5 Chain Block/Fuller.
6.1.1.6 Square drive set
6.1.1.7 Hex wrench set
6.1.1.8 Set of tools as applicable.
7.0 METHODS/PROCEDURE
7.1 General Requirements
7.1.1 Torque values vary according to flange rating, bolt size, type of gasket and friction factor of the thread lubricant.
7.1.2 Bolt tightening shall be in accordance with SAEP-351.
7.1.3 The manufacture’s instruction shall be followed for the operation, limitation and maintenance of all torque wrench used to perform flange bolt tightening. Calibration shall be performed in accordance’s with manufacture’s recommendation or as required in specification.
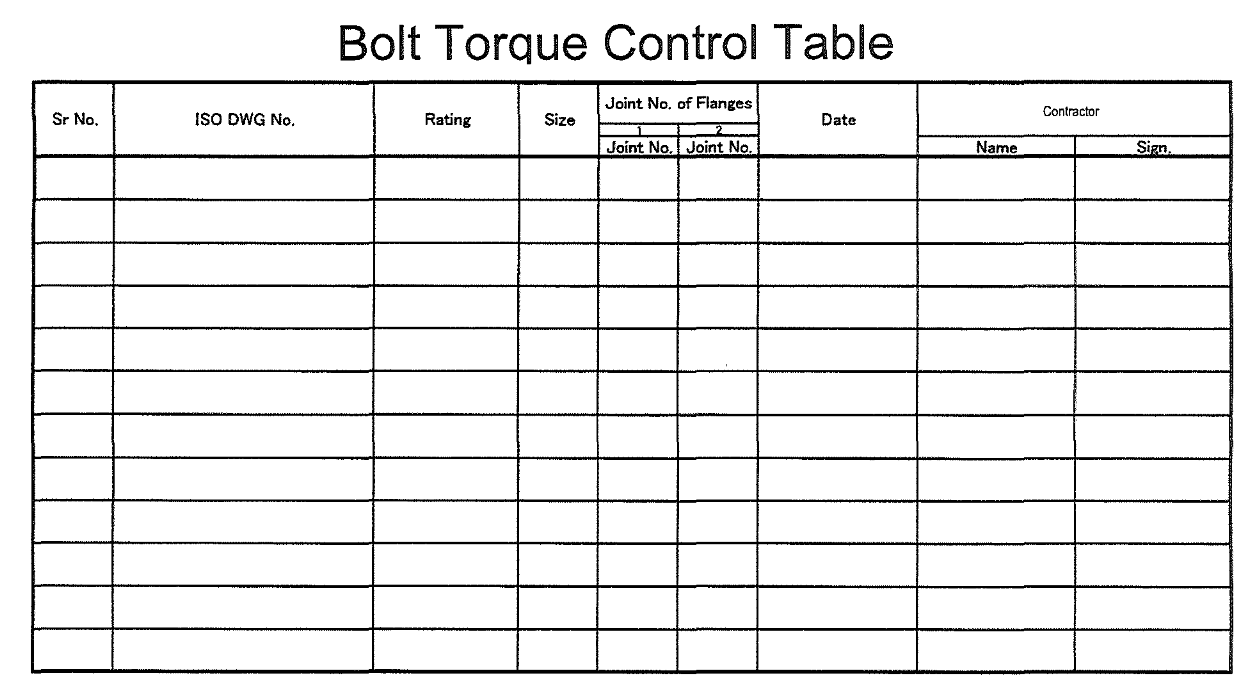
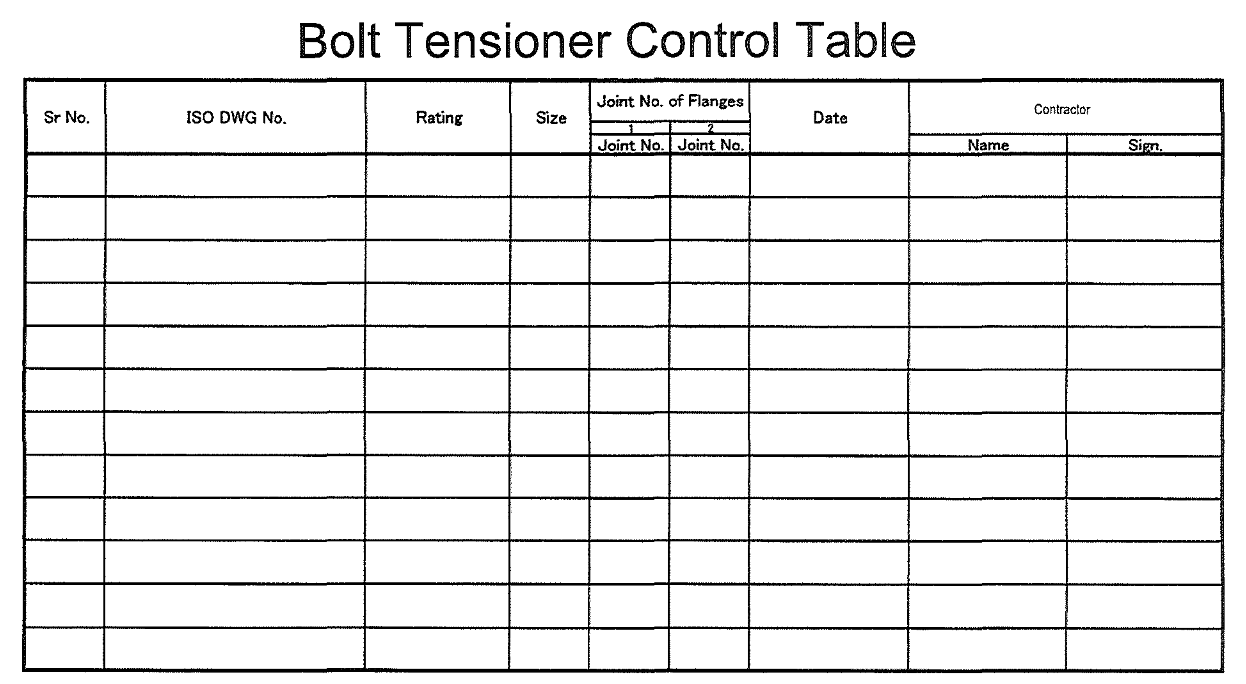
7.1.4 All bolts shall be tightened before hydro test except for flanges where test blind is installed. Then the bolt tightening shall be confirmed in accordance with “Bolt & Gasket Control Table of Piping Pressure Test Procedure(S-000-3160-004)”. In addition to item-no. (1) and (2) of S-000-3160-009 table 1, usage of bolt tensioner/torqueing method shall be recorded on “Bolt tensioner Control Table ( Attachment 2A)” and “Bolt Torque Control table (Attachment 2B)”
7.2 Bolt Tightening Procedure
7.2.1 All bolt shell shall be visually check for proper size, dimension for any physical damage to shank or threads which would interfere with bolt assembly or performance. Also check the material suitability of the stud bolt for service temperature.
7.2.2 Check/verify the gasket as per approved drawing for type, rating, dimension, compatibility with flange facing and free of any damages particularly in seating area.
7.2.3 Bolts, nuts and washer shall be as per approved drawing & visually check as per size, grade, dimension and any physical damage to threads that affect the bolts assembly. Stud bolts and nuts material shall be suitable for the service temperature and compatibility with flange materials.
7.2.4 Only proper and approved thread lubricant shall be used to lubricate the threaded components. These include the threads of bolts, nuts and bearing surfaces of nut and washers if any. Lubricant shall be as per Table SAEP351-001.
7.2.5 Torque values vary according to flange rating, bolt size, type of gasket and friction factor of the lubricant.
7.2.6 Torque wrench calibration shall be performed in accordance with the manufacture’s recommendation or recommended by in consultation with Saudi Aramco Representative.
7.2.7 Lubricant shall not be used on gasket setting area.
7.3 Stud bolt tightening procedure
7.3.1 Align flanges and gasket. Forced Tightening is not allowed to overcome non acceptable alignment tolerances. Clamp securely in place.
7.3.2 Apply Lubricant to stud threads over length and nut engagement and to face of nut which contacts flange. Ensure that the nuts run freely down the thread of the studs.
7.3.3 Install all studs and nuts hand tight; ensure that the studs pass freely through the flange holes. Position the nut on one end of the stud such that only the studs projects beyond the face of the nut. The excess stud length project beyond the nut on the other side.
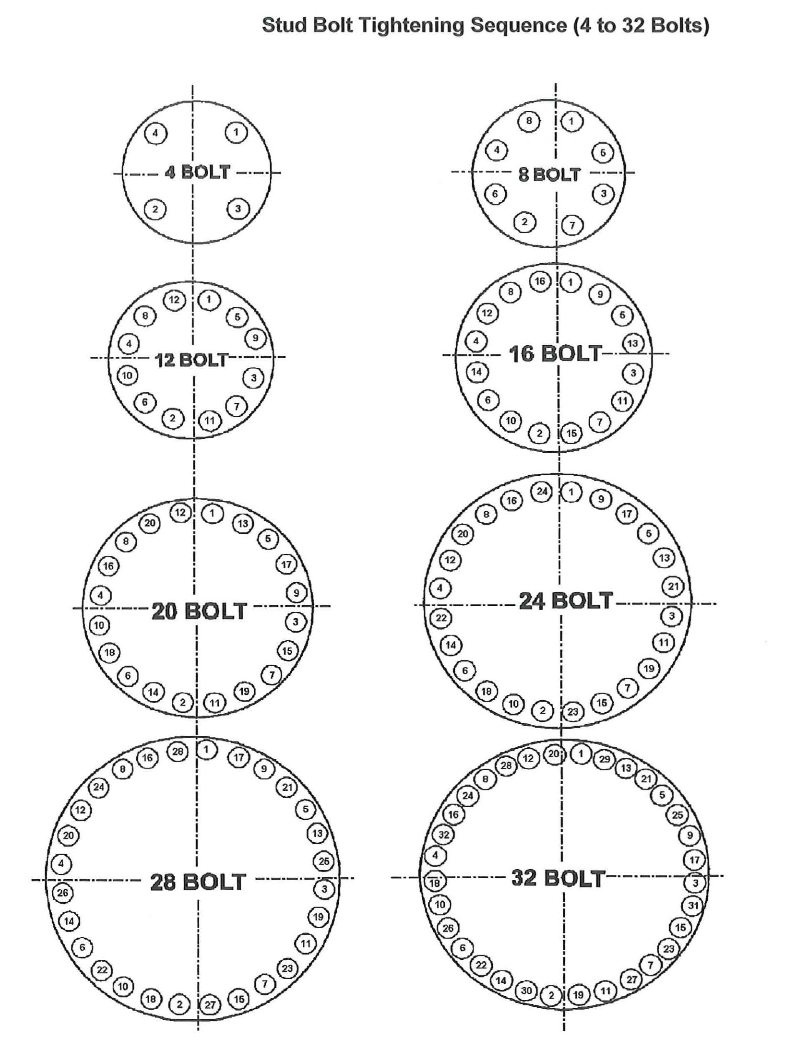
7.3.4 Number each stud according to each position in the flange. Refer to attachment 1 & 2 SAEP-351-001 Stud bolt tightening sequence.
7.3.5 For insulating gaskets like PIKOTEK, enough gap (½”of gap is recommended) should be available between flange faces to avoid any damage to seals during inserting the gaskets, if due to any reasons, seals are damaged, change the seal before installing PIKOTEK.
7.3.6 Matting flange faces and the gaskets shall be dry and free from grease, oil or water.
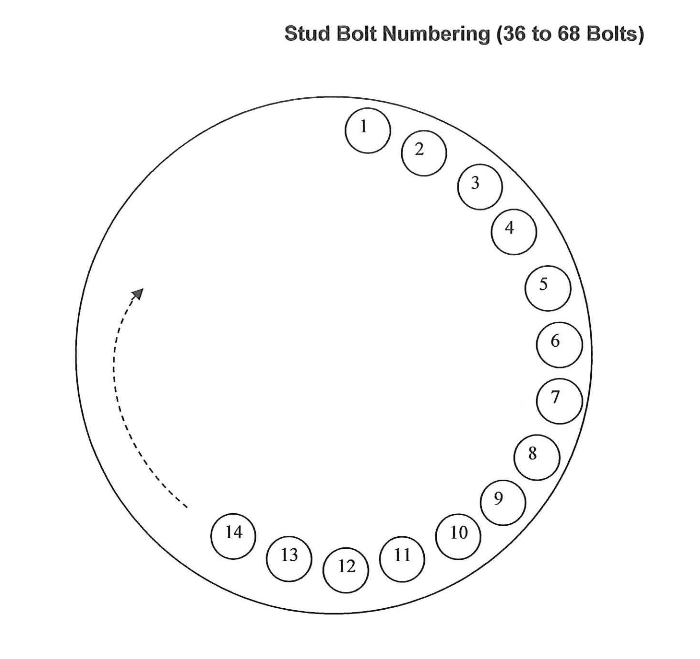
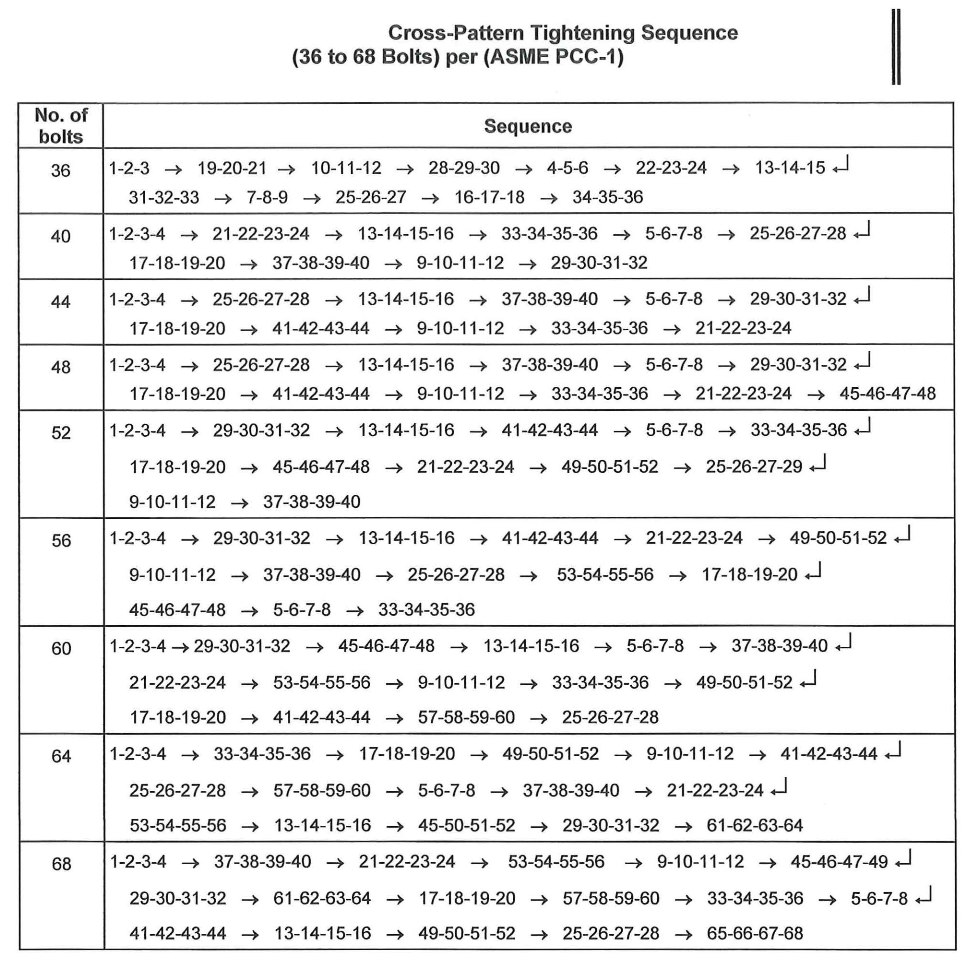
7.3.7 Tighten studs per the Stud Bolt Tightening Sequence, for 4 to 32 bolts use Figure SAEP-351-01 and for 36 to 68 bolts see Figure SAEP-351-002 for bolts numbering and then follow the tightening sequence of the Table SAEP351-004. An appropriate tool should be used such as an air impact wrench or equivalent.
7.3.8 Tighten the stud bolts in stages to obtain the final required torque from the appropriate torque Table –SAEP-351-02. The first stage should not be more than 30% of the final torque. The final torque must be within ±5%of the required torque value. Apply the torque evenly to each stud following the stud bolt tightening sequence. The final torque must be within ±5% of the required torque value per section 7.3.7 above.
7.3.9 Marked with applicable color for the identification of tightened bolt.
7.4 Tightening Method
7.4.1 Tensioning
7.4.1.1 Ready the appropriate Tensioning Tools and accessories.
7.4.1.2 All flanges and bolt shall be prepared and pre-assembled prior to tensioning as specified in Para. 7.3.
7.4.1.3 The tensioning device must engage the threads on the stud bolt for length equal to a minimum of 1 bolt diameter.
7.4.1.4 On application where several bolts will be tensioned simultaneously, all tensioning equipment shall be connected to the same pump.
7.4.1.5 50% of the studs shall be tensioned during the procedure. The pattern involved is every other bolt hole.
7.4.1.6 Setting up of tensioning device shall be as per manufacture’s recommendations.
7.4.1.6.1 First Pass Tensioning
7.4.1.6.1.1 Tension first 50% of the 1/3 stress value listed in Table SAEP-351-02 and 03.
7.4.1.6.1.2 Tension the remaining bolts to the 1/3 stress value listed in Table SAEP-351-002 and 003 and reseat nuts.
7.4.1.6.2 Second Pass Tensioning
7.4.1.6.2.1 Tension first 50% of the bolts to 2/3 stress value listed in Table SAEP-351-02 and 03 and reseat nuts.
7.4.1.6.2.2 Tension the remaining bolts to 2/3 stress value listed in Table SAEP-351-02 and 03 reseat the nuts.
7.4.1.6.3 Final Pass tensioning
7.4.1.6.3.1 Tensioning first 50% of the bolt to the final stress value listed in Table SAEP351-02 and 03 and reseat nuts.
7.4.1.6.3.2 Tension the remaining bolts to the final stress value listed in Table SAEP-351-02 and 03 and reseat the nuts.
7.4.1.6.4 Ultrasonic measurements for tensioning are not required unless directed by Owner’s Engineer.
7.4.2 Torquing
7.4.2.1 Tightening assembly
7.4.2.1.1 Hydraulic Torquing
7.4.2.1.1.1 Determine the torque value to be applied
7.4.2.1.1.2 Select the tool Hex wrench head/square drive wrench head and hex/sockets to be used for tightening which serves best for application of torque
7.4.2.1.1.3 Assemble the hex head wrench/square drive wrench head to Power head as shown I figure 3-2 and 4-2, refer to page 13 and 17 respectively in attachment 5.
7.4.2.1.1.4 Prepare the console (pump) for the connection of twin hoses to the assembly. Connect the twin hoses to the console. Each end of the hole will have one male and female quick connect fittings to ensure no leaks and allow the oil flow to pass freely prior to the pressurization of the system.
7.4.2.1.1.5 Connect the twin hoses to the tool also using the quick connect fittings, as shown in the figure 2-2 refer to page 6 of the attachment 5.
7.4.2.1.1.6 Set the tool on the nut.
7.4.2.1.1.7 Set the torque value on the console by setting the torque control knob according to the desired bolt torque for tightening or loosening as applicable.
7.4.2.1.2 Hand/Manual Bolt Tightening
7.4.2.1.2.1 For less than 1-1/2” hand/manual bolt tightening will be done.
7.4.2.1.2.2 Determine the torque value to be applied for hand tool as required.
7.4.2.1.2.3 Torque value shall be in accordance with SAEP-351.
7.4.2.1.2.4 Select the correct size and hex/socket of torque wrench as applicable.
7.4.2.1.2.5 Paint both side of bolt head to show “ Bolt tightening has been completed” after required activity finishes. White color paint should be used.
7.4.2.1.3 Tightening Procedure
7.4.2.1.3.1 Bolt Tightening sequence are given in Figure SAEP-351-001. For the joints not shown, the owner’s Engineers shall approved the tightening sequence. All 4 holes bolting pattern flanges shall be in the sequence of 4 bolt holes. See attachment 1 for sequential order and rotation order based on 4-bolt holes.
7.4.2.1.3.2 Manual with Torque Control procedures.
8 QUALITY CONTROL
8.1 QC Piping Inspector shall be assign to ensure the quality control and quality assurance requirement on the project.
8.2 QC Piping Inspector shall coordinate with other inspector to conduct inspection as required in SATIP.
8.3 QC Piping Inspector shall be responsible for all required inspections/documentations and to ensure that all applicable requirements, codes and standards are complied with.
8.4 QC Piping Inspector to utilize the applicable Saudi Aramco Inspection Checklist (SAIC) for every inspection activities.
8.5 Calibration shall be done as required for all machine and tools going to be used in the work in accordance with Schedule Q.
9 SAFETY PRECAUTION
Obtain the approval of the work permit from the concerned Representative before starting any work.
9.1 All electrical tools shall be check and color coded..
9.2 Continuous monitoring and inspection shall be done by Piping Supervisor and Safety Supervisor and it shall be continuously implemented to detect and correct unsafe practices while performing the work activities.
9.3 Provide warning sign and sufficient barricade on working area and only assigned personnel will be allowed in the area.
9.4 Safety harness with double lanyards shall be used all the time when working at elevated temporary platforms 1.8 meters high and above.
9.5 Piping Supervisor shall monitor the work activities to help and to protect the assigned workers against exposure to safety hazards. He shall ensure that Personal Protective Equipment (PPE’s) are supplied and used and comply with applicable standards. HSE will assist in giving advice.
9.6 All rigging equipment shall be in good condition and possess a valid certification from authorized certifying and inspection department, inspection and color coding shall be done in accordance with inspection guideline.
9.7 Toolbox meeting shall be conducted by Piping Supervisor daily so as works activities will be properly coordinated to all concerned and all safety infractions will be acted immediately.
9.8 All necessary Personal Protective equipment (PPE) shall be provided and to be worn at all times.
9.9 Housekeeping shall be maintained and working area shall be kept in a clean and tidy manner.
9.10 Job Hazard and Risk Assessment (JHRA) of this method statement shall be disseminated and explained to workers prior to start of work.
10 ATTACHMENT
10.1 Attachment 1 Job Hazard and Risk Assessment (JHRA)
10.2 Attachment 2 Stud Bolt Tightening Sequence (4-32 Bolts)
10.3 Attachment 3 Stud Bolt Numbering (36-68 Bolts)
10.4 Attachment 4 Cross Pattern tightening Sequence
10.5 Attachment 5 Hydratight RSL Operation & Maintenance Manual.
10.6 Attachment 6 Bolt Tensioner Control Table
10.7 Attachment 7 Bolt Torque Control Table
