Vibration Measurement Basic Parameters

Vibration Measurement

Vibration Measurement Basic Parameters

Do you notice why Vibration Measurement is so important? Many plants are in the process of changing their philosophy from that of shutting down a plant on a time scheduled basis to that of running the plant until the condition of the machinery indicates, it is time to shut down.

This condition is, of course, determined by instrumentation. This “predictive maintenance” philosophy is particularly applicable where the rotating machinery is the limiting factor in a plant maintenance schedule. Obviously this type of predictive maintenance program requires dependence upon instrumentation, and the proper interpretation of the data it provides. In this respect, it is important that all available parameters of vibration and rotor position are measured and evaluated. A simple investigation of amplitude and frequency alone does not, and will not, provide sufficient information about machinery performance to provide a strong, accurate predictive maintenance program.

Pleas check also: VIBRATION MONITORING SYSTEM

The following is a discussion of basic dynamic motion (vibration) and rotor position parameters that should be measured and analyzed in the diagnosis of rotating machinery in predictive maintenance programs;

DYNAMIC MOTION VIBRATION PARAMETERS

Amplitude

Amplitude of vibration on most machinery is expressed in peak-to-peak mils displacement. Amplitude, whether expressed in displacement, velocity, or acceleration, is generally an indicator of severity. It attempts to answer the question, “Is this machine running smoothly or roughly?”. The ability to measured the shaft with proximity probes has helped greatly in providing more accurate information with regard to the amplitude of the vibration. Today, most continuous monitoring of critical machinery is provided with a peak-to-peak displacement measurement either in mils or micrometers.

Frequency

The frequency of vibration (cycle per minute) is most commonly expressed in multiples of rotative speed of the machine.
It also provides an easy means to express the frequency of vibration. It is necessary only to refer to the frequency of vibration in such terms as one times rpm, two times rpm, 43% of rpm etc, rather than having to express all vibration in cycle-per-minute or hertz.

SYSTEM POWER UP INHIBIT (3300 Series)

The system monitor provide a power up inhabit function that allows each monitor to inhibit its alarms during power up or whenever a system voltage falls below its operating level. After power up, the inhibit function remains active for approx. 2 seconds.

SUPPLY VOLTAGE OKInput supply is 110/220 50Hz. We are using here 110 50Hz option and obtaining different outputs which are,

0/P voltage = -18 VDC (9000 series)

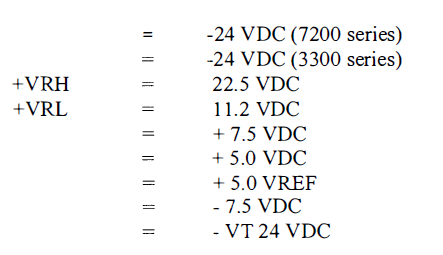
Seven LEDs located behind the front panel of the system monitor are ON to indicate when above mention supply voltages are functioning. Then a green LED on the front panel (Supplies OK) will lit.

SYSTEM RESET

The system monitor provide system reset capability that is activated by either external contact closer through terminals on the power input module or by pressing the RESET switch on the front panel.

TRIP MULTIPLY

It is activated by contact closure through terminals on the power input module. When activated, trip multiply allows the alarm set points to be multiplied by a factor preset on monitors with trip multiply option installed. The trip multiply function is indicated by a red led on the front panel.

Please check also: Vibration Rod drop measurement

OK RELAY

The system monitor drives an OK RELAY that is located on the power input module. The SPDT relay is used to indicate that the 3300 rack is in ok condition. The ok relay is set normally energized. The ok relay is deactivated either by the system power up inhibit signal from system monitor or by a not ok signal from the monitor.

ALARM SET POINT ADJUST

The system monitor has two switches on the front panel that adjust set point levels on each monitor. One switch is for upscale adjustments and the other is for down scale adjustments.


Read more

Basic Concept of Vibration Monitoring System

Vibration Monitoring System

Basic Concept of Vibration Monitoring System

Vibration Monitoring System For optimum performance of the machine it is very necessary that parameter like, vibration, speed, position, bearing temperature, pressure and lubricating oil conditions of machine must be monitored continuously so that any change in any parameter could be rectified without any time lag, to avoid any severe damage resulting big financial loss. Vibration is probably the best operating parameter to judge dynamic conditions such as, bearing stability and the dynamic stress applied to components, e.g. balding and gear teeth. In addition other common machinery anomalies (Misaligned couplings and improper clearances) are often manifested as vibration characteristics. By measuring a rotating shaft’s position relative to stationery components, clearances are measured to guard against changes, which would result in severe damage. In machine monitoring system we will be dealing with two kinds of vibration, namely axial vibration or thrust (XT) and radial vibration (VT).

Please check this: Vibration-measurement-basic-parameters

Axial Vibration or Thrust (XT)

Vibration of a shaft in the axial direction with respect to some fixed reference is called axial vibration. Typically the reference is the thrust bearing support structure or other casing member close to the thrust baring.
The measurement is made with proximity probe observing the shaft axially where a known probe gap distance/ voltage represents to the thrust bearing clearance. The probe may observe the thrust caller directly, or some other integral axial shaft surfaces, if such surface’s is closed to the thrust bearing.

Vibration Monitoring System

Fig. Shows Vibration Probe installation Points in machine Train

Read more

Linearity Check and Calibration Of Vibration Probe (Axial and Radial) & Proximitor

In this article we are discussing the very easy and basic method of calibration of vibration probe. Most of engineers and technicians think its very difficult to play with vibration instruments because in normal operation you face very minimum chances to touch these instruments. Follow the following steps one by one for linearity check and calibration of vibration probe and proximeter.

1.)  NATURE OF ACTIVITY 
  •  Linearity.
  • Check for Radial and Axial vibration probes 7200 and 3300 series

2.)   TEST INSTRUMENTS VIBRATION PROBE:

  •    Digital
  •    Multi-meter and TK-3 vibration calibration device

Please check also: What is ph meter analyzers

3.)  PROCEDURE OF CALIBRATION OF VIBRATION PROBE CHECKING:

  1. Obtain work permit from Operations.
  2. Explain to the operation that the work will be carried out is Vibration probe linearity test. Ask the operations to ensure that the stated compressor/fan is ready & safe to perform the linearity test. By-pass the vibration ESD interlocks, if it is required during plant operation using deviation form.
  3. Before removing vibration probes, ensure that lube oil and seal oil should be stop.
  4. Remove vibration probe and open the respective junction box where proximitor of vibration probe is mounted.
  5. Ensure that vibration probe is properly connected to its own extension cable.
  6. Mount vibration probe on micrometer of TK-3 by using appropriate adaptor. Set probe in close vicinity of micrometer spindle at zero reading on micrometer.


Read more

INDIRECT LEVEL MEASUREMENT METHODS- PAKTECHPOINT

INDIRECT LEVEL MEASUREMENT METHODS

There are different method for level measurements for indirect method, here we will be discussing in details some and short words. Purge level system, Displacer type level measurement, FLOAT AND CABLE Level Measurement, DISPLACEMENT (BUOYANCY) LEVEL MEASUREMENT, Magnetic Reed Switches for Level Measurment, DIFFERENTIAL PRESSURE METHOD for Level Measurement, CAPACITANCE TYPE LEVEL MEASUREMENT, CAPACITANCE TYPE LEVEL MEASUREMENT, RADIATION TYPE LEVEL MEASUREMENT, ULTRASONIC TYPE LEVEL MEASUREMENT.

Purge level system

The method above is suitable for open tank applications. When a liquid is in a pressure vessel, the liquid column pressure can’t be used unless the vessel pressure is balanced out. This is done through the use of different pressure meters.
purge sysyem diagram for level measurement

Differential pressure meter

This will be discussing in other article i am shareing link here Pleas click above heading. See below of this article.

Displacer type level measurement

The common methods employed for automatic continuous liquid level measurement are as follows.
  1. Float and cable
  2. Displacement (Buoyancy)
  3. Head  (Bubble tube, Diaphragm box, Pressure, Differential pressure)
  4. Capacitance
  5. Radiation (Nucleonic)
  6. Ultrasonic

FLOAT AND CABLE Level Measurement

A float and cable instrument measures liquid level by transmitting to a mechanism the rise and fall of a float that rides on the surface of the liquid. These methods can be used on both open and closed tanks. Advantage of float is simplicity and
insensitive to density changes. Disadvantage is limitation to clean liquid and turbulence of liquid creates measurement problem.

DISPLACEMENT (BUOYANCY) LEVEL MEASUREMENT

It is a type of force balance transmitter. It is based on Archimedes’ principle which states as “A body immersed in a
DISPLACEMENT (BUOYANCY)
DISPLACEMENT (BUOYANCY) type level diagram
liquid will be buoyed upward by a force equal to the weight of liquid displaced”. This method is used to measure liquid level by sensing the buoyant force exerted on a displacer by the liquid in which it is immersed. The buoyant force on an object depends on how much liquid is displaced and the density of the liquid. The buoyant force always equals the weight of the displaced liquid. If the  buoyant force becomes equal to the object’s weight, the object floats. Displacer element is a cylinder of constant cross sectional area and heavier than the liquid displaced.
This method is used for both open and closed tanks. Buoyancy transmitter is normally used in vessels where lower connection is not possible/permissible, fluctuating pressures or levels and high temperature service.

Magnetic Reed Switches for Level Measurment

If the liquid is hazardous chemical or at high temperature or pressure, magnetic reed switches are used. It is normally in open state. When the floating magnet outside the tube comes near the switch, it attracts the magnetic pole piece in the switch. This action closes the switch until the floating magnet moves away. These switches are not sealed in the tube, and they never come into contact with In this method a diaphragm box is suspended from a chain. Diaphragm is filled with air. The instrument that senses pressure changes and relates to level measurement is mounted above vessel. This method is normally used for open vessels.
magnetic reed switch daigram
magnetic reed switch diagram

DIFFERENTIAL PRESSURE METHOD for Level Measurement

In open tank pressure at high pressure side of cell is measure of liquid level. In closed tank, effect of tank pressure on measurement is nullified by piping this pressure to opposite side of cell. Any difference between the pressures sensed by the two legs is due to head pressure alone, and is used to measure the liquid level in the vessel.
In closed tank with liquid that produce vapors, the condensed liquid produces a head pressure on the low side of the instrument (called wet leg), causing the reading to be below zero. A zero elevation adjustment is carried out to compensate for this zero error. After draining the wet leg, the transmitter does not read correctly until the wet leg is refilled.

CAPACITANCE TYPE LEVEL MEASUREMENT

The amount of capacitance depends on the distance between the plates, the area of the plates, and the height of the dielectric between the plates. The equation is
C = K (A/D)
Where, C = capacitance, K = dielectric constant,             A = area of plate, D = distance between plates.
In this method a probe is inserted in a tank and capacitance is measured between probe and tank. Capacitance varies with respect to tank level. This phenomenon is due to the difference between dielectric constant of air and liquid Concept of capacitance –
CAPACITANCE TYPE LEVEL TRANSMITTER DIAGRAM

Sensing Liquid Level for Level Measurement

For sensor calibration reference measurement its empty and full tank condition must be taken .Generally we need to know the dielectric constants of the liquid being measured to calibrate the sensor at its full condition.

Application

Liquids level measurement.
Powered and granular solids.
Liquid metals at very high temperature.
Liquefied gases at very low temperature.
Corrosive material.
Very high pressure industrial processes.

Advantages of capacitance level measurement

Inexpensive.
Reliable.
Versatile.
Minimal maintenance.
Contains no moving parts.
Good range of measurement
Rugged.
Simple to use.
Easy to clean.
High temperature and high pressure application.

Disadvantage capacitance level measurement

Not suitable for low dielectric material

RADIATION TYPE LEVEL MEASUREMENT

In this method a radioactive source is kept on one side of tank and detector on other side. As radiation passes through the tank, its intensity varies with amount of material in tank and can be related to level. Its advantage is that nothing comes
in contact with liquids. It is very costly and difficult to handle.

ULTRASONIC TYPE LEVEL MEASUREMENT

Ultrasonic sound waves with frequencies of 1 to 5 MHz can be used to detect liquid or solid levels. Ultrasonic are sound waves but at higher frequencies than 20 KHz  (detected by human ear). It consists of an ultrasonic transducer (piezoelectric crystal). When voltage is applied to plates, the piezoelectric crystal expands or contracts. The crystal vibrates, and these
vibrations can be transferred to a diaphragm to produce ultrasonic sound waves. The liquid surface acts as a reflector, and the transducer receives the reflection of its transmitted pulses. The transmitter and receiver are both connected to an echo timer, which measures the amount of time between the emission of sound wave and the  reception of the echo. Time required by sound wave to travel to the liquid and back to receiver is carefully measured and this time is related to level.
In case transmitter could not be installed in tank, a noninvasive (not in contact with liquid) sensor transmits an ultrasonic signal through the walls of a vessel. When the vessel is filled with liquid, the signal travels through the liquid and the opposite wall to a receiver transducer, where it is converted to and electrical signal. It has good accuracy. It is costly.

Advantages of uidGed Wave Radar Level transmitter

Application with density variation, pressure and temperature fluctuation. Long ranges with narrow setting. Interface measurement independent of density.
Guided Wave Radar Level transmitter Diagram

Guided Wave Radar Level transmitter Advantages –

1.Long range.
2.Top mounted with narrow measurement beam.
3.Low sensitivity to foam and build up.
4.Flexible interface measurement with no moving parts.(Simultaneous measurement of interface and total level).

Disadvantages of Guided wave radar transmitter

1.Contacting
2.Corrosion
3.Pulling forces
4.Buildup


Read more

error: Content is Protected.