5.2 Acetylene 5.3 Oxygen Regulator …………
5.4 Acetylene Regulator
9 Typical Torch Positions
Fuel Gas Welding (FGW) General Practices | Oxyacetylene Welding
- Scope
This article describes the general practices in oxyacetylene welding process and includes considerations for equipment, joint design, and welding techniques.
- References
Reference is made in this article as per international standards.
- Safety
3.1 General
Safe practices prescribed in SES W02-F01 shall be followed on plant sites.
3.2 Safe Operating Procedures
3.2.1 Hazards related to unwanted backflow and mixing of fuel and oxygen shall be avoided by:
- a. Checking torches and connections for tightness, b. Checking tip to assure freedom from obstruction,
- c. Purging each supply hose individually before lighting the torch and after each potential backflow event, for example, emptying a cylinder or plugging the tip. Purging is accomplished by flowing each gas through its respective hose and the torch separately and long enough to purge out the hose. The hoses shall not be purged into confined spaces or near ignition sources.
- d. Lighting the acetylene before admitting oxygen.
- e. Closing torch oxygen valve first, then the fuel valve; when closing down torc
3.2.2 Combination hose line check-valve-flame arrester units shall be installed between the hose and the torch in both the fuel and the oxygen lines.
3.2.3 Proper maintenance of equipment shall be performed.
- General
4.1 Oxyacetylene gas welding is a fusion welding process in which the work is heated to the melting point by the combustion of a mixture of oxygen and a fuel gas, acetylene. Filler material in the form of a filler wire is added to the weld puddle.
4.2 Fuel gasses other than acetylene, for example, propane and proprietary gases are available, but their use is limited to welding some of the low melting point metals, brazing, and some cutting.
- Equipment
The equipment requirements to control and manipulate the oxyacetylene welding flame consists of the following.
5.1 Oxygen
Welding-grade oxygen approximately 99.5 percent pure is supplied in high-pressure steel cylinders at a pressure of 15,170 kPa (2200 psig) containing 2, 3 or 7 m3 (80, 122, or 244 ft3) at 21 °C (70 °F).
5.2 Acetylene
Acetylene gas is supplied in steel cylinders at a pressure of approximately 1,724 kPa (250 psig) and in capacities of from 1-8 m3 (50-300 ft3). Due to the safety hazard when acetylene gas is stored at high pressures, the cylinders containing welding acetylene are filled with a porous material and the acetylene gas is dissolved in liquid acetone. The acetone has the ability to absorb large quantities of acetylene under pressure and will release it when the pressure in the cylinder is reduced.
5.3 Oxygen Regulator
The function of the oxygen regulator is to reduce the high-pressure oxygen in the cylinder to the pressure required for welding or cutting, and to keep this pressure at a constant value between 7 and 1,379 kPa
(1 and 200 psig), depending upon the requirements of the job at hand. The pressure adjusting screw is backed-off before the cylinder valve is opened.
5.4 Acetylene Regulator
The function of the acetylene regulator is to reduce the acetylene cylinder pressure to a constant value between 7 and 103 kPa (1 and 15 psig) depending on requirements. Under no circumstances shall acetylene be used or distributed at pressures exceeding 103 kPa (15 psig), as it will otherwise heat up, expand, and explode.
5.5 Cylinder Valves
Valves on acetylene cylinders shall be opened only enough to provide proper gas release to the regulator; not more than three quarters of a turn. However, the valve shall be opened sufficiently so that the torch will not be starved of fuel gases. The partially opened valve shall be closed quickly in case of an emergency. Oxygen valves shall be fully opened to back-seat valve. If a cylinder valve has no handwheel, only wrenches specifically made for the valve shall be used. This device shall be left on the valve while the cylinder is in service (valve open) to prevent delays in emergency shutdown of the gas flow.
5.6 Oxyacetylene Torch
The oxyacetylene torch consists of a tubular handle, in one end of which is a valve body containing two needle valves, one for oxygen, one for acetylene. The other end contains the head mixer and tips. To facilitate operator control in welding and quality of weld, the torch is adapted for a wide range of interchangeable welding tips. The tips are manufactured with a number of hole diameters, making possible a selection for various plate thicknesses, joint designs, materials, and position of welding. In addition, most torch handles can be fitted with an oxyacetylene cutting attachment. This provides a means whereby the operator can inject extra oxygen into the flame to burn the metal and effect a cutting action. By using a variety of cutting tips, the cutting attachment becomes a versatile tool for gouging and removing metal for subsequent welding operations.
5.7 Auxiliary Equipment
5.7.1 The oxygen and acetylene is transferred from the cylinders to the welding torch by means of hoses. The oxygen hose is colored green while the acetylene hose is red. These hoses shall be single or molded together, forming one assembly but with the proper color identification and fittings appropriate to each use. The standard sizes are 3/16, 1/4, 3/8, and 1/2 inches. In general, the hose chosen is of sufficient diameter to fit the hose connection furnished with the welding torch. Oxygen and acetylene hoses shall never be interchanged. Oxygen fittings have right-hand threads and acetylene fittings have left-hand threads; also, acetylene fittings are usually notched. Use a proper wrench for assembling joints.
5.7.2 Flint lighters are an acceptable safe method of igniting the welding and cutting torches. These lighters consist of an assembly with one arm of a spring attached to a rough striking surface for a flint, which is attached to the other arm of the spring.
5.7.3 Welding goggles with a selection of lens shades are required for all welding and cutting operations. The lenses are numbered 3, 4, 5, and 6; the number 3 lens being the lightest shade.
- Joint Design
6.1 Butt Joints
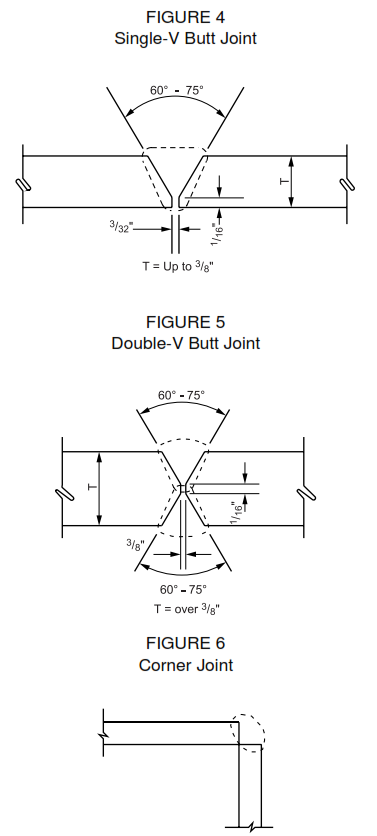
The joint design and angle of bevel is important because of its definite effect on the ease, quality, and cost of welding. Most butt joints of the beveled-edge type are made using a 60 degree included V angle. The root of the bevel joint shall be machined or cut with a small land or shoulder. It is desirable to have this shoulder approximately 1.5-2 mm (1/16-3/32 in) thick. If this shoulder is eliminated, the sharp edges of the plates melt away very rapidly and, thus, destroy the spacing. Edges of butt joints shall be separated a sufficient amount before tack welding to compensate for contraction of the tack welds and to ensure a root opening of approximately 2 mm (3/32 in) during the welding operation. Thicker plates or pipe walls shall require adequately larger spacing.
6.1.1 Open Square Butt Joint
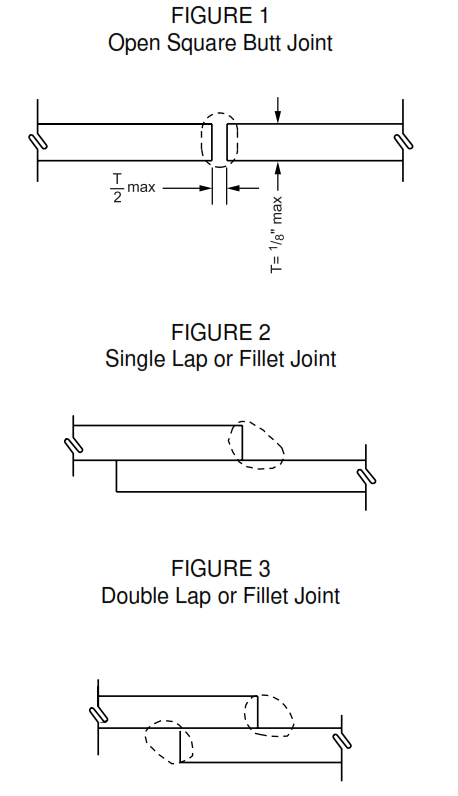
For material thicknesses of 3 mm (1/8 in) or less, the open square butt joint can be made satisfactorily. See Figure 1.
6.1.2 Lap Joint
The lap or fillet-type joint as shown on Figure 2 is the least desirable type of joint to be used. It offers little resistance to bending in flat plates or sheets. A double-lap weld as shown on Figure 3 results in a more rigid joint. Lap welds shall be considered for joint designs in cylindrical work, for instance, when fitting one cylinder inside another.
6.1.3 Single-V Butt Joints
The single-V butt joint is used for material thicknesses above 3 mm (1/8 in) and up to 9 mm (3/8 in). Joint design for single-V joints is shown on Figure 4.
6.1.4 Double-V Butt Joints
The double-V butt joint is recommended for heavier plate thicknesses where accessibility to the joint from both sides is possible. Figure 5 shows a typical joint. Consideration for other welding processes (for example: the coated electrode and inert-gas methods) shall be made when welding heavy plates or pipe.
6.1.5 Corner Joints and Flange Joints
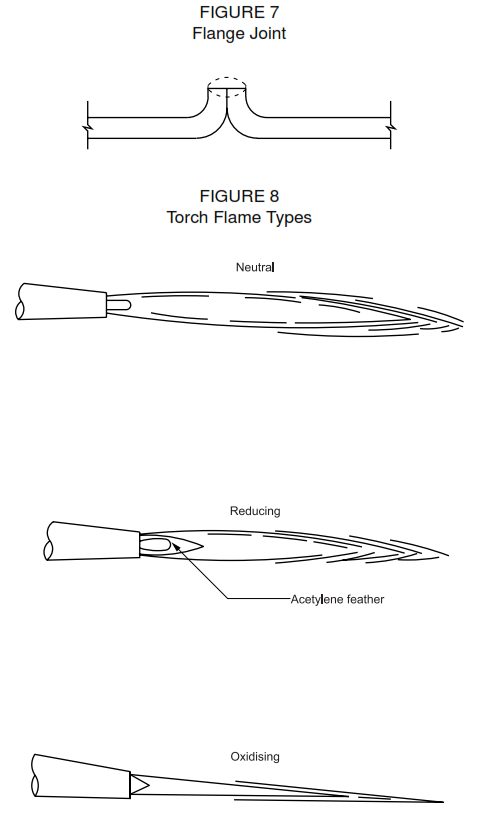
Corner joints on 3 mm (1/8 in) thick sheet-metal work are acceptable practice. A typical joint is illustrated on Figure 6. The flange joint, as shown on Figure 7, is used extensively in sheet-metal fabrication. Corner and flange joints can be successfully made on material thicknesses up to 3 mm (1/8 in) by fusing without the addition of filler metal.
6.1.6 Fit-Up
Welds made under the jurisdiction of recognized Codes shall meet alignment tolerances of the applicable Code. Otherwise, the pieces to be joined are supported to provide plate alignment within 25 percent of the material thickness or 3 mm (1/8 in), whichever is less. For pipe alignment, see ASME Section VIII. Tack welds shall be made by qualified welders only, with full penetration unless otherwise specified. Remove all cracked tack welds.
- Welding Techniques
7.1 Flame
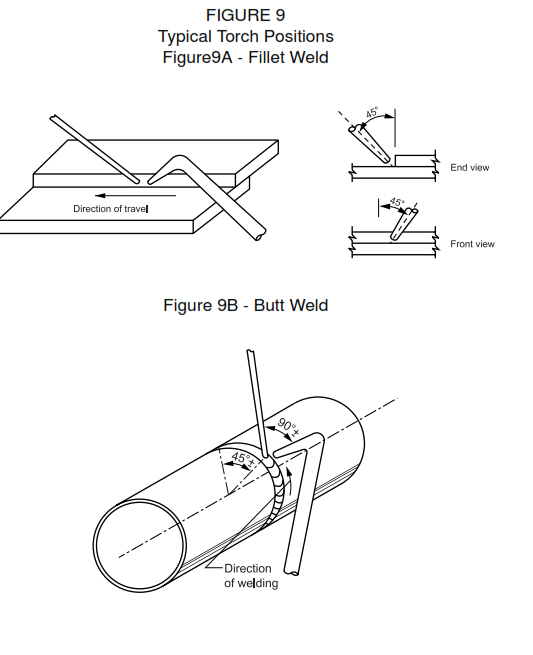
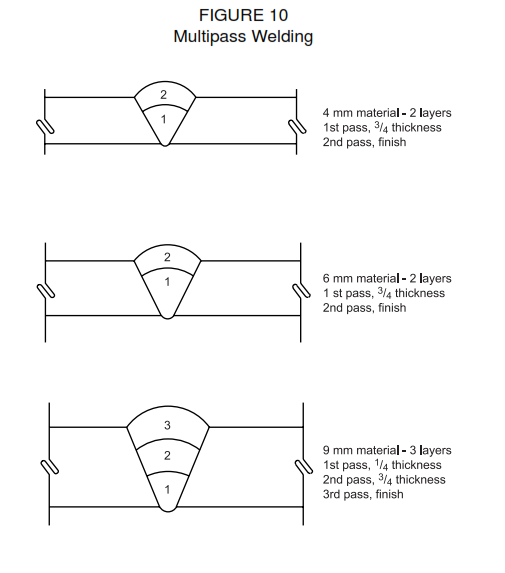
Figure 8 illustrates the three types of flame: that is, neutral, reducing and oxidizing. The neutral flame produces the most intense heat and is used for most welding applications. The reducing flame is used for heating objects where oxidation of the part is to be minimized or decarburization of the steel eliminated. A reducing flame promotes wetting of the base metal by lowering its melting point, thereby reducing dilution in hardfacing. The proper rod and torch position for making butt and fillet welds is shown on Figure 9. The travel of the welding torch is at a steady rate consistent with the metal thickness and filler rod diameter. The motion of the filler rod is one of rapid dipping of the rod into the center of the molten puddle at a rate depending upon rod size and joint configuration. Motion of the torch is generally in a straight line with minimum oscillation or forward and reverse motions. See Figure 10 for suggested number of passes in multilayer welding.
7.2 Corner Welding
The welding of light-gauge metal by corner or edge-type joints shall be done in the flat position, when possible. The torch shall be held at a 45 degree angle from the plate edges. The forehand technique is quite satisfactory for performing this welding operation with the inner cone of the flame tip being held approximately 1.5 to 3 mm (1/16 to 1/8 in) above the molten pool. Filler metal rod may be added by the method as described in 7.1. Speed of travel shall be adjusted to result in complete penetration.
7.3 Fillet or Lap Welding
In fillet or lap welding, there is a tendency for the upper side of the joint to become molten first, and the weld puddle to run over the lower plate with incomplete fusion. Direct the welding flame more to the lower plate than to the upper. When starting, the flame is concentrated on the lower plate until it has reached a bright red color (in the case of carbon steel), then directed to the upper plate until both simultaneously reach the fusion temperature. The upper plate does not require the flame to be played on it as long as the lower plate. The flame shall not be directed at the inner corner of the joint. When this is done, there is a danger that the burning gases shall cause pocketing and burn unevenly causing the weld puddle to be difficult to control. The motion and position of the filler rod assists in obtaining complete fusion at the base of the V. Thicker plate and pipe requires the backhand method. This is with the torch angle directed into the deposited metal rather than a leading angle. This method is successful on horizontal butt welds.
- Inspection
The amount and type of inspection required depends upon the service conditions and hazards to personnel and property. It is the responsibility of the originator to define the inspection requirements. Inspection shall be in accordance with applicable code(s).
