Measurements and its Significance
The measurement of a given quantity is essentially an act or the result of comparison between the quantity (whose magnitude is unknown) and a predefined standard. Measurement is the process by which one can convert physical parameters to meaningful numbers. The measuring process is one in which the property of an object or system under consideration is compared to an accepted standard unit, a standard defined for that particular property. For the result of the measurement to be meaningful, the standard used for comparison purposes must be accurately defined and should be commonly accepted. Also, the apparatus used and the method adopted must be provable. The importance of measurement is simply expressed in the following statement of the famous physicist “Lord Kelvin” • “l often say that when you can measure what you are speaking about and can express it in numbers, you know something about it; when you can ‘t express it in numbers your knowledge is of a meager and unsatisfactory kind. ”
Direct Measurement
In this method, the measured or the unknown quantity is directly compared against a standard.
This method of measurement sometimes produces human errors and hence gives inaccurate results.
Indirect Measurement
This method of measurement is more accurate and more sensitive. These are more preferred over direct measurement. Mechanical, Electrical and Electronic Instruments
Mechanical
This instruments are used for stable and static conditions: They are unable to respond rapidly to measurements of dynamic and transient conditions because of having moving parts that are bulky, heavy are rigid possessing high inertia.
Electrical Electrical methods of indicating the output of detectors are more rapid than mechanical methods. But, they are limited time response.
Electronic
These instruments require use of semiconductor devices. The response time of these instruments are extremely small as a very small inertia of electron is only involved. The sensitivity of these instruments are also very high. Faster response, lower weight, lower power consumption are some of the advantages of an electronic instrument.
Types of Instruments
Absolute Instruments
These instruments give the magnitude of the quantity under measurement in terms of physical constants of the instruments i.e. Tangent Galvanometer, Rayleigh’s current balance. Secondary Instruments
In these type of instruments, the quantity being measured can only be measured by observing the output indicated by the instrument. These instruments are calibrated by comparing with an absolute instrument.
Deflection and null type instruments
Deflection type
The deflection of instrument provides basis for determining the quantity under measurement i.e. PMMC Ammeter and electrodynometer and moving iron instruments. They are less accurate, less sensitive and have faster response.
Null Type Instruments
In null type instruments, a zero or null indication leads to determination of the magnitude of measured quantity. Null type instruments are more accurate, highly sensitive and are less suited for measurements under dynamic conditions than deflection type instruments.
Calibration
The calibration of all instruments is important since it affords the opportunity to check the instrument against a known standard and subsequently to find errors and accuracy. Calibration procedures involve a comparison of the particular instrument with a primary standard or, a secondary standard or, an instrument of known accuracy.
Characteristics of Instrument and Measurement Systems Accuracy
It is the closeness with which an instrument reading approaches the true value of the quantity being measured.
The accuracy can be specified in terms of inaccuracy or limits of error.
The best way to conceive the idea of accuracy is to specify it in terms of the true value of the quantity being measured.
The accuracy of a measurement means conformity to truth. Precision
It is a measure of the reproducibility of the measurements i.e. given a fixed value of a variable, precision is a measure of the degree to which successive measurements differ from one another.
The term Precisely” means clearly or sharply defined.
Precision is used in measurements to describe the consistency or the reproducibility of results.
Precision instruments are not guaranteed for accuracy.
Precision depends upon number of significant figures.
The more significant figures, then the precision is more Significant. Above figures convey actual information regarding the magnitude and the measurement precision of a quantity.
Example:
302 A (Number of significant figures = 3)
302.10 V (Number of significant figures = 5)
0.000030 (Number of significant figures = 6)
Example-
In calculating voltage drop, a current of 4.37 A is recorded in a resistance of .27 ohm. Calculate the voltage drop across the resistor to the appropriate number of significant figures.
Current I = 4.37A (3 significant figures) Resistance R = 31.27ohm (4 significant figures)
Voltage drop V = IR- 4.37 x 31.27 = 136.6499 volt (seven 5fs) since number of significant figures used in multiplication is 3. So answer can be written only to a maximum of three significant figures i.e. V = 137
Q: A reading is recorded as 23.900C. The reading has
(a) three significant figures (b) five significant figures (c) four significant figures (d) none of these
Solution: C
Assertion (A): A precision instrument is always accurate. Reason (R): A precision instrument is one where the degree of reproducibility of the measurements is very good.
(a) Both A and R are true and R is the correct explanation of A
(b) Both A and are true but R is NOT the correct explanation of A
(c) A is true but R is false (d) A is false but R is true Solution:
(d) Precision instruments are not guaranteed for accuracy.
Refer to definition of precision.
Solution: d
Linearity
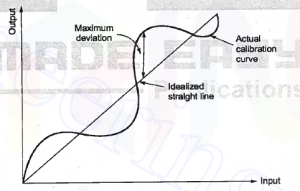
if the output is proportional to input then, it is called linear.
• Non-linear behaviour of an instrument doesn’t essentially lead to inaccuracy.
• Most of the time it is necessary that measurement system component should have linear characteristics. For example, the resistance used in a potentiometer should vary linearly with displacement of the sliding contact in order that the displacement is directly proportional to the sliding contact voltage. Any departure from linearity result in error in the read out system.
Reproducibility
It is the degree of closeness with which a given value may be repeatedly measured. It may be specified in terms of units for a given period of time.
Static Sensitivity
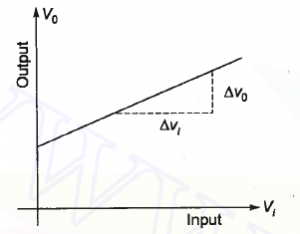
The “static sensitivity” of an instrument is the ratio of the magnitude of the output signal or response to the magnitude of input signal or the quantity being measured. It’s units are mm/μA; per volts etc. depending upon type of input and output.
Sometimes the static sensitivity is expressed as the ratio of the magnitude of the measured quantity to the magnitude Of the response.
Static Sensitivity = Small change in output/ Small change in input
The sensitivity an instrument should be high and therefore, should not have a range greatly exceeding the value to be measured.
Deflection Factor = 1/(Static Sensitivity )
Resolution or Discrimination
• The small measurable input change that can be measured by the instrument is called resolution or discrimination. • If the input is slowly increased from some arbitrary (non•zero) input value. will again be found that output doesn’t change at all until a certain increment is exceeded. This increment is called resolution.
Question:
A digital voltmeter has a read-out range from O to 9,999 counts. Determine the resolution of the instrument in volt when the full scale reading is 9.999 V.
Solution: Resolution of instrument= 1 count in 9,999
Resolution = 1/9999 Count=1/9999*9.999= 103 volt = 1 mv
Dead Time & Dead Zone
Dead Time: The time required for the measurement to begin to respond to the changes in the measured is known as dead time. It is the time before which the instrument begins to respond after the measured quantity has been changed.
Dead Zone:
It is largest change of input quantity for which there is no output for the instrument.
Signal to Noise Ratio
Noise an unwanted signal superimposed upon the signal Of interest thereby causing a deviation Of the from its expected value. The ratio Of desired to the unwanted is called signal to noise ratio and is expressed as S/N= Signal Power /Noise Power
In any measurement system. it is desired to have a large signal-to-noise ratio. This can be achieved by increasing signal level without increasing the noise level or the noise level with some suitable technique
Repeatability
It is the repetition of reading of an instrument from a given set Of reading.
Errors in Measurements and their Analysis
Measurements done a laboratory at some other place always involve errors. No measurement is free from errors. If the precision of the equipment is adequate, no matter Whet accuracy is, a discrepancy Will always be Observed between two measured results.
True Value
The true value of quantity to be measured may be defined as the average of an infinite number Of measured values when the average deviation due to various contributing factors tends to zero. Errors The accuracy and precision Of an instrument depends upon its design, the material used and the work man ship that goes into making the instrument. Components are guaranteed to be within a certain percentage of me rated value. Thus. the manufacturer has to specify the deviations from the “nominal value” of a particular quantity. The limits Of these deviations from the specified value are defined as”Limiting Errors ” ” Guarantee errors”
For example. the magnitude Of a resistor is 200 Q with a limiting error of ±10Ω. The magnitude Of resistance will be between the limits


What a material of un-ambiguity and preserveness of valuable familiarity concerning unpredicted feelings.
I’m no longer certain where you’re getting your info, but great topic. I needs to spend a while finding out more or figuring out more. Thank you for excellent info I used to be looking for this info for my mission.