This article defines the minimum requirements for initial inspection, loop check, and commissioning of control systems during new plant construction, as well as those inspections, loop checks, and commissioning that might be necessary following major revisions/modifications or repair.
This document outlines specific steps that need to be taken in the course of commissioning. The document is organized so that key sections may be extracted to be used as instructions for that identified task, these tasks shall be coordinated by Process Controls Engineering.
This standard applies globally to all control systems undergoing initial inspection, loop checking, and commissioning.
Documents used in Commissioning and Loop checking
Application and Use of Instrumented Systems in Process Plants
Initial Instrumented Protection System Validation
Initial Validation Testing of Instrumented Protection Functions and Systems
Glossary – Process Control Definitions
Alarm and Trip Summary
Programmable Electronic System (PES) Staging Requirements
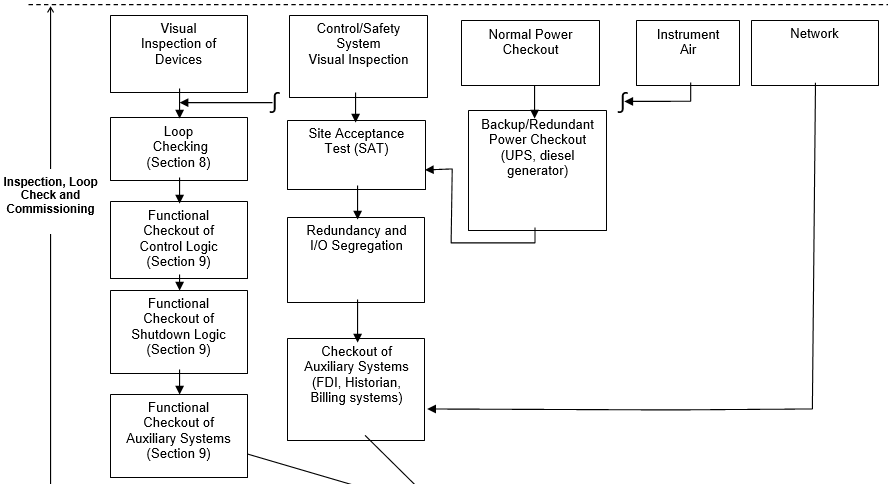
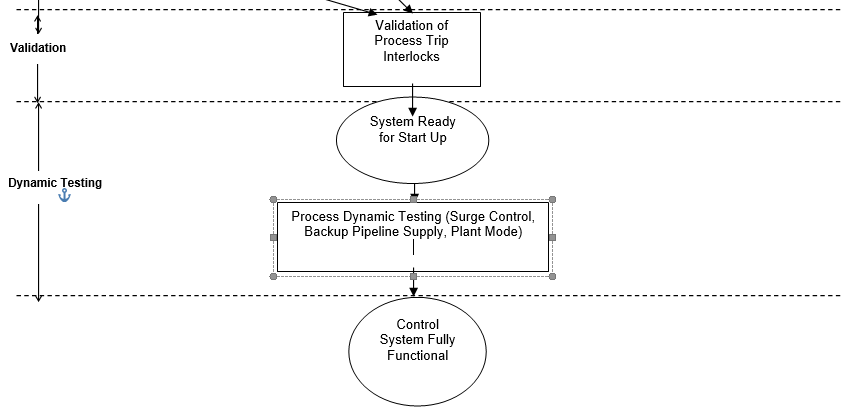
The tasks to be performed to fully commission an entire control/safety and independent safety system are outlined in Figure 1, Task Flow Diagram. All steps will be clarified with references to other standards when the content falls outside the scope of this standard.
The intent of this standard is to provide the minimum requirements for initial inspection, loop check, and commissioning of a control system. The objectives of this standard are as follows:
- Verify the proper physical installation (wiring, grounding, labels, tags, pressure ratings, area classification) of instruments.
- Ensure wiring is landed on the proper termination and verify overall wiring loop integrity.
- Verify proper calibration range, engineering units, tag name, and diagnostics.
- Verify PES input range.
- Verify all logic including the interlock system
- Verify pre-alarms, bad quality, maintenance bypass switches, and proper configuration of HMI displays.
- Verify and confirm proper operation of the instrument and sensor according to supplier and Air Products specifications.
- Verify proper installation, power and grounding, backup power, network communications, system diagnostics, and operational functionality of the PES.
- Verify auxiliary systems (Foreign Device Interfaces, Historians, and Billing Systems).
- Verify remote access and remote control if applicable.
The following documents shall be available on site and shall be the latest revision:
- PES Procurement Specification.
- Supplier Control System Manufacturing Drawings (if applicable).
- Control System Design Objectives and Control and Optimization Strategy Document (if applicable).
- HMI Console Configuration Guidelines/Control System Design Basis Paper (if applicable).
- Instrument Specifications.
- Alarm and Trip Summary.
- Electrical Schematics (both Air Products- and supplier-furnished).
- Hazardous area classification drawings.
- Relevant calculations and process data (for example, heat and material balance, sequence data, compressor curves, compressor surge lines, motor data sheets, and flow element calculations).
- Any relevant data needed for interface to supplier skids and equipment.
- Applicable configuration standards.
- P&ID.
- FAT report and punch list.
Test Equipment
Other than for purposes of rectification, repair, or replacement, no test equipment shall be moved from the job site for the duration of the contract.
All calibration test equipment supplied by a contractor shall be certified for accuracy by an independent testing laboratory before use.
Each item of calibration test equipment supplied by a contractor shall exhibit a permanently fixed validation label indicating the serial number, name of certifier, and the date and duration of certification. Copies of relevant test certificates will be kept on file by the supplier of the test equipment and shall be made available for inspection by Air Products at any time.
Equipment that shall be considered calibration test equipment shall comprise, but not be limited to, the following: Hart Communicators, hand pumps, precision test gauges, portable potentiometers, deadweight tester (pneumatic only), manometers, constant temperature generator, thermocouple calibrator, RTD calibrator, transmitter simulators, pneumatic calibrators, signal generator and counter, portable oscilloscope, leak detection unit, and instrument manufacturer’s specially designed portable test sets.
Visual inspection of devices
Typically, physical inspection is the first task to be performed once an instrument is turned over from construction. Physical inspections do not have to be done in conjunction with loop checking but depending on manpower and instrument location, physical inspections and loop checking may be done at the same time. At a minimum, physical inspections must be documented to provide evidence of what was checked and whether the device passed or failed. It is recommended that field inspection reports be filled out for every piece of instrumentation. Failed devices shall be corrected before proceeding to loop check.
General Inspection Checks:
- Transmitter support stands installed
- Proper wiring, glanding, and conduit connection such as low point drains, grounding, shielding and terminations, and bottom cabinet entry
- Verify proper labeling of all tags, warning signs, pressure ratings, etc…
- Confirm all covers, screws, fittings, etc. are installed and properly tightened
- Look for signs of moisture and/or corrosion in electrical conduit and process impulse line
- Wire terminations are tightened
Pressure Transmitters Checking:
- Verify sensing line size, material, slope, tap orientation, adequate supports, etc.
- Proper installation of all compression fitting.
- Root valves installation and location.
- Manifold valve selection and proper installation.
- Verify sufficient impulse line length for heat transfer.
- Verify loop seals where required.
- Verify configuration according to specification sheet.
- Instrument accessible for routine maintenance and correctly supported
- Environment acceptable, vibration, heat, splash, etc.
- Heat traced if necessary.
- Verify proper electrical connections.
DP (level and flow) Transmitters and orifice plate Checking:
- Verify beta ratio and flow direction for orifice plates directly from the handle or nameplate.
- Verify sensing line size, material, slope, tap location, adequate supports, etc.
- Verify HI/LO pressure tap location relative to gas or liquid measurement.
- Proper installation of all compression fitting.
- Root valves installation and location.
- Manifold valve selection and proper installation.
- Inspect and confirm all sealed capillary sensing systems used for level measurement against instrument specification.
- Verify sufficient impulse line length for heat transfer.
- Verify loop seals where required.
- Verify configuration according to specification sheet.
- Instrument accessible for routine maintenance.
- Instrument correctly supported.
- Environment acceptable, vibration, heat, splash, etc.
- Heat traced if necessary.
- Verify proper electrical connections.
Temperature Element/ Transmitters Checking:
- Verify insertion length within process pipe and ensure firm contact with bottom of well.
- Verify that either RTD or T/C elements are connected and properly terminated to the transmitter
- Verify T/C element type and extension wire type according to specification
- Verify proper grounding and shielding according to specification and electrical installation drawings
- Confirm that all threaded connections are tight (for example, nipple-union-nipple, head cover and gasket)
- Verify transmitter configuration according to specification sheet
- Instrument accessible for routine maintenance
- Instrument correctly supported
- Environment acceptable, vibration, heat, splash, etc.
- Heat traced if necessary
- Verify proper electrical connections
Control Valves Checking:
- Verify control valve flow direction.
- Ensure proper installation of all tubing, fittings, and solenoid valves.
- Verify positioner and solenoid wiring for proper connections and tagging.
- Inspect overall installation of valve body and actuator. Look for signs of overstressed piping or improper actuator installation causing unnecessary stress.
- For rotary valves, ensure actuator rotation is indexed correctly with valve rotation.
- Verify installation of bug screens or other means of preventing water ingress for all vented openings.
- Check fail action.
- Verify start-up flush kit has been removed where applicable.
- Verify all other ancillary valve equipment functions properly.
- Verify configuration according to specification sheet.
- Instrument accessible for routine maintenance, actuator removal, bonnet and plug removal, hand wheel operation, positioner maintenance, and solenoid maintenance.
- Valve stroke is within specified time
- Proper support.
- Correct packing for application.
- Packing gland properly tightened.
- Verify all covers, screws, fittings, etc., are installed and properly tightened.
Field Switches Checking :
- Verify installation location, confirm against P&ID
- Verify wiring: NO/ NC contacts
- Verify wiring labeling
- Instrument accessible for routine maintenanc
- Verify all covers, screws, fittings, etc., are installed and properly tightened
Note: Field Inspection Reports (Appendix A) are included to provide guidance. There is a unique report template for each type of instrument and a generic form for special devices.

