The altimeter is a crucial instrument in aircraft that measures the aircraft’s height above a specific pressure level. Understanding how it works and its potential errors is essential for pilots because it’s the primary instrument for determining altitude. Pilots must grasp both the operation of the altimeter and the various factors that can cause errors in its readings to use it effectively and ensure safe flight.
What is Altimeter?
Basic Construction of Altimeter.
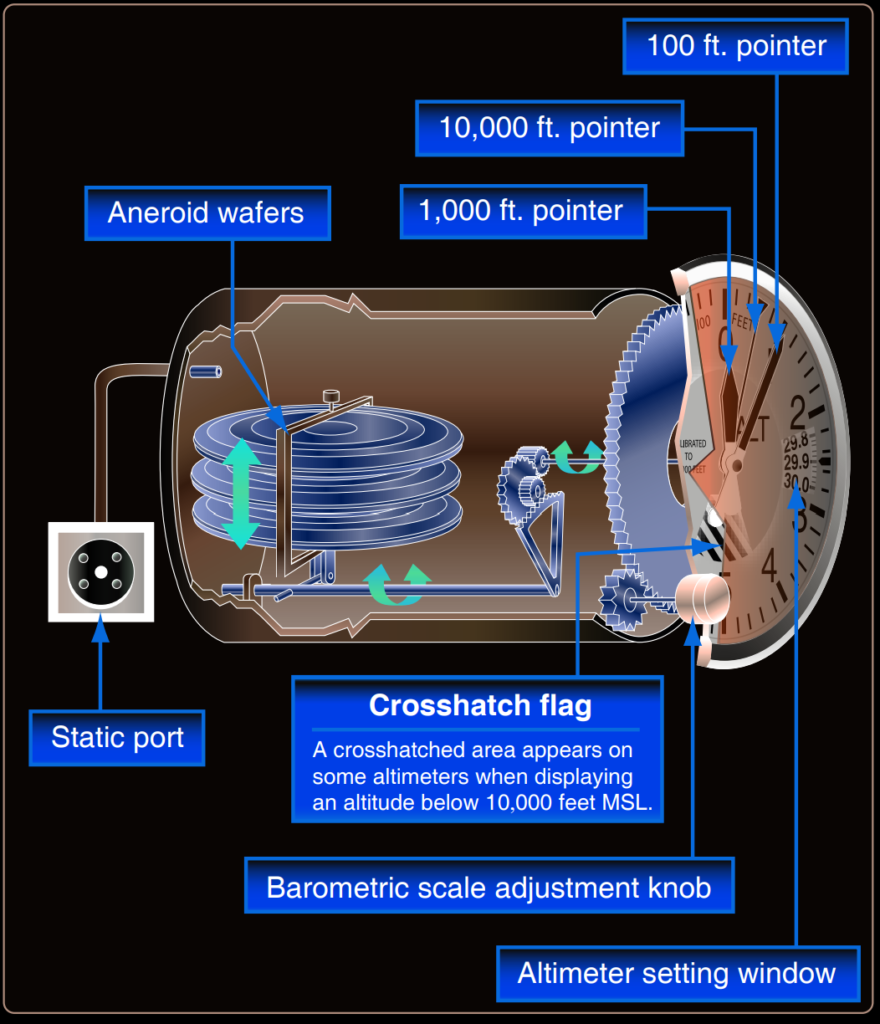
The altimeter consists of a stack of sealed aneroid wafers as its main component. These wafers are like small sealed containers, initially evacuated to an internal pressure equivalent to 29.92 inches of mercury (“Hg). As the static pressure changes, these wafers can expand or contract accordingly.
When the static pressure increases, it pushes down on the wafers, causing them to compress. Conversely, when the static pressure decreases (drops below 29.92 “Hg), the wafers expand. The movement of these wafers is linked mechanically to the needles on the altimeter’s indicator face. When the wafers compress, indicating higher pressure, the altitude reading decreases, and when they expand, indicating lower pressure, the altitude reading increases.

The static pressure enters the rear of the sealed altimeter case. The outer chamber of the altimeter is sealed, allowing the static pressure to surround the aneroid wafers. If the static pressure is higher than the pressure inside the aneroid wafers (29.92 “Hg), the wafers compress until the pressure inside equals the surrounding static pressure.
Conversely, if the static pressure is lower than the pressure inside the wafers, they can expand, increasing their volume. This expansion and contraction of the wafers move the mechanical linkage, which in turn drives the needles on the altimeter’s face.
Altimeter Working Principle.
The pressure altimeter functions as an aneroid barometer, measuring the atmospheric pressure at the altimeter’s location and displaying altitude in feet. It operates based on static pressure, which decreases with increasing altitude due to the lower density of air aloft compared to sea level. This pressure difference causes the altimeter to indicate changes in altitude.
Different types of altimeters have varying presentations of altitude readings. The multipointer type, discussed here, typically features a dial graduated with numerals from zero to nine arranged clockwise. The movement of the aneroid element is transmitted through gears to three hands indicating altitude. In a typical setup, the long, thin needle with an inverted triangle represents tens of thousands of feet, the short, wide needle represents thousands of feet, and the long needle on top indicates hundreds of feet.
The indicated altitude provided by the altimeter is accurate only under standard conditions: sea level barometric pressure is at 29.92 “Hg, the sea level temperature is at +15°C (59°F), and pressure and temperature decrease at a standard rate with increasing altitude. Adjustments for nonstandard pressures are made by setting the corrected pressure into a barometric scale on the altimeter’s face, often referred to as the Kollsman window.
After setting the altimeter, it displays the correct altitude above sea level. The term “correct” here denotes the approximate altitude above sea level. It’s important to note that this indicated altitude is uncorrected until the barometric pressure setting is dialed into the Kollsman window. Further explanations of different types of altitudes are provided later.
Effect of Nonstandard Pressure and Temperature.
Maintaining a consistent altitude above ground is crucial for safe flight, but changes in barometric pressure and temperature can make this challenging. Even on local flights, pressure and temperature can vary between takeoff and landing, posing a risk if not accounted for.
If altimeters couldn’t be adjusted for nonstandard pressure, it could lead to hazardous situations. For instance, flying from a high-pressure area to a low-pressure area without adjusting the altimeter would result in the altimeter displaying a constant altitude, while the actual height above the ground would be lower than indicated. Conversely, flying from a low-pressure area to a high-pressure area without adjusting the altimeter would result in the aircraft’s actual altitude being higher than indicated.
It’s essential to frequently obtain current altimeter settings during flight to ensure clearance from terrain and obstructions. However, some altimeters may not accurately adjust to barometric pressures above 31.00 “Hg. In such cases, if the altimeter cannot be set to the higher pressure, the aircraft’s actual altitude is higher than indicated. Flight operations under low barometric pressure conditions (below 28.00 “Hg) are not recommended for aircraft unable to set the actual altimeter setting.
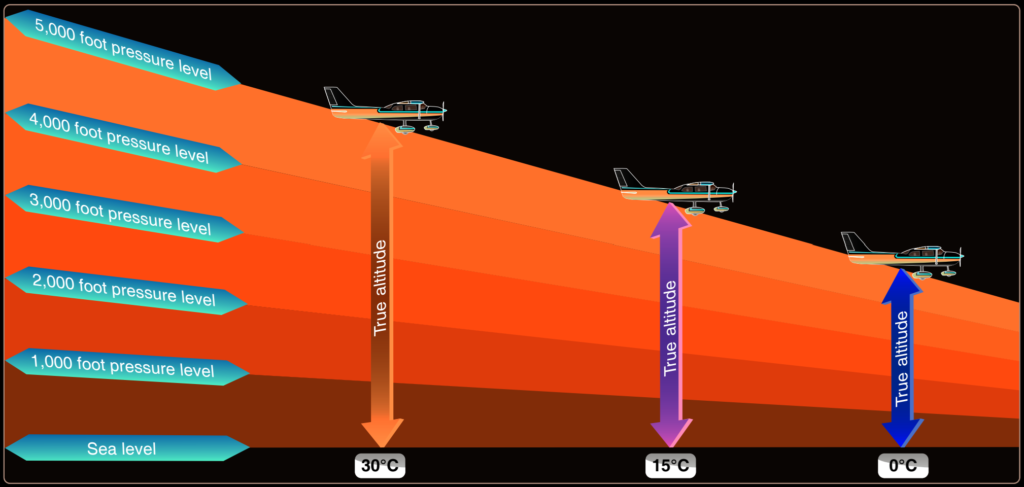
Adjustments made to compensate for nonstandard pressure don’t address nonstandard temperature variations. Cold air, being denser than warm air, causes the aircraft to be lower than indicated by the altimeter when operating in temperatures colder than standard.

The magnitude of this difference in altitude is determined by the temperature variance. When flying into colder air while maintaining a constant indicated altitude, the true altitude is lower. This discrepancy is crucial to consider, especially when terrain or obstacle clearance is a concern, particularly in mountainous regions. In such cases, anticipating that colder-than-standard temperatures will place the aircraft lower than indicated, a higher indicated altitude may be necessary for adequate terrain clearance.
A helpful memory aid for this situation is: “FROM HOT TO COLD, LOOK OUT BELOW.” Conversely, when the air is warmer than standard, the aircraft is higher than indicated. Corrections for temperature effects on altitude can be computed using a navigation computer.
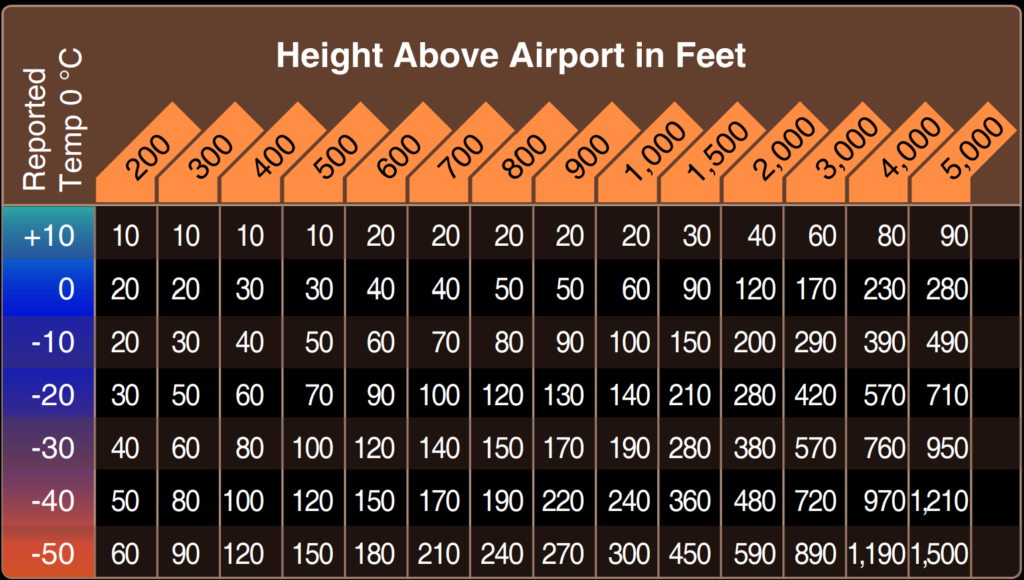
Extremely cold temperatures can also affect altimeter readings significantly. Figure below, based on ICAO formulas, illustrates the potential error when temperatures are extremely cold.

Setting the Altimeter.
Most altimeters feature a barometric pressure setting window, also known as the Kollsman window, which allows for adjustments. A knob located at the bottom of the instrument facilitates this adjustment.
To compensate for changes in atmospheric pressure, the pressure scale in the altimeter setting window, calibrated in inches of mercury (“Hg) and/or millibars (mb), is adjusted to match the provided altimeter setting. The altimeter setting represents station pressure reduced to sea level, but it’s only accurate within the vicinity of the reporting station. Thus, the altimeter must be adjusted as the flight progresses from one station to the next. Air traffic control (ATC) will inform pilots when updated altimeter settings are available. Alternatively, pilots not under ATC guidance can obtain local altimeter settings by monitoring broadcasts from local automated weather observing systems/automated surface observation systems (AWOS/ASOS) or automatic terminal information service (ATIS).
Many pilots assume that the current altimeter setting compensates for variations in atmospheric pressure at all altitudes, but this isn’t always accurate. The altimeter setting broadcast by ground stations corrects station pressure to mean sea level, but it doesn’t address irregularities at higher levels, especially the impact of nonstandard temperature. If all pilots in an area use the same altimeter setting, their altimeters should be equally affected by temperature and pressure variations, theoretically allowing for maintained vertical separation between aircraft. However, this doesn’t guarantee vertical separation, so it’s crucial to maintain a vigilant visual scan for other aircraft.
When flying over high, mountainous terrain, specific atmospheric conditions can cause the altimeter to indicate an altitude of 1,000 feet or more higher than the actual altitude. Due to this, it’s advisable to allow for a generous margin of altitude, not only to accommodate potential altimeter error but also to factor in possible downdrafts associated with high winds.
To demonstrate the use of the altimeter setting system, let’s follow a flight from Dallas Love Field, Texas, to Abilene Municipal Airport, Texas, via Mineral Wells. Before departure from Love Field, the pilot receives a current altimeter setting of 29.85 “Hg from the control tower or ATIS and sets this value in the altimeter setting window. The altimeter reading should then be checked against the known airport elevation of 487 feet. Since most altimeters aren’t perfectly calibrated, there may be some error.
When over Mineral Wells, let’s assume the pilot receives a current altimeter setting of 29.94 “Hg and sets this in the altimeter window. Before entering the traffic pattern at Abilene Municipal Airport, the pilot receives a new altimeter setting of 29.69 “Hg from the Abilene Control Tower and sets it in the altimeter setting window. If the pilot intends to fly the traffic pattern at about 800 feet above the terrain, and the field elevation of Abilene is 1,791 feet, the indicated altitude to maintain would be 2,600 feet (1,791 feet + 800 feet = 2,591 feet, rounded to 2,600 feet).
The significance of correctly setting the altimeter cannot be overstated. Suppose the pilot fails to adjust the altimeter at Abilene to the current setting and continues using the Mineral Wells setting of 29.94 “Hg. When entering the Abilene traffic pattern at an indicated altitude of 2,600 feet, the aircraft would actually be around 250 feet below the proper traffic pattern altitude. Upon landing, the altimeter would indicate approximately 250 feet higher than the field elevation.
Difference between Mineral Wells and Abilene altimeter settings: 29.94 – 29.69 = 0.25
(Since 1 inch of pressure equates to approximately 1,000 feet of altitude, 0.25 × 1,000 feet = 250 feet.)
When deciding whether to add or subtract the altimeter error, remember that when the actual pressure is lower than what is set in the altimeter window, the true altitude of the aircraft is lower than what is indicated on the altimeter. Here’s another method to compute the altitude deviation:
- Start by subtracting the current altimeter setting from 29.94 “Hg. Always place the original setting as the top number, then subtract the current altimeter setting.
- Mineral Wells altimeter setting: 29.94
- Abilene altimeter setting: 29.69
- 29.94 – 29.69 = Difference 0.25
- Since 1 inch of pressure equals approximately 1,000 feet of altitude, 0.25 × 1,000 feet = 250 feet. Always subtract this number from the indicated altitude.
- 2,600 – 250 = 2,350
- Now, let’s try a lower pressure setting, adjusting from altimeter setting 29.94 to 30.56 “Hg.
- Mineral Wells altimeter setting: 29.94
- New altimeter setting: 30.56
- 29.94 – 30.56 = Difference -0.62
- Since 1 inch of pressure equals approximately 1,000 feet of altitude, 0.62 × 1,000 feet = 620 feet. Always subtract this number from the indicated altitude.
- 2,600 – (-620) = 3,220
Notice the difference is a negative number. Starting with the current indicated altitude of 2,600 feet, subtracting a negative number is the same as adding the two numbers. By using this method, a pilot will better understand the importance of using the current altimeter setting. Miscalculating where and in what direction an error lies can affect safety; if the altitude is lower than indicated, an aircraft could be at risk of colliding with an obstacle.
Altimeter Operation.
The altimeter operates based on two main principles: changes in air pressure and adjustments to the barometric scale. When the aircraft ascends or descends, alterations in air pressure inside the altimeter case cause the aneroid barometer to expand or contract. This movement is then transmitted through mechanical linkage to rotate the pointers on the altimeter.
A decrease in air pressure results in the altimeter indicating an increase in altitude, while an increase in air pressure causes the altimeter to show a decrease in altitude. For instance, if an aircraft is parked on the ground with a pressure level of 29.98 “Hg and the pressure changes to 29.68 “Hg, the altimeter would display an increase of about 300 feet in altitude. This change in pressure is particularly noticeable when an aircraft remains parked overnight, as the altimeter interprets the pressure drop as a climb, indicating an altitude above the actual field elevation. Resetting the barometric pressure setting to the current altimeter setting of 29.68 “Hg would then correctly indicate the field elevation on the altimeter.
In-flight, changes in pressure are less noticeable since aircraft typically fly at specific altitudes. However, the aircraft’s true altitude steadily decreases while the altimeter remains constant, requiring pilot action to maintain the correct altitude.
Knowing the aircraft’s altitude is crucial for a pilot, especially to ensure clearance over terrain or obstructions along the intended route, particularly in limited visibility conditions. Maintaining accurate altitude information is vital to reduce the risk of midair collisions and adhere to air traffic regulations.
Types of Altitude.
Altitude is a critical concept in aviation, but it’s important to understand the different types of altitude and when they’re used:
- Indicated Altitude: This is the altitude directly read from the altimeter without any corrections. It’s what you see on the altimeter dial when it’s set to the current altimeter setting.
- True Altitude: This refers to the actual vertical distance of the aircraft above sea level. It’s often expressed in feet above mean sea level (MSL) and is used for depicting obstacles, airspace, and separating air traffic. Airport elevations on charts are examples of true altitudes.
- Absolute Altitude: This is the vertical distance of an aircraft above the terrain or ground level (AGL). It’s useful for tasks like obstacle avoidance during low-level flight.
- Pressure Altitude: Pressure altitude is what the altimeter indicates when set to a standard barometric pressure of 29.92 inches of mercury (“Hg). It’s the altitude above the standard datum plane, where air pressure equals 29.92 “Hg corrected to 15°C. Pressure altitude is used for calculating other performance data like density altitude and true airspeed (TAS).
- Density Altitude: This is pressure altitude corrected for variations from standard temperature. When conditions are standard, pressure altitude and density altitude are the same. However, if the temperature deviates from standard, density altitude adjusts accordingly. This altitude is crucial for understanding aircraft performance because it directly affects engine power and airfoil efficiency.
For example, let’s consider an airport with a field elevation of 5,048 feet MSL at standard temperature (5°C). In this case, pressure altitude and density altitude are both 5,048 feet. However, if the temperature rises to 30°C, the density altitude increases to 7,855 feet, indicating that the aircraft would perform as though it were taking off from a field elevation of 7,855 feet at standard temperature. Conversely, if the temperature drops to -25°C, the density altitude decreases to 1,232 feet, resulting in better aircraft performance during takeoff.
How to Check Altimeter Instrument?
Before each flight, it’s crucial for a pilot to check the altimeter to ensure it’s giving accurate readings. Here’s how to perform an instrument check:
- Set Barometric Scale: Adjust the altimeter’s barometric scale to match the current altimeter setting provided by reliable sources like the local airport control tower, flight service station (FSS), ATIS, AWOS, or ASOS.
- Verify Indication: The altimeter pointers should align with the surveyed field elevation of the airport. If the indicated altitude differs by more than 75 feet from the surveyed field elevation, the instrument needs to be recalibrated by a certified instrument repair station.
By following these steps, pilots can ensure the accuracy of their altimeter readings, which is crucial for safe and precise navigation during flight.
How to read an altimeter?
Long Pointer (10,000 feet): This pointer indicates altitude in intervals of 10,000 feet. Each number on the dial represents an increment of 10,000 feet. For example, if the long pointer is pointing between the 2 and 3 on the dial, it indicates an altitude of 20,000 to 30,000 feet.
Short, Wide Pointer (1,000 feet): The short, wide pointer measures altitude in intervals of 1,000 feet. Each number on the dial represents an increment of 1,000 feet. For instance, if the short, wide pointer is pointing at the number 2, it indicates an altitude of 2,000 feet.
Medium, Thin Pointer (100 feet): This pointer measures altitude in intervals of 100 feet. Each small tick mark on the dial usually represents 100 feet. For example, if the medium, thin pointer is pointing between the 1 and 2, and each tick mark represents 100 feet, it indicates an altitude of approximately 100 to 200 feet.
When reading the altimeter, simply note the position of each pointer on the dial and combine the readings to determine the altitude. For example, if the long pointer is pointing to 2, the short, wide pointer is pointing to 4, and the medium, thin pointer is pointing between the 1 and 2, it indicates an altitude of approximately 24,100 feet (20,000 feet from the long pointer, 4,000 feet from the short, wide pointer, and 100 feet from the medium, thin pointer).
What causes variations in altimeter settings between weather reporting points?
The unequal heating of the Earth’s surface contributes to the formation of areas of high and low pressure. Warm air expands and rises, creating regions of low pressure, while cooler air contracts and sinks, resulting in areas of high pressure. These pressure differences drive the movement of air masses, leading to the establishment of wind patterns.
Above 2000 feet above ground level (AGL), wind flow tends to follow a more predictable pattern, often parallel to isobars. Isobars are lines on weather maps that connect points of equal atmospheric pressure. This parallel flow of winds aloft is a result of the Coriolis effect and the pressure gradient force, which influence the direction and speed of winds at higher altitudes.
How do variations in temperature affect the altimeter?
Conversely, when the ambient temperature is warmer than the standard atmospheric conditions (known as a “warm day”), the air density is lower than standard. This decreased air density leads to a lower pressure level than what the altimeter is calibrated for. Consequently, the altimeter will indicate a lower altitude than the actual height above sea level. In this case, the altimeter is “under-reading” due to the less dense air.
How do altimeters work?
Within this chamber, the spring mechanism is sensitive to changes in air pressure caused by shifts in altitude. As air pressure decreases with increasing altitude and vice versa, the sealed chamber expands or contracts accordingly, influencing the spring’s behavior. This interaction between the spring and the changing air pressure results in the movement of the pointer along the altimeter’s scale, providing a visual representation of the user’s altitude.