This procedure is to ensure that the Electric Power (LV/MV) Energization are in accordance with design specifications, their characteristics are within applicable standards and manufacturer’s tolerances. Main keywords for this article are Procedure for Electric Power Energization, Phase Identification Test, Insulation Resistance Test, DC Hi-Pot Test, Shield continuity test.
The following tests before ”ELECTRIC POWER ENERGIZATION” will be performed.
- Visual and mechanical check
- Phase identification
- Shield continuity test
- Insulation resistance test
- DC-HI-Pot test
The following test equipment will use to perform the above tests:
- Mega ohmmeter
- Digital multi meter
- Battery box or DC voltage supply with multiple outputs
- HI-POT test set
- Thermometer
PROCEDURE FOR ELECTRIC POWER ENERGIZATION (LV & MV)
TESTING PROCEDURE
The following shall be guidelines for the testing personnel during the inspection and test/energizing cables.
Visual and Mechanical check
- Compare cable data with drawing and specifications
- Inspect exposed section of cables for physical damage.
- Inspect for shield grounding, cable support, and termination.
- If cables are terminated through window type current transformers make an inspection to verify that neutral and ground conductors are correctly placed and that shields are correctly terminated for operation of protective devices.
- Inspect for correct identification and arrangements.
Phase Identification Test
Test equipment: Battery box or DC Power supply with multiple outputs; Digital multi meters
- Use safety grounding devices to discharge any trapped charges before connecting/disconnecting any test leads or other connection to/from the cable.
- Disconnect the cables under test from any electrical circuit.
- Connect the battery box, at one end of the cable.
– 0V to earth
– 4.5V to L1
– 9V to L2
– 13.5V to L3
- Using a multi meter, check if the other end of the cable, the voltage for each phase is correct according to drawings and specifications.
Test Equipment: Digital multi meter
- Use safety grounding devices to discharge any trapped charges before connecting/disconnecting any test leads or other connection to /from the cable.
- Using a multi-meter, measure the resistance of the shields.
- Investigate the shields with resistance of more than 10 ohms per 1000 feet of cable.
Insulation Resistance Test
Test equipment: Mega ohmmeter; Thermometer; Humidity meter
- Measure and record the ambient temperature and humidity.
- Discharge all stored capacitance in the cable by grounding it before testing or Energization.
- Disconnect the cable to be tested from other equipment and circuits.
- Test voltage should be as recommended by the manufacturer.
- The test duration should be one minute.
Insulation Resistance Test
- Measure the insulation resistance of each phase to ground as in fig.1 and between phase as in fig.2.The guard terminal of the mega ohmmeter can be use to eliminate the effects of surface leakage across exposed insulation or leakage to ground.
- After completing the test, ground all conductor in order to discharge the stored energy.
- The measured insulation resistance must be compared with the value recommended by the manufacturer.
IR=1000(KV+10)/L
Where: IR is insulation resistance Mega ohms per 1000 feet
KV is insulation voltage rating
L is the cable length in feet
DC Hi-Pot Test (leakage current versus time)-on critical low voltage cables.
Test Equipment; DC Hi-Pot test set; Thermometer; Humidity Meter
- Measure and record the ambient temperature and humidity
- Perform this test only if the insulation resistance of the cable was found to be satisfactory. Repeat the insulation resistance test after the Hi- Pot test to assure that the cable was not damaged during the over-potential test.
- Because of the combination of high voltage and high energy involved in high voltage cable testing, the test area is always to be cordoned off, at both cable ends, with safety rope barriers.
- Only persons that are directly engage in the testing process and who are well aware of the risks involved are to be allowed in the cordoned off area.
- Position a safety man at the other end of the cable.
- Identify the cable to ensure that the other end really belongs to the same cable.
- Cable to be tested must be de-energized, opened at both ends and grounded to discharge any electrostatic charge of the cable. Any switches, PTs, lighting arresters, fuses and switchgears should be disconnected from the cable under test. If it’s impossible to disconnect any or some equipment, the test voltage should not exceed the value that could overstress devices connected to the cable.
DC Hi-Pot Test
- Check to ensure that both ends of the cable are at an adequate distance from earthed objects
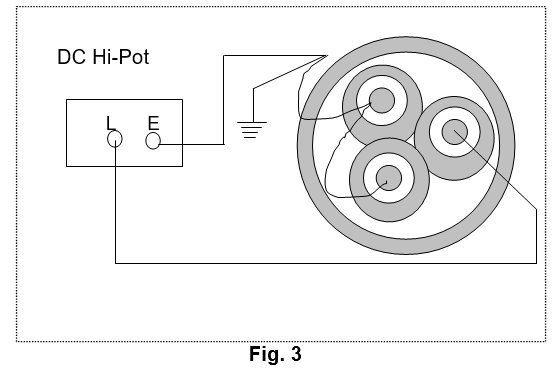
- As in fig.3, the test voltage should be applied from each conductor to ground with other conductors, shields and metallic sheath connected to ground
- Before beginning the test, ensure that the high pot main switch is in off position and that the voltage control switch is turned to zero position.
- Connect the hi-pot safety ground stud to a good electrical ground. Also connect the shield ground strap of the shielded cable under test to the hi-pot ground stud.
- Connect the line cable of the hi-pot to the desired phase of the cable under test. Make sure that connections are tight and without any sharp edges. The line cable should be short and supported over its entire length so that it’s not touching any grounded materials.
- Switch on the hi-pot and select the desired range for the test voltage.
- Increase the voltage up to the maximum test value in minimum 4 equal steps. The final value, for new cables, is usually 80% of the factory test voltage. For old cables the final value will be 65% or 40% of the factory test voltage. The DC test voltage shall not exceed 1.4x (2x rated voltage +1000).
- Record the leakage current at each step.
- When the specified test voltage has been reached it will be maintained for 15 minutes.
- After the maximum test voltage has been reached, record the leakage current at 15, 30, 45 seconds,1 minute, then every minute until the test is completed.
- After the test is completed, turn the voltage adjusting switch to zero and the voltage range switch to off position.
- Allow the cable to discharge either through the internal test set discharge circuit or to ground by using a discharge rod. Do not touch the cable until it is fully discharged.
- Connect a ground to the conductor that was tested and leave it connected at least four times the length of the test period.
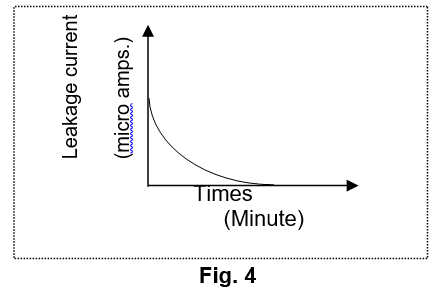
- Plot the leakage current versus time curve, based on the current leakage records. For a good cable, the will generally indicate a continuous de crease in the leakage current, as in fig.4
Main keywords for this article are Procedure for Electric Power Energization, Phase Identification Test, Insulation Resistance Test, DC Hi-Pot Test, Shield continuity test.


