This article is about Calibration of Differential Pressure Indicator focusing to the engineers, technicians and supervisors. You will find lot of documents related to this article. Just navigate our website www.paktechpoint.com and find more articles. Please! Do not forget to subscribe our Youtube channel also. Thanks
PAKTECHPOINT YOUTUBE CHANNEL SUBSCRIBE BY CLICKING
Calibration of Differential Pressure Indicator
TOOLS AND EQUIPMENT:
The testing/ calibration equipment and tools shall be properly stored in the Calibration Lab and valid calibration certificate, issued by an approved third party, shall be available for checking.
The list of all testing equipment with related serial number, calibration certificate number and the next calibration due date shall be displayed in the Calibration Lab/ Workshop.
Contractor shall ensure the re-calibration of the testing equipment, in batches and before the due date, in such a way not to create disruptions in the calibration activity.
The following test and calibration equipment shall be used but not limited to:
- HART Communicator
- Dead Weight Tester
- Test Gauges with Ranges per Specification
- Absolute Pressure Gauge
- Portable 120Vac, 60Hz Gasoline Powered Generator
- DC Power Supply Regulated 24Vdc Variable
- Nitrogen Tank w/ High Pressure Regulator
- Thermo Bath
- Set of Precision Weights
- Potentiometer
- Portable Pressure Calibrator (DRUCK)
- Process Calibrator
- RTD Conversion Chart
- Decade Resistance Box
- Hand Pump
- Hygrometer (Humidity Tester)
- Multi meter
- Test Bench
- Set of Tools, Hose & Fittings
- Stop Watch
- Millivolt/Temperature conversion chart
- Vernier Calliper
Please read also: Linearity Check and Calibration Of Vibration Probe (Axial and Radial) Proximitor
All tools utilized in a classified area should be intrinsically safe and suitable for hazardous areas.
Following procedure should be followed for calibration of differential pressure indicator.
1.0 Manufacturer’s test routines shall be followed and calibrations shall be confirmed within tolerance limits or use the procedure below. Manufacture’s special test procedures if any, shall be confirmed.
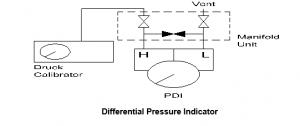
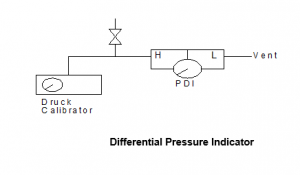
2.0 Hook up testing equipment as illustrated below:
Differential Pressure Indicator
Differential Pressure Indicator
3.0 Vent Low side. When no pressure is applied to the high side, the indicator should indicate zero. If correct output reading cannot be obtained, reset zero by adjusting screw until the indication read zero.
4.0 Increase input signal to 100% of each range and read the output. The output should be 100% of each range. If correct output reading cannot be obtained, adjust screw adjustment.
5.0 Recheck zero after span adjustment. Repeat until both are correct.
6.0 Check output for 0%, 25%, 50%, 75% and 100% of range with signal rising and falling. If correct output reading
cannot be obtained, adjust linearity adjustment and repeat until every output reading corresponds within acceptable error limit.
7.0 After the test has been completed, the instrument shall be identified with a color code sticker.
8.0 Results shall be filed and recorded on applicable forms.
The End! Enjoy! Comment to article

