The execution of the work shall be supervised at all stages. Supervision shall be undertaken by suitable qualified and experienced personnel. The contractor shall be responsible for carrying out this supervision. When coating materials with which the contractor is unfamiliar are to be applied, the manufacturer of the coating material shall be consulted.
The level of supervision / Checking will depend on the type and importance of the project, the degree of difficulty of the work and local conditions, and on the type of coating and its intended service life. This supervision will require appropriate technical knowledge and experience.
Measurement and test instruments
The instrument manufacturer‟s instructions for the use of their equipment shall be complied with. The instruments used shall be checked, calibrated and maintained at regular intervals and the results shall be recorded.
Checking the Paint Coating
Coating shall be checked for compliance with the specification, for example:
– by visual assessment, e.g. for uniformity, color, hiding power and defects such as holidays, wrinkling, cratering, air bubbles, flaking, cracks and curtains;
– by means of instruments for compliance with the following characteristics of the dry film, if required:
– dry film thickness: generally by non-destructive methods.
– adhesion: by destructive methods.
– porosity: by flow or high – voltage detectors.
For dry film thickness measurements, the parties concerned shall agree on the following:
a) The method to be used, the measurement instrument to be used, details of the calibration of the measurement instrument, and how to take into account the contribution of the surface profile to the result.
b) The sampling plan – how and how many measurements are to be made for each type of surface.
c) How the results are to be reported and how they are to be compared with acceptance criteria. Dry film thickness (including the nominal and maximum thickness) shall be checked at each critical stage, and when the complete system has been applied. A critical stage is, for example, when there is a change in the responsibility for the paint work or when a long time elapses between application of priming coats and subsequent coasts.
The coating on contact surfaces of preloaded bolted connections, for example high-strength fitted bolts in friction-grip connections and high-strength bolts in shear-type bearing connections shall be checked for conformity with the agreements made in the contract.
If destructive testing is necessary, notch-cutter measurements are acceptable. Such instruments can be used to check the thickness of individual coats and that of the complete system, and the sequence of the cots can also be checked. When testing for pores, the instrument and test voltage used shall
be agreed between the parties concerned. Any coating damage shall be repaired in accordance with the specification (see PAINT APPLICATION GUIDELINES ).
Reference areas
Reference areas are suitable areas on the structure used to establish a minimum acceptable standard for the work, to check that data provided by a manufacturer or contractor is correct and to enable the performance of the coating to be assessed at any time after completion. Reference areas are
normally not used for guarantee purposes but may be used for this purpose if agreed between the contracting parties.
If reference areas are required, they shall be prepared in locations in which the corrosive stresses are typical for the structure concerned. All surface preparation and paint application work on reference areas shall be carried out in the presence of representatives of all parties concerned, who shall give their agreement in writing when the reference areas are in accordance with the specification. All reference areas shall be accurately documented and may also be permanently marked on the structure itself.
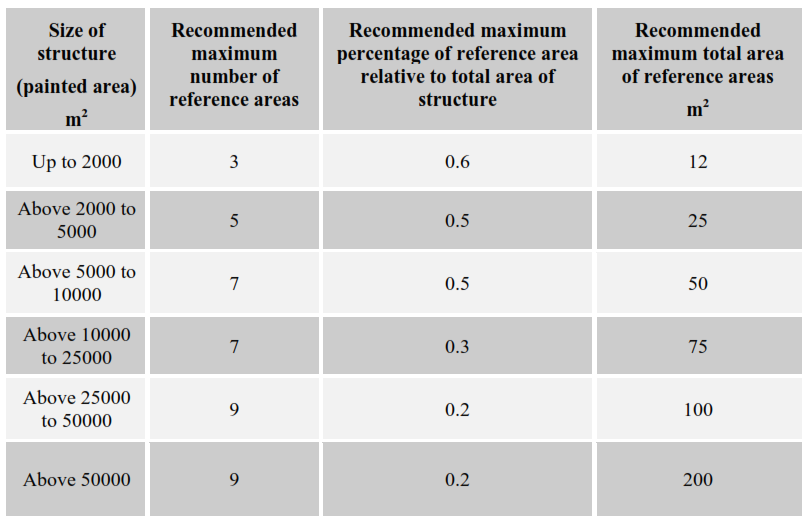
The size and number of reference areas shall be in reasonable proportion, both practically and economically, to the area of the complete structure.
Previously coated surfaces
In the particular case of previously coated surfaces, two types of reference area (A and B) may be prepared. Such previous coatings may be either old coatings applied recently by other contractors.
Type A reference area
Surface preparation and application of coatings is in accordance with the specification.
Type B reference area
All existing organic coatings are removed to the bare substrate, and the complete coating system is then applied, all in accordance with the specification.
Reference area records
The contractor / Installation Team shall keep records on the preparation of reference areas for each step of the work, the records shall include all relevant data and shall be approved by all parties concerned.
Assessment of Coating
The coating shall be assessed by methods agreed between the parties concerned, preferably using international or national standards. Defects in the coating could occur at the following locations:
– on the structure but not in the reference area(s);
– both on the structure and in the reference area(s);
– in the reference area(s) only.
If reference areas are used for guarantee purposes, possible causes of the defects shall be determined by suitably qualified and experienced personnel approved by the parties concerned. If reference areas have been damaged, the defects shall be carefully repaired but these repaired partsare no longer valid as reference areas.
Number of reference areas
