Repair Procedure for Adsorbent Tower Annular Chamber Weld Pinhole
1. SCOPE
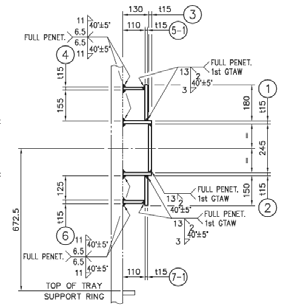
This procedure covers repair work for Adsorbent towers (Vessel, Towers etc.) pinhole on weld joints on annular chamber, which may occurred during Adsorbent tower internal inspection, internal trays installation works.
Applicable parts : Welds on annular chamber including full penetration weld.
Material specification:
1.5 Applicable Code
– ASME Sec II Part A,C,D 2010 Edition up to and Incl.2011 Addenda (SI Unit).
– ASME Sec. V 2010 Edition up to and Incl. 2011 Addenda (SI Unit).
– ASME Sec VIII Div.1 2010 Edition up to and Incl.2011Addenda (SI Unit).
– ASME Sec IX 2010 Edition up to and Incl.2011Addenda (SI Unit).
– National Board of Boiler and Pressure Vessel Inspectors(NBIC) 2017.
1.6 Project Specification
– SAES-W-010 : Welding Requirements for Pressure Vessels.
– 32-SAMSS-004 : Manufacture of Pressure Vessel.
1.7 Applicable drawing
– Annular Chamber Detail (1/5) Doc No. V-2151-201-A-0164
2. REPAIR SEQUENCE
| ACTIVITY | REMARK |
| Remove the pinhole on full penetration weld by grinding. After remove by grinding, if remaining fillet length is comply with applicable drawing, no additional welding is required. If any defect on fillet weld to shell, remove the pinhole by grinding until 2mm of fillet length remaining. *1 NDE (MT) shall be applied after grinding. |
< Typical sketch of annular chamber> |
| Perform build-up welding with GTAW | WPS NO. : W1-GT-A.I-6742_Rev.1 |
| Smooth grinding for build-up weld | |
| Dimension for fillet weld size shall be checked as per drawing. | |
| NDE (PT) *1 NDE (A wet Fluorescent Magnetic Test ; WFMT) | |
| Air tightness test for the repaired annular chamber. |
3. INSPECTION AND TEST PLAN
The activities of inspection and test for repair work shall be performed as per attached
Inspection and Test Plan.(See Attachment #2)
4. ROUTINE REPAIR
4.1 This repair work is a kind of routine repair according to NBIC part 3 Para. 3.3.2 d) and 3.3.3 a).
Quote) NBIC part 3 Para. 3.3.2 d) and 3.3.3 a)
3.3.2 d) Repairs falling within one or more of the following categories may be considered routine:
3.3.3 a) Weld repairs or replacement of pressure parts or attachments that have failed in a weld or in the base material;
5. POST WELD HEAT TREATMENT (PWHT)
5.1 NBIC part 3 Para. 2.5.2 a), PWHT shall be performed as required by the original code of construction.
Quote) NBIC part 3 Para. 2.5.2 a)
Postweld heat treatment shall be performed as required by the original code of construction, the construction standard or code selected in accordance with a written procedure. The procedure shall contain the parameters for postweld heat treatment.
5.2 According to original code ASME Sec. VIII Div.1 UCS-56-1, PWHT is required when nominal thickness is not exceeding 32mm. For this repair welding nominal thickness is 15mm so PWHT is not necessary.
*1 Vessel nominal shell thickness is 66mm for reference.
Quote) ASME Sec.VIII Div.1 2010ED+2011ADD, UCS-56-1 note (2)-b)
(2) Postweld heat treatment is mandatory under the following conditions:
(b) for welded joints over 1 1/4 in. (32 mm) nominal thickness through 1 1/2in. (38 mm) nominal thickness unless preheat is applied at a minimum temperature of 2000 F (950 C) during welding.
*1 Normally on projects, Preheating Min. 95 deg C is applied to the repair weld.
6. HYDROSTATIC TEST
Hydrostatic test is not required when NDE((VT&WFMT)) is conducted as per NBIC part3, section
Quote) NBIC part 3 Para. 4.4.1
Based on the nature and scope of the repair activity, one or a combination of the following examination and test methods shall be applied to repairs and replacement parts used in repairs.
