- PURPOSE.
- DEFINITION.
- MANPOWER.
- TOOLS AND EQUIPMENT.
- GENERAL.
- ASSESMENT OF THE INDICATION.
- REMOVAL OF DEFECT (UNACCEPTABLE INDICATIONS).
- WELD-BUILD UP.
- NDE AND ACCEPTANCE CRITERIA.
- METHODS / PROCEDURES.
- QUALITY CONTROL AND ASSURANCE.
- SAFETY CONSIDERATION.
- ATTACHMENTS.
WELD APPEARANCE RECTIFICATION PROCEDURE METHOD STATEMENT FOR VESSEL, TOWERS
1. PURPOSE
This method statement shall provide minimum guidelines to carry out weld repair procedure for annular chamber of Adsorbent Tower, Vessel for Plants and Refinery Projects to ensure that the work is carried out safely and in accordance with Project Drawings and Project Specifications.
This method statement will cover the retain work and the weld repair work for welding defect such as pinholes on fillet joint of annular chamber, which was observed during Adsorbent Tower, Vessel internal inspection by Axens.
1.3 Applicable item and parts
Adsorbent Tower (J12-C-0201A/B)
Material ; SA516-70N
Shell Thickness 66mm
Applicable repair parts ; Annular chamber(SA516-70N), Annular chamber welded to shell
2. DEFINITIONS
2.1 COMPANY
2.2 CONTRACTOR
2.3 Subcontractor
2.4 Vendor
3. MANPOWER
3.1 Superintendent / Supervisor.
3.2 Foreman.
3.3 Welder.
3.4 Fitter.
3.5 Helper.
3.6 Inspector.
4. TOOLS AND EQUIPMENT
4.1 Tools and equipment shall be in good condition and must be checked by Competent Person and respective Supervisor prior to use in the plant.
4.2 Measuring instruments shall have valid calibration certificates.
4.3 Tools and equipment must be color-coded according to the colour of the month. Defective tools and equipment shall be returned to Central Tool room and Equipment Services to avoid inadvertent use.
4.4 Tools and equipment shall consist but not limited to the following:
4.4.1 GTAW welding tools / Tungsten touch.
4.4.2 Shield gas (Argon gas) vessel.
4.4.3 Heating coil.
4.4.4 Electric power.
4.4.5 Electric power cable.
4.4.6 Lighting.
4.4.7 Inspection tools.
5. GENERAL
5.1 SCOPE OF DOCUMENTS
5.1.1 Saudi ARAMCO Project Specifications and Standard
5.1.1.1 SAES-W-010 Welding Requirements for Pressure Vessels.
5.1.1.2 32-SAMSS-004 Manufacture of Pressure Vessel
5.1.2 Design and Inspection Code
5.1.2.1 ASME Sec II Part A, B, C,D Ferrous Material Specifications Materials 2010 Edition up to and Incl. 2011 Addenda (SI Unit).
5.1.2.2 ASME Sec VIII Div.1 Rules for Construction of Pressure Vessels 2010 Edition up to and Incl. 2011 Addenda (SI Unit).
5.1.2.3 ASME Sec IX Qualification Standard for Welding and Brazing Procedures, Welders, Brazers, and Welding and Brazing Operators 2010 Edition up to and Incl. 2011 Addenda (SI Unit).
5.1.2.4 ASME Sec V Nondestructive Examination 2010 Edition up to and Incl. 2011 Addenda (SI Unit).
5.1.3 Inspection and Testing Plan/ Method Statement
Weld Repair Procedure for Internal Attachment of Adsorbent Towers Inspection and Test Plan is attached to above procedure.
5.1.4 Latest Revision of the following Documents shall be used
5.1.4.1 Related Vendors fabrication drawings
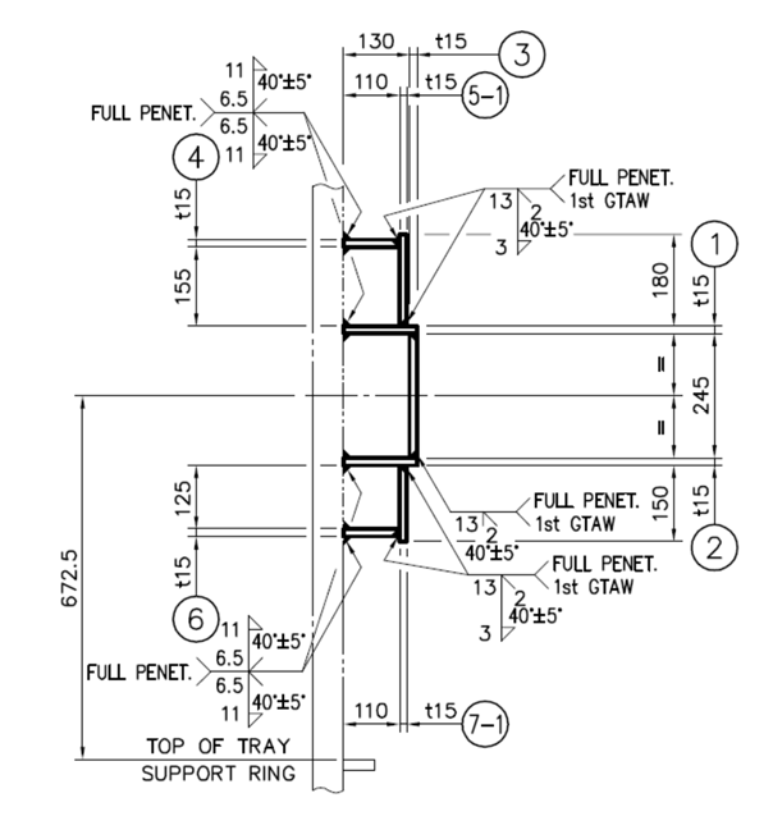
V-2151-201-A-0164 Annular Chamber Detail
5.1.5 Contractor`s Safety, Health and Environmental Standard.
Contractor Site Safety Program
Construction Environmental Management Program
5.2 ROLES AND RESPONSIBILITIES
5.2.1 This repair work will be conducted and controlled by Vendor. Vendor has all responsibility for this repair weld.
5.2.2 Vendor will dispatch their own ASME Sec IX qualified welder for this project and these welders will also be qualified at construction site under Company supervision.
5.2.3 QC ASME Sec. V qualified inspector will be assigned to attend to the quality control and assurance of this work.
5.3 QUALIFICATION REQUIREMENTS OF THE PERSONEL FOR WELDING AND INSPECTION
5.3.1 ASME qualified welders from Vendor will be assigned to this repair weld activity. Before the welding work, they shall have a welding qualification test at construction site under Company supervision.
5.3.2 ASME Sec. V qualified inspector will be assigned to attend to the quality control and assurance of this work.
6. ASSESMENT OF THE INDICATIONS
6.1 Assessment of the indications with regards to the acceptance criteria shall be in line with project specifications and the design code.
6.2 Selection of the area where defects (indications not meeting the acceptable limits) shall need removal.
7. REMOVAL OF DEFECTS (UNACCEPTABLE INDICATIONS)
7.1 Removal of defects by gentle grinding in successive/progressive manner in combination of MPI to ensure the remaining area is free from any defect.
7.2 The excavated area shall be blended into the surrounding surface so as to avoid sharp notches, crevices, or corners.
7.3 Weld-build up is not required if the remaining weld geometry fulfills the project and code requirements.
8. WELD-BUILD UP
8.1 Where welding is required after removal of an imperfection, the area shall be cleaned and welding shall be performed in accordance with a qualified welding procedure (See Attachment S-120-1351-915).
8.2 Weld build-up sequence and reference to the WPS to be used.
The minimum preheat shall be as per SAES-W-010 and it shall not be less than either of the following, whichever is more conservative:
a) The preheat listed in ASME SEC VIII.
b) The preheat listed in Standard Drawing AE-036451 (combined thickness method).
As a conclusion, Min.95degC for preheating shall be applied to this repair weld.
9. NDE AND Acceptance CRITERIA
9.1 All repaired welds shall, as a minimum, be inspected using the original testing method. Additional test methods may also be required, if deemed necessary by the authorized Saudi Aramco inspector.
9.2 Any weld not meeting the acceptance criteria of the applicable code or standard shall be cut out
or repaired. Other methods, such as sleeving, shall not be permitted.
10. METHODS / PROCEDURES
10.1 Preparation
10.1.1 Secure work permit prior to work commence.
10.1.2 Mobilize all manpower, tools and equipment needed for the work.
10.1.3 Prepare barricades for the work area to confine the area for authorized personnel only.
10.2 Inspect welding defect condition and its evaluation in accordance with applicable code and project specification.
Assessment of the indications with regards to the acceptance criteria shall be in line with project specifications and the applicable design code.
Selection of the area where defects (indications not meeting the acceptable limits) needs removal shall be in accordance with Axens inspection report. Welding defect (location and quantity) shall be identified by CONTRACTOR /VENDOR in accordance with Axens inspection report and physical marking at site prior to any grinding and repair work.
10.3 Retain work (in case of only grinding work)
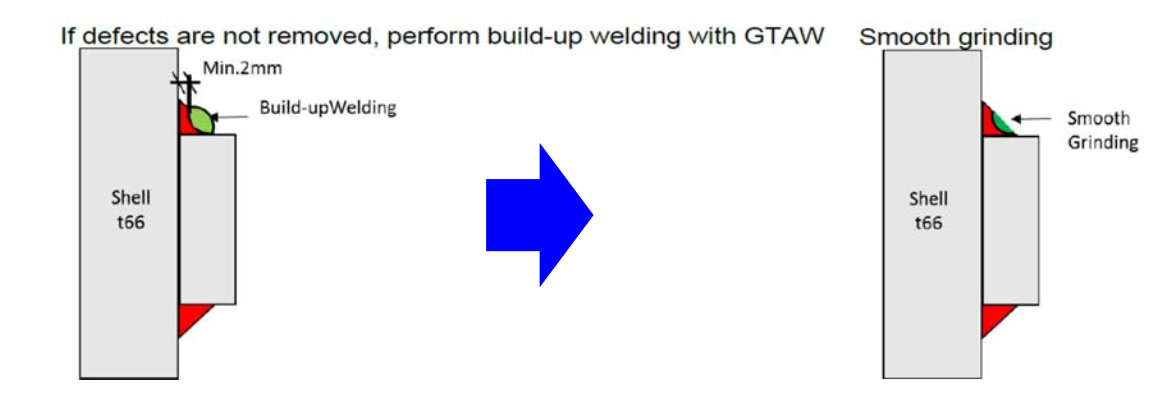
10.3.1 Remove the welding defect, such as pinholes, by grinding until 2mm of fillet length remaining. Dimension for remaining fillet length shall be checked during grinding.
10.3.2 If defects can be removed by only grinding, perform smooth grinding on fillet weld bead
10.3.3 Removal of defects by gentle grinding in successive / progressive manner in combination of Magnetic Particle Inspection(MPI) to ensure the remaining area is free of any defect.
10.3.4 The excavated area shall be blended into the surrounding surface so as to avoid sharp notches, crevices, or corners.
10.3.5 Weld build up is not required if the remaining weld geometry fulfils the project, code requirement and applicable drawings.
Fig-1 Retain Work
(This sketch is only referred to fillet weld retain work condition)
Fig-2 Typical Sketch of Annular Chamber in the drawing
10.4 Repair work (in case of both grinding and deposit weld)
10.4.1 Para 10.3.1 to 10.3.4 shall be followed before deposit weld
10.4.2 Arrangement of Preheating before deposit weld
The minimum preheat shall be as per SAES-W-010 and it not be less than either of the following, whichever is more conservative:
a. The preheat listed in ASME Section VIII.
b. The preheat listed in the standard drawing AE-036451(combined thickness method) As a conclusion, Min.95degC for preheating shall be applied to this repair weld.
10.4.3 Where welding is required after removal of an imperfection, the area shall be cleaned and welding shall be performed in accordance with a qualified welding procedure
10.4.4 Weld build up sequence and design be reference to the WPS and Drawings to be used.
10.4.5 All repaired welds shall, as a minimum, be inspected using the original testing method (A wet Fluorescent Magnetic Test). Additional test methods may also be required, if deemed necessary by authorized Saudi Aramco inspector.
10.4.6 Any weld not meeting the acceptance criteria of the applicable code or standard shall be cut out or repaired. Other methods, such as sleeving, shall not be permitted.
10.4.7 In case of GTAW of welding process, the quality of the shielding gas for any contamination and its flow rates shall be checked to avoid gas porosity.
Fig-2 Repair Work
(This sketch is only referred to fillet weld repair work condition)
11. QUALITY CONTROL AND ASSURANCE
11.1 QC Inspector shall be responsible to conduct all required inspection to ensure that all applicable requirements, codes and standards are complied with.
11.2 All stages of work shall be inspected in accordance with the Saudi Aramco Typical inspection plan or approved Inspection and Test Plan.
12. SAFETY ACTION PLAN
12.1 All personnel shall have JGC/Daewoo E&C safety required training (e.g. induction, Hot work, Working at height)
12.2 Obtain the approval of work permit from before starting any work.
12.3 Continuous monitoring and inspection shall be implemented to detect and correct any unsafe practices while performing work activities.
12.4 Good housekeeping shall be maintained in the duration of works.
12.5 Lifting equipment certificate required, checked, in-date and available on site for inspection.
Third party equipment inspections required. E&C monthly color code tags for lifting equipment to be used.
12.6 Provide warning sign and sufficient barricade on working area and only assigned personnel be allowed in the area.
12.7 Firewatcher with fire extinguisher shall be at work area whenever there is hot work.
12.8 Welding location shall be enclosed with wind barrier and provided with non-asbestos fire blanket to prevent spread of any welding sparks.
12.9 Safety Officer shall monitor the work activities to help and protect all assigned workers against exposure to safety hazard. He shall ensure that Personnel Protective Equipment (PPE’s) are supplied, used and in compliance with E&C applicable instruction and standards.
13. ATTACHMENTS
Weld Appearance Rectification Procedure for Adsorbent Towers.
Mechanical work inside of the Adsorbent Towers.


