This article is about Calibration of control valve using HART Communicator.
Here’s a detailed explanation of the steps involved in calibrating a control valve:
Set Up Preparation
A) **Valve Condition Check:** Before starting the calibration process, it’s crucial to ensure that the control valve is in proper operational condition. This means it should be free from any mechanical issues or blockages that could affect its performance during calibration.
B) **Safety Precautions:** If operating the valve during calibration poses any safety risks to people or equipment, take necessary precautions. This could involve isolating the area, using protective barriers, or implementing safety protocols to prevent accidents.
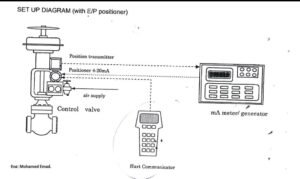
C) **Instrument Connection:** Make sure that all the required measuring instruments are properly connected according to the setup diagram. These instruments will be used to monitor and measure the valve’s performance during calibration.

Control Valve Calibration
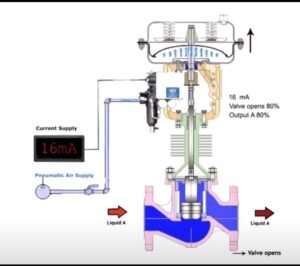
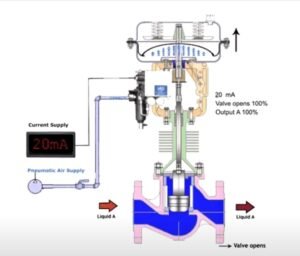
1- **Power Supply:** Supply the valve positioner with the specified power supply as indicated in the data sheet. The positioner is a device that helps control the valve’s position based on input signals.
2- **Air Supply:** Adjust the air supply pressure source to match the specifications mentioned in the data sheet provided with the positioner. Proper air pressure is crucial for the positioner to function accurately.
3- **Current Adjustment:** Use a milliamp injector to increase the current within the range of 4 to 20 mA. This mimics the control signal that the valve will receive during normal operation. While increasing the current, observe and check how the valve stem responds in terms of opening and closing.
4- **Current Decrease:** Repeat the previous step but decrease the current value to test the valve’s response in the opposite direction. This ensures that the valve can operate within the entire range effectively.
5- **Full Stroking:** Verify that the control valve is capable of fully opening and fully closing. This is essential to ensure precise control over the fluid or gas flow.
6- **Fail-Safe Testing:** Test the fail-safe mechanism of the valve. In case of a power supply failure, the valve should move to a predetermined fail-safe position (e.g., fully open or fully closed). Record the time it takes for the valve to reach this fail-safe position.
7- **Documentation:** Throughout the calibration process, maintain thorough records of all procedures and measurements. These records are typically compiled into a certificate, which serves as documentation of the calibration process.
Calibrating control valves is critical in ensuring their accurate and reliable operation within industrial processes, where precise control of flow rates is essential for maintaining product quality and process efficiency.