Sieve analysis of sand is a laboratory technique used to determine the particle size distribution of sand or other fine aggregates. It involves separating the sand into different size fractions based on the diameter of the particles. The analysis is typically conducted using a set of standard sieves with progressively smaller mesh openings.
What is Sieve Analysis of Sand?
This article is about the procedure for conducting a sieve analysis of fine aggregates or sand to determine their particle size distribution.
1.0 Introduction:
- Describes the purpose of the test, which is to determine the particle size distribution of fine aggregates or sand.
1.2 Definitions:
- Defines important terms related to the test, such as particle size distribution analysis, fine aggregates/sand, silt, clay, and dust.
1.3 Main Principles:
- Explains that for fine aggregates free from impurities, a dry sieve analysis method is used.
- States that for fine aggregates containing impurities like silt or clay, a preliminary separation is done through washing using a fine sieve of 75µm before dry sieving.
1.4 Main Reference:
- References the British Standard BS 812: Part 103.1 as the main standard for conducting this test.
1.5 Test Method:
- Specifies that the test method used is dry sieve analysis.
1.6 Objective/Purpose/Significance of the Test:
The objective, purpose, and significance of the sieve analysis test, as well as the tools required for the test, are outlined as follows:
Objective/Purpose/Significance of the Test:
- Determine Grading of Aggregate Materials: The primary objective of the sieve analysis test is to determine the grading of materials that are either proposed for use as aggregates or are already being used as aggregates in construction or manufacturing processes. This grading refers to the distribution of particle sizes within the material.
- Compliance with Specifications: The results of the sieve analysis are used to assess whether the particle size distribution of the material complies with applicable specification requirements. Different applications, such as construction projects, may have specific requirements for the particle size distribution of aggregates. This test helps ensure that the material meets these requirements.
- Production Control: The test results also play a crucial role in controlling the production of various aggregate products and mixtures that incorporate aggregates. By analyzing the particle size distribution, producers can adjust their processes to achieve the desired grading, which is essential for the quality and performance of the final product.
- Versatile Applications: Sieve analysis test results are versatile and find application in various fields, including:
- Bio-sand Filter Materials: Sieve analysis helps determine the suitability of materials for use in bio-sand filters, which are used for water purification.
- Quality Sand in Concrete and Mortar Making: Ensuring that sand used in concrete and mortar making meets specified particle size requirements is crucial for the strength and workability of these materials.
- Uniformity Coefficient and Coefficient of Curvature: These parameters are calculated based on the particle size distribution data obtained from sieve analysis. They provide valuable information about the uniformity and shape of the particle size distribution.
- Many Other Applications: Sieve analysis can be used in a wide range of applications beyond the construction industry, including soil analysis, agriculture, and geology.
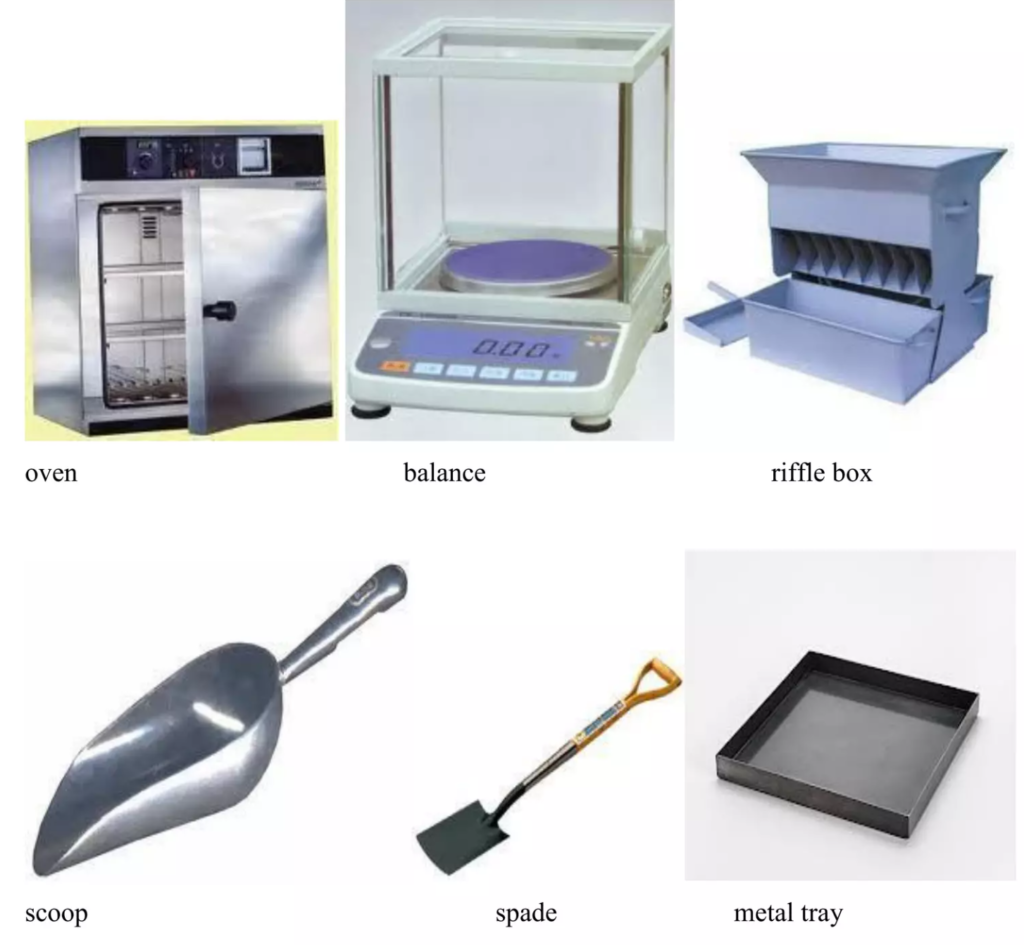
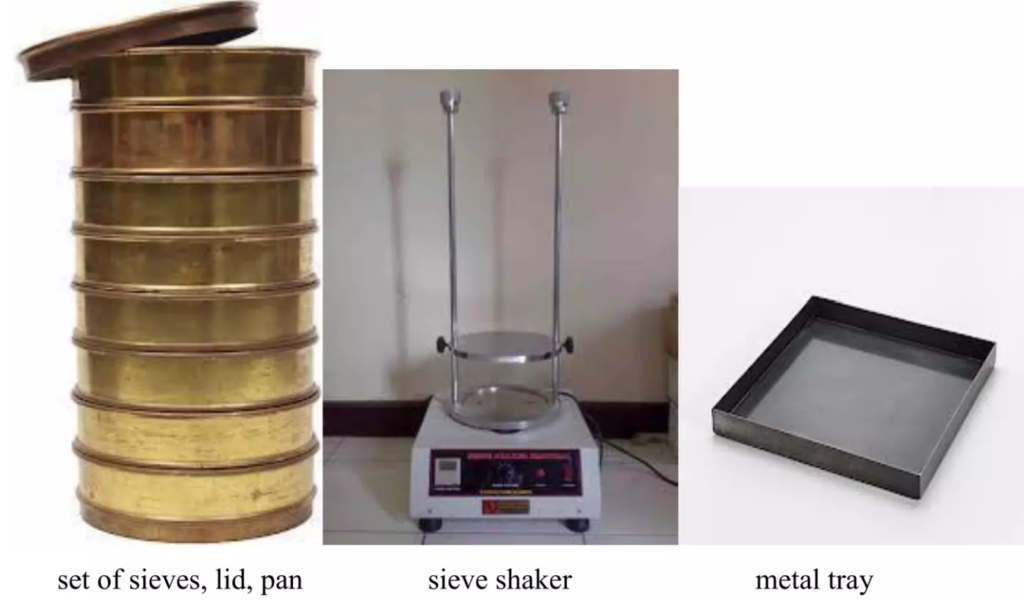
Tools Required:
- Test Sieves: A set of test sieves with various sieve sizes, including 10.0mm, 6.3mm, 5.0mm/4.75mm, 3.35mm, 2.36mm, 1.7mm, 1.18mm, 825μm, 600μm, 425µm, 300µm, 212µm, 150µm, and 75µm/63µm. These sieves are used to separate and classify particles based on their size.
- Drying Oven: A drying oven capable of maintaining a temperature of 105°C ± 5°C is essential for removing moisture from the sample material before sieving.
- Balance: A balance that is readable and accurate to 0.5g is used to measure and weigh the representative sample of the material.
- Sieve Brushes: Both soft and wire brushes are necessary for cleaning and maintaining the test sieves.
- Lid and Receiver: These components are used to collect and measure the material that passes through the sieves during the test.
These tools are crucial for conducting the sieve analysis test accurately and obtaining valuable information about the particle size distribution of the material under examination.
2 Instructions:
- Provides an overview of the instructions to be followed in conducting the particle size distribution test.
2.1 Prepare the Sample:
- Lists the materials and equipment needed for sample preparation, including metal trays, containers, riffle boxes, and more.
The document seems to be part of a detailed procedure for conducting a sieve analysis of fine aggregates or sand. If you require more specific instructions or details on any particular section, please let me know, and I can provide further information.
These instructions describe how to prepare a sample of fine aggregate or sand for particle size distribution testing. Below are the detailed steps for sample preparation:
2.1.1 Materials/Ingredients:
- Fine aggregate (approximately 12 kg)
- Metal tray
- Drying oven capable of maintaining 105°C ± 5°C
- Balance accurate to 0.5g
- Sieve brushes (soft and wire)
- Lid and receiver.

Appratus:
Following apparatus required for sieve analysis of sand.
2.1.3 Procedures/Instructions:
a) Drying the Sample:
- Take the 12 kg fine aggregate or sand sample to the laboratory and place it on a metal tray.
- Put the sample into a drying oven for 12 to 24 hours at a temperature of 105°C ± 5°C until all the moisture is extracted. Note: Ensure that all moisture is removed; if not, leave the sample in the oven for an additional 24 hours.
b) Cooling the Sample:
- Remove the dried sample from the oven and allow it to cool to room temperature.

c) Obtaining a Representative Sample:
- Place the cooled sample on a clean surface, preferably in a cone shape.
- Take a representative sample of about 1.5 kg.
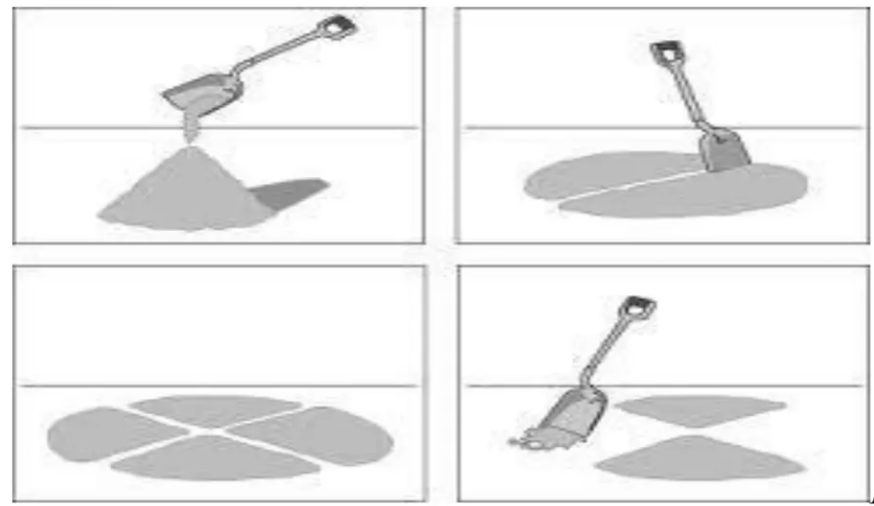
d) Using Quartering Method:
- If using the quartering method, heap the sample into a cone shape on a flat, clean surface.
- Divide the sample into four portions, with two opposite quarters forming a diagonal.
- Select one diagonal, and discard the remaining one.
- Continue this process until the sample is reduced from about 12 kg to about 1.5 kg.
- Weigh exactly 1.5 kg of the sample using the balance.
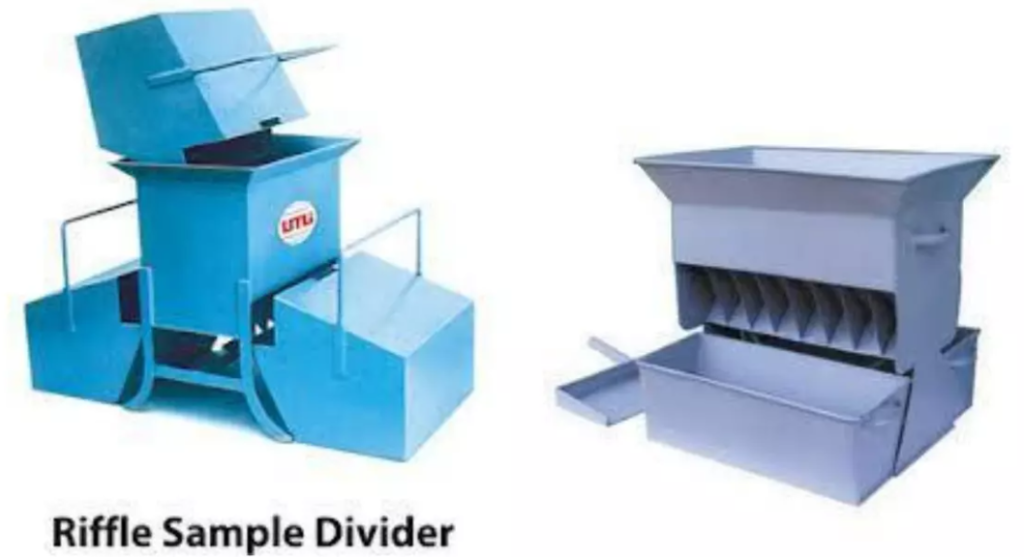
e) Using Riffle Boxes Method:
- If using riffle boxes, pour the dried sample into the apparatus, ensuring even distribution.
- The apparatus will automatically divide the sample into two parts, each going into a separate box.
- Retain the sample in one box and discard the sample in the other box.
- Continue to divide the retained sample until it is reduced from 12 kg to 1.5 kg.
- Weigh exactly 1.5 kg of the sample using the balance.
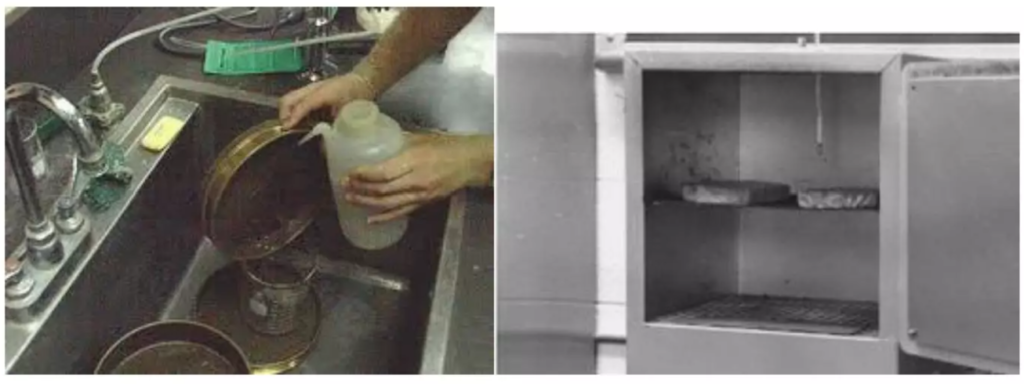
f) Washing for Samples Containing Impurities:
- For samples that may contain impurities like silt, clay, or other materials, washing is required.
- Use sieves with openings of 1.18 mm and 75 µm/63 µm.
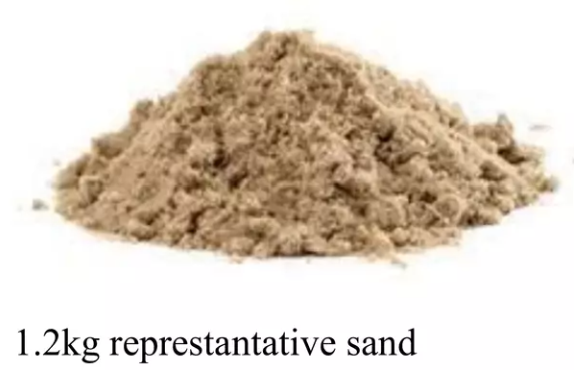
- Place the 1.2 kg representative sample on the top sieve with an opening of 1.18 mm.
- Apply water to the sample; sand particles will be retained on the 1.18 mm sieve and 75 µm/63 µm.
- Allow silt and clay to run out with the water.
- The sample is considered clean when the color of the water applied to the top sieve matches the water coming out of the lower sieve. Note: If it’s difficult to combine the two sieves while washing, wash the sample with the 1.18 mm sieve first, collect the particles that pass through, and then wash those particles with the 75 µm/63 µm sieve.
g) Drying the Washed Sample:
After washing, collect the sample onto a metal tray and place it in the drying oven for 12 to 24 hours at 105°C ± 5°C to remove all moisture.
h) Sample Ready for Sieving:
h) To prepare sand or fine aggregates that may contain silt, clay, or other impurities likely to cause clumping, it’s essential to conduct a preliminary separation before dry sieving. This separation involves washing a representative 1.2kg sample through a fine sieve with openings of 75µm/63µm. Here’s how it’s done:
- Place the 1.2kg representative sample on the top sieve with openings of 1.18mm.
- Apply water to the sample, allowing the sand particles to be retained on the 1.18mm sieve, while silt and clay particles are carried away by the water.
- Continue washing until the water passing through the lower 75µm/63µm sieve appears to have the same color as the water applied to the top sieve.
If it’s challenging to combine the two sieves during washing, you can follow this alternative approach:
- Initially, wash the sample using the 1.18mm sieve, collecting the particles that pass through on a metal tray.
- Then, take the particles that went through the 1.18mm sieve and place them on the 75µm/63µm sieve for further washing. This step ensures that water running through carries away silt and clay particles.
The use of the 1.18mm sieve in the initial washing is crucial to prevent overloading and potential damage to the 75µm/63µm sieve, which is the key sieve in this process.
Please exercise care when conducting this washing process to avoid sink blockages. If necessary, it’s advisable to let the water, along with silt and clay particles, run into a drain.
After washing, collect the sample onto a single metal tray. Then, place it in a drying oven for a duration of 12 to 24 hours at a temperature of 105°C ±5°C. This ensures that all moisture is completely extracted from the washed sample.
Once the sample is removed from the oven and has cooled to room temperature, it’s ready for the sieving process.

These detailed steps provide a comprehensive guide on how to prepare the sample of fine aggregate or sand for subsequent particle size distribution testing.
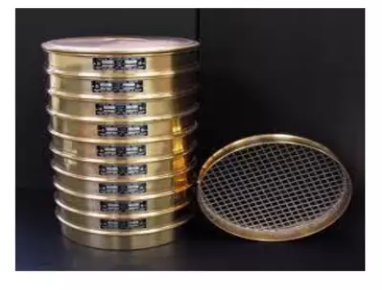
Sieves Arrangement
Ingredients or Materials
Test sieves of sizes 10.0mm, 6.3mm, 5.0mm/4.75mm, 3.35mm, 2.36mm, 1.7mm, 1.18mm, 825µm, 600µm, 425µm, 300µm, 212µm, 150µm and 75µm/63µm;
Apparatus:

2.2.3 Procedures/Instructions
a) Start by carefully selecting the sieves to be used in the test.

b) Ensure thorough cleaning of the selected sieves, leaving no particles trapped in the mesh holes. Removing any residual particles is crucial, as they can introduce errors by adding contaminants to the original 1.2kg representative sample. Take care not to damage the sieves while cleaning, and remove particles with a gentle touch rather than applying excessive force.
c) Use a hard sieve brush to clean sieves with aperture sizes above 1.0mm (including 10.0mm, 6.3mm, 5.0mm/4.75mm, 3.35mm, 2.36mm, 1.7mm, and 1.18mm). For sieves with aperture sizes below 1.0mm (such as 825µm, 600µm, 425µm, 300µm, 212µm, 150µm, and 75µm/63µm), employ a soft sieve brush during the cleaning process.

d) Once the sieves are clean, arrange them in a sequence where those with larger apertures are positioned above and those with smaller apertures are placed below. This arrangement ensures that larger sand particles are retained on the upper sieves, while smaller sand particles are collected on the lower sieves during the sieving process.
e) Set up the equipment as follows: place the receiver/pan at the bottom to capture any particles passing through the 75µm/63µm sieve (including silt and clay) during sieving. Additionally, position the lid/cover on top of the highest sieve (10.0mm) to prevent any particles from escaping during the sieving process.

Sieving Carrying Out
Ingredients or Materials
Equipments
2.3.3 Procedures/Instructions
a) Begin by gently placing the 1.2kg representative sand sample onto the topmost sieve (10.0mm) and then replace the sieve’s lid. Ensure a careful transfer of the sand sample onto the top sieve.

b) The sieving process can be conducted either manually or using a mechanical method.
c) In the case of manual sieving, follow these steps:
- Start with one of the sieves with larger apertures, such as sieve 10.0mm.
- Hold the sieve and shake it manually, allowing the sample to pass through the sieve’s openings. Collect the material that passes through onto a tray.
- The material retained on the 10.0mm sieve should be set aside for later weighing.
- Take great care to prevent any particle loss during this process. Examine particles that may have become lodged within the sieve mesh holes to determine if they should pass through or remain retained. Manual sieving is a time-consuming method but generally provides more accurate results compared to mechanical sieving.

d) For mechanical sieving, follow these steps:
- Ensure the sieve shaker is in proper working condition.
- Securely fasten a set of sieves, including the pan at the bottom and the lid on top, containing the 1.2kg representative sand sample to the sieve shaker.
- Switch on the machine and allow it to shake the sample for approximately 15-30 minutes. The machine may stop automatically or a timer can be used to determine the shaking duration.
- After switching off the machine, disconnect it from the power source.
- Carefully remove the set of sieves from the sieve shaker and place it near the weighing scale (balance) for further steps.
2.4 Weigh materials retained on each sieve
Ingredients or Materials


2.4.3 Procedures/Instructions
a) Begin by checking the balance to ensure it is in good working condition.
b) Carefully remove the lid from the sieve set.
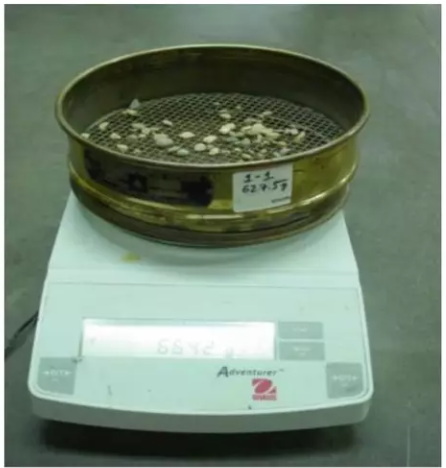
c) Gently take off the topmost sieve (10.0mm). Place it on an empty metal tray and shake it manually to ensure that no other materials are passing through.
d) Remove and weigh the particles retained on the 10.0mm sieve.
e) Take extreme care during the removal process to prevent any particle loss.
f) Ensure that all particles are completely removed from the sieve.
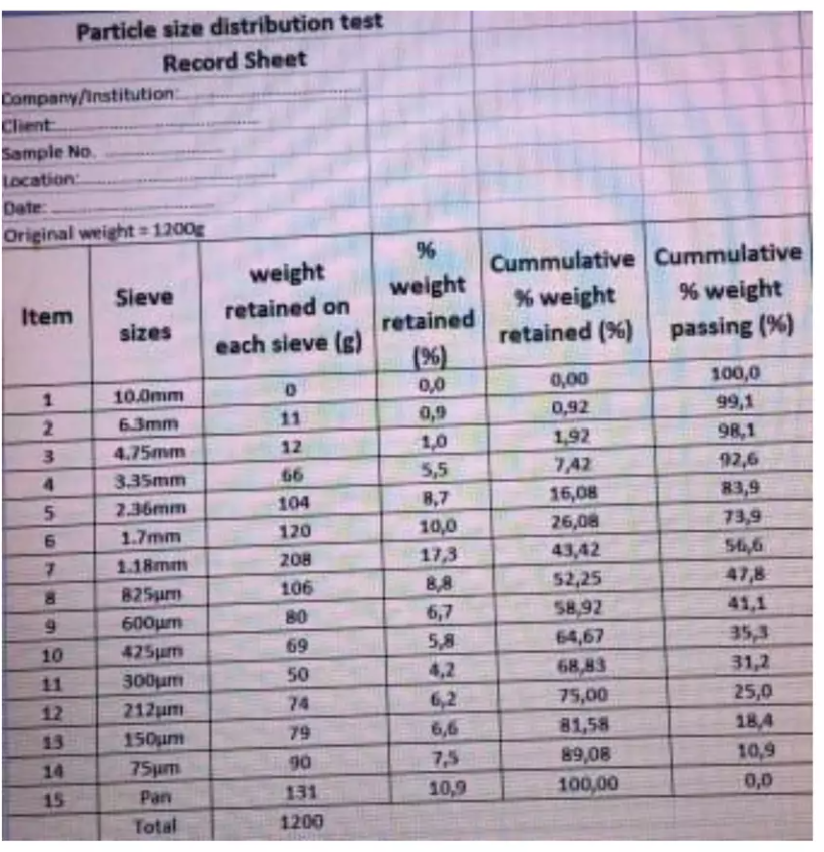
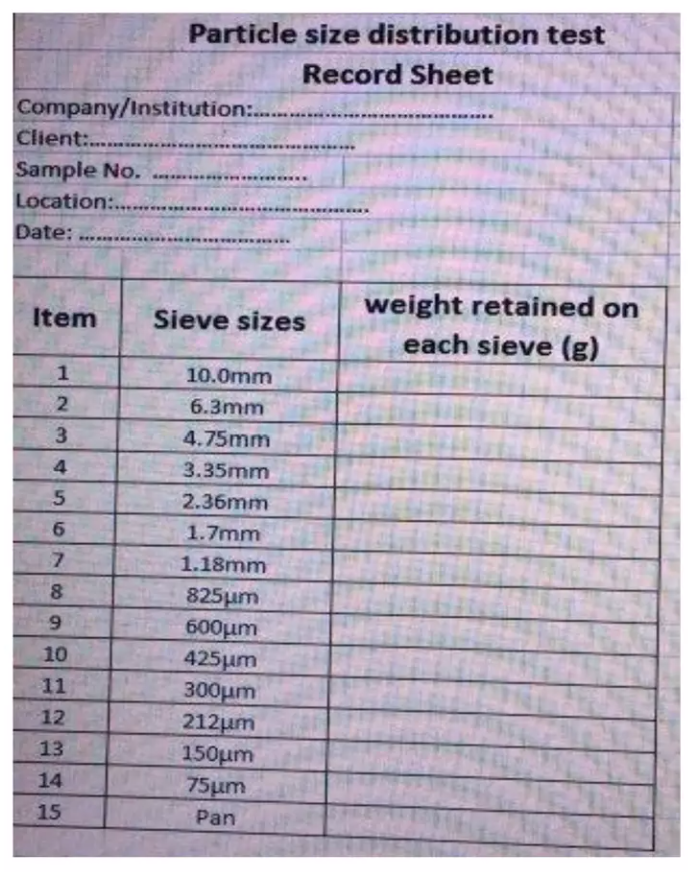
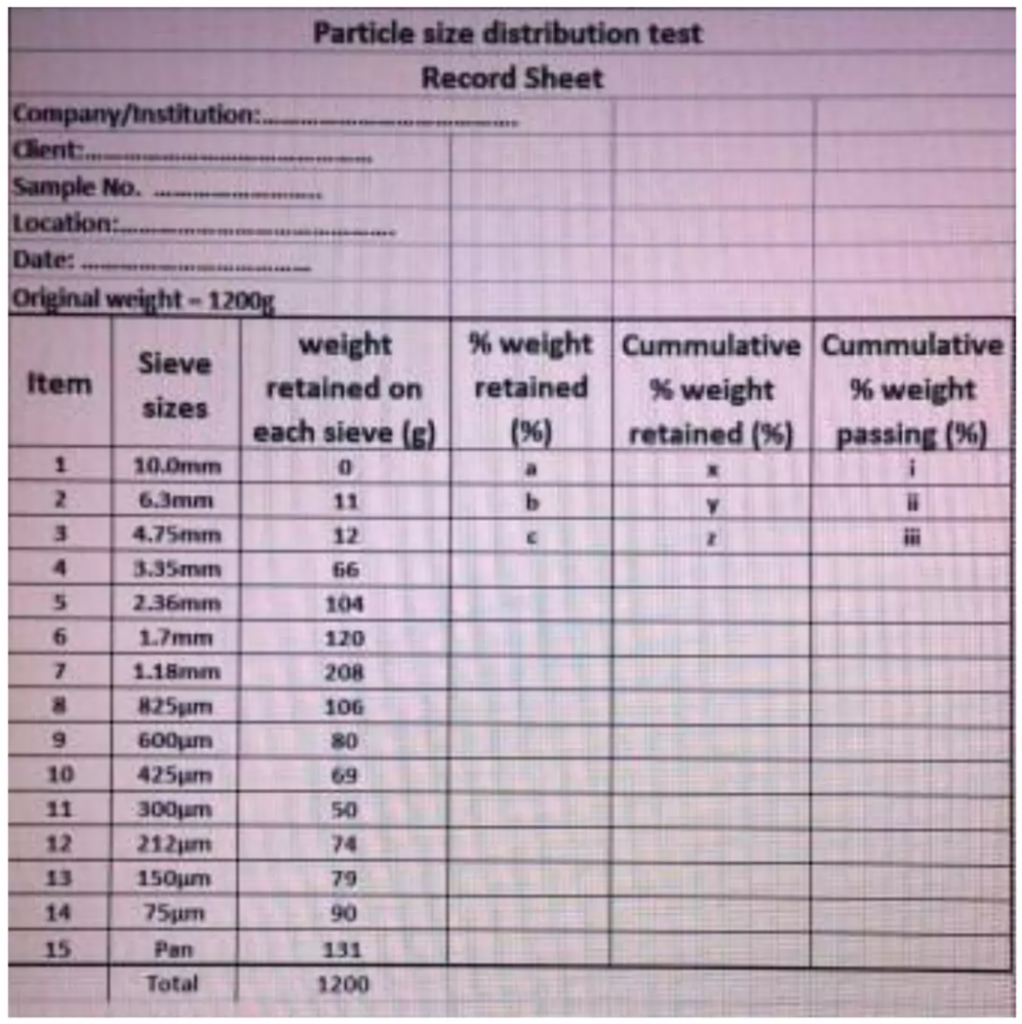
g) Record the weight of particles retained on each sieve in a record sheet corresponding to that specific sieve.
h) Repeat the same procedure for all the sieves in the set.
i) If there are any particles on the pan, record their weight as well. Note that when the sample is washed first, the weight of particles retained on the pan may not be necessary.
j) After recording the weights retained on each sieve, add them up. The total weight should match the original weight of the sample, which is 1200g (1.2kg), as indicated below.

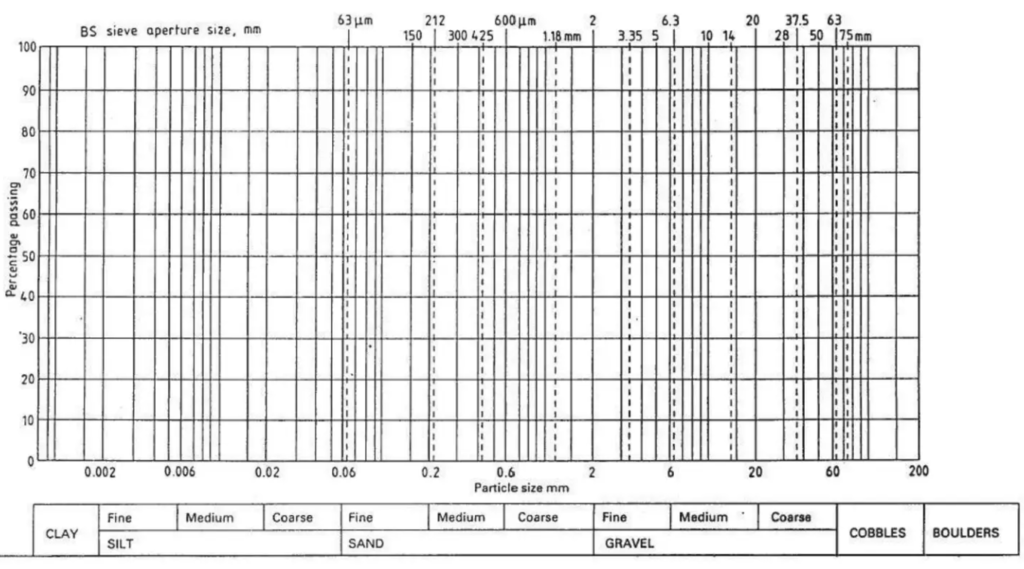
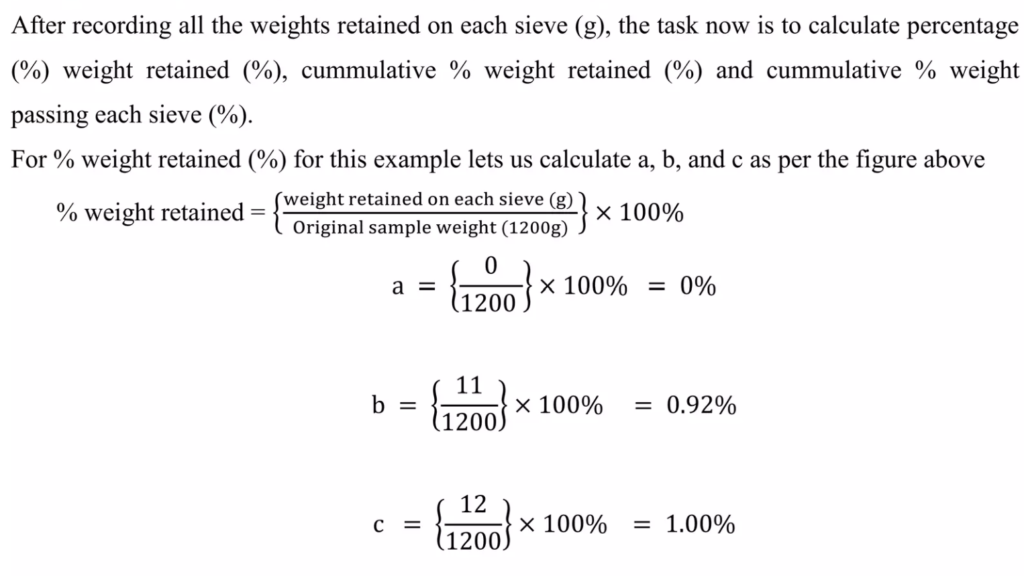
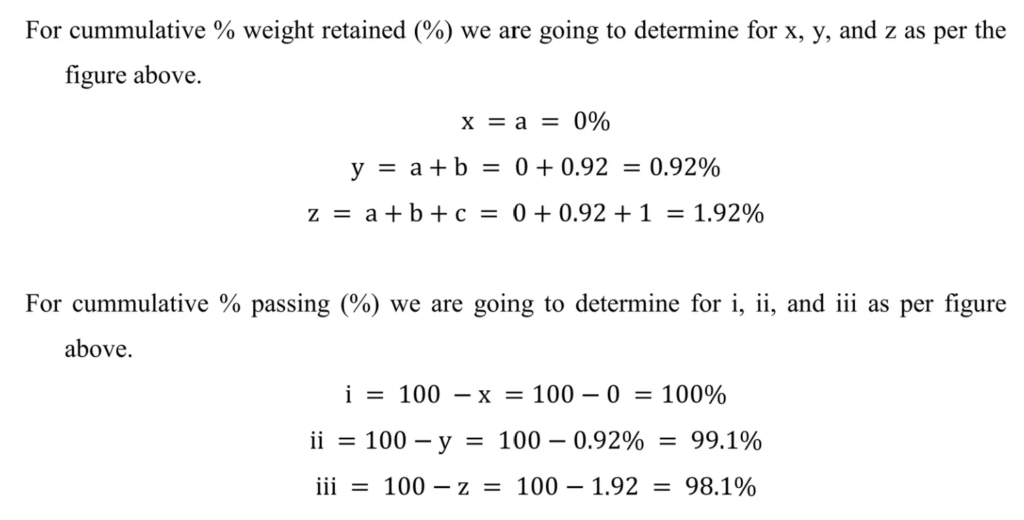
Calculate Passing Percentage
Procedure:
Following picture shows completed test.

2.6 Draw Conclusions
By analyzing the plotted graph, one can determine whether the fine aggregates/sand particles exhibit a well-graded or poorly graded distribution (uniformly graded or gap graded). Additionally, the graph provides data points that can be utilized in the calculation of the uniformity coefficient and coefficient of curvature.