This article is about Grouting Procedure for Equipment related to topic of Base Plate Grouting as per Saudi Aramco or International Standards. This questions can be useful for who are attending CBT Aramco Test or other international test for Mechanical or Civil QC Inspector or Engineer.

Grouting Procedure for Equipment | Base Plate Grouting
Purpose:
These recommended practices (PIP) are intended to provide recommended procedures, practices and checklist for the installation and pre-commissioning of new and reapplied machinery for petroleum, chemical and gas industry services facilities. In general this, recommended practices are intended to supplement vendor instructions and the instruction provided by the original equipment manufacturer (OEM) should be carefully followed with regards to equipment installation and checkout.
Most major topic of these recommended practices are subdivided into section of installation Design and Installation with the intent being that each section can be removed and used as needed by the appropriate design or installation personnel.
1. The concrete surface shall be roughened to provide a key for bonding. Any concrete laitance or unsound material must be removed. Removed all dust by suction or compressed air. The roughened and clean surface should then be protected from subsequent contamination.
2. The concrete surface shall be continuously saturated with water for at least 24 hours before grouting. Remove all free water before grouting.
3. Before placement, metal surfaces shall be cleaned of all paint, grease, oil, loose rust or other contaminants.
4. If anchor bolts are to be grouted, anchor bolt sleeves, holes and similar items shall be cleaned of all debris, dirt and water using an oil free air compressor or vacuum. Concrete in the hole shall be saturated with water for 24 hours and the water removed just prior to grouting when using grout.
5. Any anchor bolt sleeve or hole shall be grouted before pouring grout under the plate. This is necessary to ensure that the grout maintains contact with the plate. If total placement is attempted in one pour, air and unremoved water may rise to the grout surface. This will result the grout settlement and reduce the contact areas of the plate.
6. Form works shall always be rigid, sufficiently tight fitting, and sealed to prevent leakage. It shall extend to at least 25 mm above the highest grout elevation under the machine base. Form shall be coated with compatible from oil or wax to facilitate form removal. Care shall be taken to prevent contamination of the concrete surface or the underside of the machine base with form release agent.
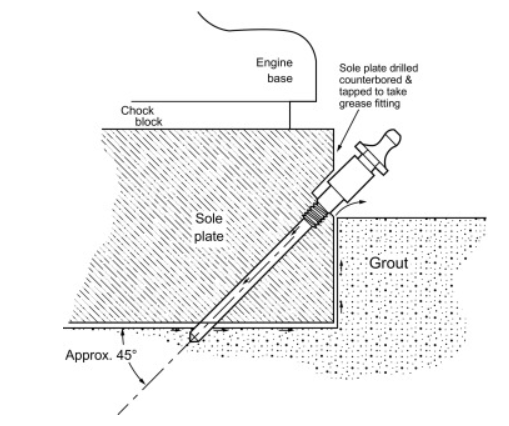
7. Grout placement shall start from one side of the base plate and flow to the other side. The form shall be constructed to provide a method of developing a head on the placement side. Forms shall have also sufficient clearance to permit rodding and tamping if required. Form work on the placement side shall extend to the bottom of the plate to form the head box. The head box should begin 50 to 100mm away from the plate and slope away of about 450. The slope allows the grout to be poured under the plate with a minimum of turbulence and air entrapment. The form on opposite side should be 50 to 100mm from the plate and should extend to at least 25 mm above the bottom of the plate. The height of the head box depends on the distance the grout must flow. In general, the height of the head box above the bottom of the plate should be about 1/5 of the travel distance of the grout.
8. Grout powder and water shall be mixed using method and equipment which will results in a grout with uniform consistency which is free of lumps. For plastic flowable and pourable grouts, horizontal shaft mixers with a stationary drum are preferred. In most instances, initially the dry powder shall be added to approximately 70% of the total recommended water content while mixing takes place. The remaining 30% of water shall be added to the grout at the continues rate while mixing continues. Mixing shall continue until a homogenous grout appears. This usually takes 3 to 5 minutes. Allow the mix to stand so that any entrapped air is freed before pouring.
9. Portable revolving drum concrete mixers are not recommended.

10. Mixing of small quantities of plastic, flowable, or fluid grout in a bucket using a propeller type mixer and drill is acceptable provided the drill speed is slow enough to prevent air entrapment.
11. Hand mixing is not recommended as it does not provide sufficient energy to disperse constituents and break up lumps.
12. All placements shall be made from one side of the plate. Placement shall begin at one end of the plate and continue at that point until the grout rises above the bottom of the plate on the opposite
side of the plate.
13. To facilitate grout compaction and flow, rodding, tamping or flexible strapping in short stroke while maintaining adequate head of grout is recommended. Preferable method to ensure flow and compaction of the grout below the base plate is to use long pieces of double flexible sheet strapping or chains. The forward movements of the strap or chain will assist in the flow of grout into place.
14. After placement of grouts, they shall be protected from excessive moisture loss and from the extremes of temperature. Moisture is retained by the process of curing. Curing can be conducted by keeping exposed areas wet at least 7 days, Continuous moist curing after placement results in higher compressive strength of the grout and better durability. Moist curing is generally achieved by continual hosing or sprinklers or by applying wet hessian or plastic sheeting over the exposed surface. The surfaces should be left wet for at least 7 days before the surface is permitted to dry.
15. Grouting materials is clean, dry, unopened containers and has been stored at a temperature of approximately 21 °C for 48 hours prior to grouting.
16. Expansion joints shall be made from 25 mm thick closed cell neoprene foam rubber and shall be place 1.2 m to 2.4 m intervals in line with the anchor bolts and perpendicular with the center line of the base plate
17. Expansion joints shall be glued into position prior to the grout pour with the silicone rubber (RTV) or elastic epoxy seam sealant (liquid rubber).
18. Mounting plate jack screw shall be liberally coated with paste wax or grease to prevent grout adherence. Liquid waxes and oil are not permitted. Care must be taken to prevent from wax from contacting the concrete foundation or metal surfaces that will be in contact with the grout.
19. All other sole plates are then installed and leveled with respect to the reference plate. Individual sole plate elevation are to be set to a tolerance of ±0.06 mm (±0.0025 inches) with respect to the reference plate 20. Sole plate level is to be set longitudinally and transversely to within 40 micrometers per meter (0.0005 inches per foot) with no more than 13 micrometers (0.005 inches) elevation difference between any two points taken on an individual sole plate. In addition each pair of sole plates (where more than one sole plate is used under an individual piece of equipment) shall be at the same elevation to within 13 micrometers (0.005 inches)
21. Sole plate level can be achieved by adjusting the jacking screw, shimming sub sole plates or dual wedges with adjusting screws and then snugging the anchor bolt nuts to hold the sole plate in place.

The following keywords for this topics are:
1. Base Plate Grouting Procedure.
2. Grouting Handbook Pdf.
3. Pump Base Plate Grouting Procedure.
4. Base Plate Grout Specification.
5. Purpose of Grout Under Base Plates.
6. Grouting Equipment and Machinery Pdf.
7. Steel Column Base Grouting.
8. What Is the Necessity of Doing Machine Grouting.
Quality Control Mechanical Interview Questions | CBT Aramco
PIPING QC CBT QUESTIONS | FLANGE JOINT TIGHTENING METHODS
Piping QC Notes CBT Aramco | PIPE FIT-UP AND TOLERANCES
Piping QC Notes & CBT Aramco | Piping Erection & Installation
For more knowledge please check Ebooksterminal.com