The Rebound Hammer Test, also known as the Schmidt Hammer Test or Swiss Hammer Test, is a non-destructive testing method used to assess the compressive strength or hardness of concrete and other construction materials. It provides a quick and convenient way to estimate the quality and consistency of concrete in structures such as buildings, bridges, and dams.
What is Rebound or Schmidt Hammer Test?
Concrete quality assessment is crucial for both ensuring the quality of new constructions and evaluating existing structures, particularly when upgrading them to meet modern seismic codes. Non-destructive testing (NDT) methods play a significant role in this process, and one commonly used method is the rebound or Schmidt hammer test. This method is favored for its simplicity and affordability. However, its reliability remains somewhat uncertain, leading to ongoing research in this field.
The concept of using surface hardness as an indicator of concrete quality dates back over 130 years. Still, it wasn’t until the early 1950s that Schmidt proposed using it to estimate concrete strength. This idea gained immediate attention from both the scientific and professional communities. Initially, researchers aimed to establish a universal calibration curve, assuming that various factors like concrete maturity, moisture, surface finish, composition, aggregate type, and hardness had a negligible impact on the test. Early calibration curves indicated doubts about the feasibility of a single universal curve.
Recent research, especially in the past two decades, has shown that the rebound hammer test results are significantly influenced by concrete type (including aggregate size, water-cement ratio, and admixtures) and environmental conditions (such as moisture, maturity, curing, surface carbonation, etc.). This has led to a wide dispersion of calibration curves obtained in various studies.
Recent scientific findings have confirmed that the rebound hammer cannot serve as an absolute measure of concrete strength and should ideally be calibrated for the specific type of concrete it is applied to. Several codes and guidelines have imposed limits on the use of the Schmidt hammer, restricting its application to assessing concrete uniformity, identifying poor-quality or deteriorated regions within a structure, and estimating in-place strength only if a specific correlation is developed for that concrete type.

Rebound Hammer Test Principle:
The rebound hammer test is based on the principle that the hardness of the surface being tested affects the rebound of the hammer. Harder surfaces will cause the hammer to rebound less, while softer surfaces will result in a higher rebound. This rebound is directly related to the compressive strength of the concrete or other materials being tested.
Rebound Value: The rebound value obtained from the test is often referred to as the “rebound number” or “rebound index.” This value is a numerical representation of the rebound distance of the hammer from the surface, and it serves as an indicator of the material’s hardness and, by extension, its compressive strength.
Factors Affecting Results:
- Mix Characteristics: The properties of the concrete mix, including its composition, aggregate type, water-cement ratio, and curing conditions, can significantly influence the rebound values. Variations in these mix characteristics can lead to variations in the test results.
- Angle of Inclination: The angle at which the rebound hammer is held or the direction in which it is struck against the surface can affect the rebound values. Consistency in the angle of inclination is important for accurate and repeatable results.
- Member Characteristics: The specific characteristics of the structural member being tested, such as its size, shape, and surface condition, can impact the rebound values. Irregularities or variations in the member’s surface may result in different rebound readings at different locations.
These factors highlight the importance of conducting the Rebound Hammer Test with proper technique and considering the specific conditions of the concrete or material being evaluated. It’s essential to follow standardized testing procedures and, when necessary, to interpret the results in the context of the material’s mix design and the characteristics of the structural elements being tested. This test provides valuable information for quality control, but it should be used in conjunction with other testing methods for a comprehensive assessment of concrete structures.
Schematic Diagram:
The schematic diagram we have provided below illustrates the various parts of a rebound hammer, which is used for conducting the Rebound Hammer Test on concrete surfaces. Each part plays a specific role in the operation of the device. Here’s a brief description of each part:
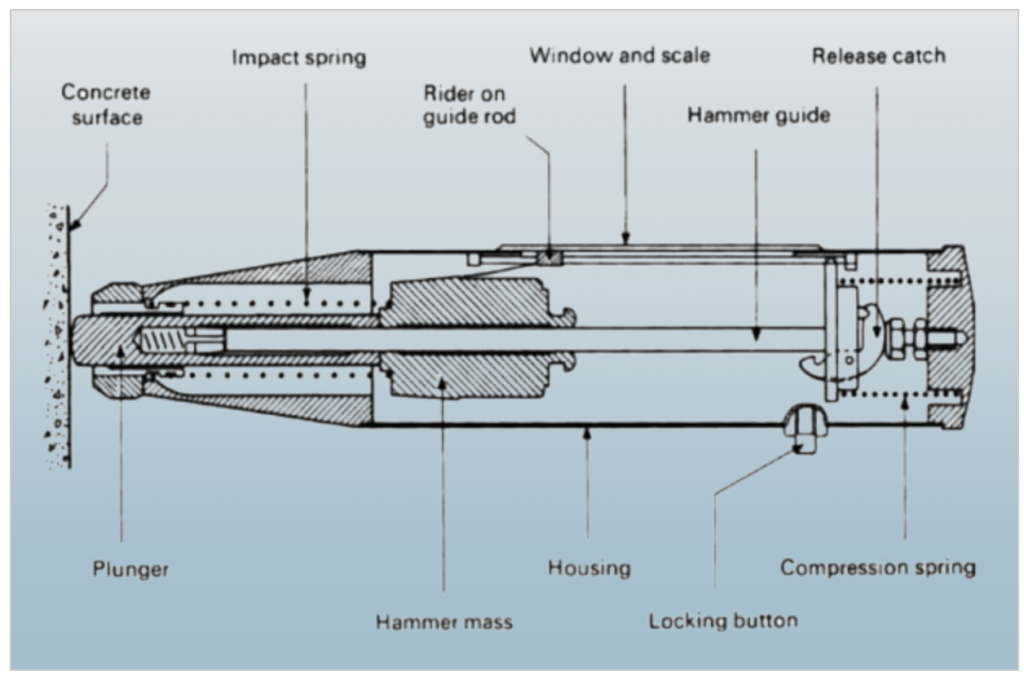
- Concrete Surface: This represents the surface of the concrete structure or material being tested. The rebound hammer makes direct contact with this surface during the test.
- Impact Spring: The impact spring is a crucial component of the rebound hammer. It is responsible for absorbing the energy generated when the hammer strikes the concrete surface.
- Rider on Guide Rod: The rider on the guide rod is a movable component that travels along the guide rod. It is directly connected to the hammer mass and impacts the concrete surface during testing.
- Window and Scale: The window and scale are typically located on the housing of the rebound hammer. They provide a visual indication of the rebound value or rebound number obtained during the test.
- Hammer Guide: The hammer guide helps ensure that the impact is delivered perpendicular to the concrete surface. It guides the motion of the hammer mass during the test.
- Release Catch: The release catch is a mechanism that holds the hammer mass in a cocked or raised position before the test. When released, it allows the hammer mass to strike the concrete surface.
- Compressive Spring: The compressive spring is used to provide resistance and control the rebound of the hammer mass after it strikes the concrete surface.
- Locking Button: The locking button is often used to lock or secure the impact spring and rider in place before the test. It ensures that the hammer is properly positioned for testing.
- Housing: The housing encloses and protects the internal components of the rebound hammer. It also provides a stable grip for the operator during testing.
- Hammer Mass: The hammer mass is a weighted component that is released to strike the concrete surface. The rebound distance of this mass is used to calculate the rebound value.
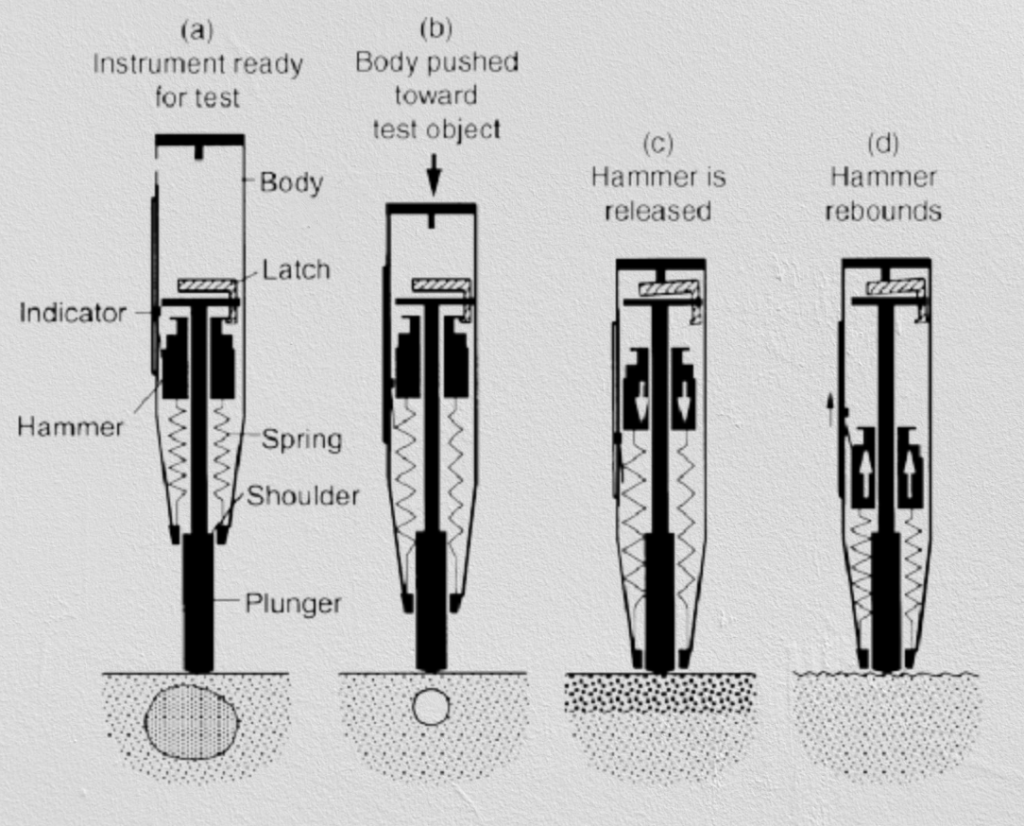
In the Rebound Hammer Test, the operator releases the hammer mass from a raised position, allowing it to impact the concrete surface. The rebound distance of the mass is observed and recorded using the scale and window on the housing. This rebound distance is then converted into a rebound number, which is used to assess the hardness and, indirectly, the compressive strength of the concrete.
The rebound hammer is a portable and non-destructive testing device commonly used for assessing the quality and integrity of concrete structures in construction and maintenance applications.
Rebound Hammer Test Procedure
The test procedure you’ve described is for conducting the Rebound Hammer Test on concrete surfaces. This test is used to assess the hardness and, indirectly, the compressive strength of the concrete. Here’s a step-by-step breakdown of the procedure:
Equipment Needed:
- Rebound hammer
- Test anvil (a hard and flat surface for calibration)
- Protective gear (e.g., safety goggles, gloves)
- Record-keeping materials (e.g., a notebook and pen)
Procedure:
- Prepare the Equipment:
- Ensure that the rebound hammer is in good working condition.
- Place the test anvil on a stable surface where you’ll conduct the test.
- Calibration (Optional):
- If necessary, calibrate the rebound hammer by pressing it gently against the test anvil. This step helps ensure accurate readings.
- Record the calibration value if applicable.
- Preparation for Testing:
- Stand in a stable position, ensuring your feet are firmly planted.
- Hold the rebound hammer with both hands, firmly gripping the housing.
- Make sure the release catch (if present) is engaged to hold the hammer mass in the raised position.
- Initial Plunger Position:
- Place the plunger or impact rod of the rebound hammer in contact with the concrete surface you intend to test.
- Apply light pressure to the plunger, allowing it to extend to the ready position for the test.
- Maintain a consistent and gentle pressure on the plunger while preparing for the test.
- Gradual Pressure Increase:
- Gradually increase the pressure on the plunger, continuing to press it against the concrete surface.
- The goal is to apply a gradual and uniform increase in pressure until the hammer impacts the concrete.
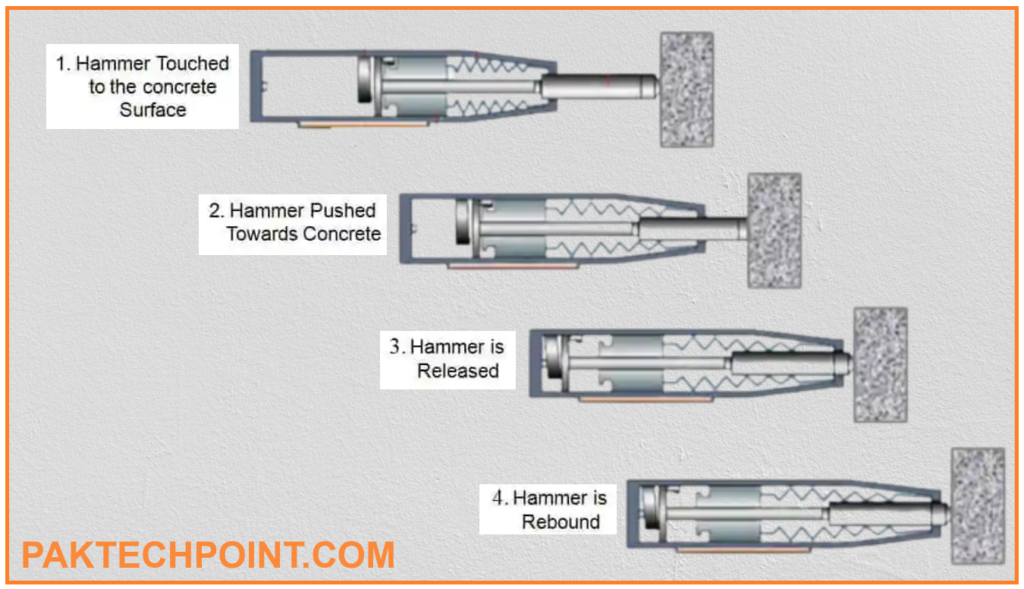
- Impact and Rebound:
- When the pressure reaches a critical point, the release catch (if engaged) will release, allowing the hammer mass to strike the concrete surface.
- Observe and feel the impact as the hammer mass strikes the concrete. This impact energy is transferred to the concrete.
- Multiple Readings:
- Take multiple readings to ensure accuracy and reliability. Typically, you should aim for an average of about 15 readings.
- Record each rebound value obtained during the test. These values are often indicated by a scale or displayed digitally on the rebound hammer.
- Analysis:
- Calculate the average rebound value from the readings you’ve recorded. This average value is commonly referred to as the “rebound number” or “rebound index.”
- Interpretation:
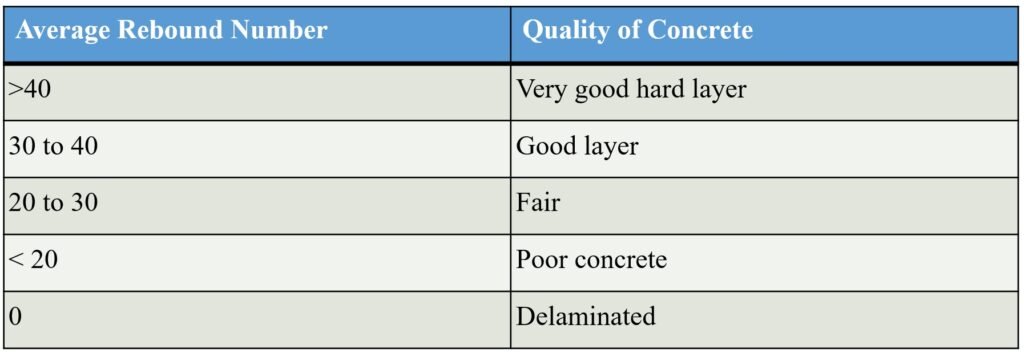
- Use the rebound number to assess the hardness of the concrete surface. Higher rebound numbers often correspond to harder and more dense concrete, while lower numbers may indicate softer or deteriorated concrete.
- The rebound reading on the indicator scale has been calibrated by the manufacturer of the rebound hammer for horizontal impact.
- Documentation:
- Record the average rebound number and any relevant information about the test location and conditions in your notebook or data sheet.
- Safety Precautions:
- Always wear appropriate safety gear, such as safety goggles and gloves, when conducting tests on concrete surfaces.
- Maintenance:
- After testing, properly maintain and store the rebound hammer to ensure its accuracy for future tests.
The Rebound Hammer Test provides valuable information about the quality and integrity of concrete structures and is commonly used in construction and civil engineering applications.
Calculation of Compressive Strength From Rebound Number:
To calculate the compressive strength from the rebound number, follow these steps:
Calculate Rebound Number:
- Measure the rebound number of the concrete cube using a rebound hammer.
Conduct Compressive Strength Test:
- Test the compressive strength of the concrete cube on a compression testing machine.
- Apply a fixed load to the cube, typically around 7 N/mm² when the impact energy of the rebound hammer is about 2.2 N·m.
- Adjust the impact load accordingly for calibrating rebound hammers with different impact energy levels.
Use an Adequate Sample Size:
- Ensure that the concrete cube specimen used for testing is as large as possible to minimize size effects on the results, especially for full-scale structures.
- For rebound hammers with lower impact energy (e.g., 2.3 N·m), you may need a minimum of 80-100 dry concrete cube specimens for calibration.
- For rebound hammers with higher impact energy (e.g., 30 N·m), ensure that the test cubes of concrete are not smaller than 300mm.
Allow for Room Temperature:
- Keep the entire concrete cube specimen at room temperature for at least 24 hours after removing it from the curing period before conducting the test with the rebound hammer.
Establish a Correlation:
- Establish a correlation between the rebound numbers and the strength of wet-cured and wet-tested cubes.
- It’s essential to establish a correlation between the strength of dry-tested concrete cubes, on which rebound readings are taken, and the strength of wet-tested cubes.
Avoid Testing Wet Concrete Cubes:
- Do not directly correlate rebound numbers from wet concrete cubes to the strength of wet concrete cubes.
Select Testing Points:
- Test only the vertical faces (excluding horizontal) of the concrete cubes as cast.
Take Sufficient Readings:
- Take at least ten readings on each of the two vertical faces that are accessible in the compression testing machine when using the rebound hammers.
- Ensure that the points of impact on the specimen are not closer to an edge than 20mm and are not less than 20mm from each other.
- Avoid impacting the same points more than once.
By following these steps and considering the impact energy, sample size, and testing conditions, you can establish a correlation between rebound numbers and the compressive strength of concrete cubes, which is valuable for quality control and assessment of concrete structures.
Various Factors:
The rebound hammer test, also known as the Schmidt hammer test, is influenced by various factors that can affect its accuracy and reliability. These factors include:
Types of Cement:
- The type of cement used in concrete construction plays a significant role. For instance, concrete made with high alumina cement tends to exhibit higher compressive strength compared to concrete made with Ordinary Portland Cement (OPC). The use of other specialized cements, such as super-sulfated cement, can also affect the correlation.
Type of Aggregate:
- The type of aggregate used in the concrete mix can impact the correlation between the rebound number and compressive strength. Normal correlations are established using standard aggregates like gravel and crushed aggregates. When lightweight aggregates are used, special calibration may be required to obtain accurate results.
Surface and Moisture Condition of Concrete:
- The condition of the concrete surface and its moisture content can influence rebound hammer test results.
- Concrete with a close texture typically provides more reliable results than concrete with an open texture.
- Concrete structures with high levels of honeycombing or no-fines concrete may not be suitable for testing with the rebound hammer.
- The test may overestimate the strength of floated or troweled concrete surfaces when compared to molded surfaces.
- Testing wet concrete surfaces can yield lower strength values, potentially underestimating the actual strength by up to 20% when compared to dry concrete.
Carbonation of Concrete Surface:
- Concrete surfaces that have undergone carbonation (a chemical reaction with carbon dioxide in the air) may exhibit higher strength values when tested with the rebound hammer.
- To obtain accurate results, testing should be performed after removing the carbonated layer, allowing the hammer to rebound on the non-carbonated portion of the concrete.
Type of Curing and Age of Concrete:
- The curing conditions applied to concrete surfaces and the age of the concrete can affect the relationship between hardness and compressive strength.
- Concrete aged between 3 days and 90 days is generally exempt from significant age-related effects. However, for older concrete, specifically calibrated curves may be necessary to obtain accurate results.
Advantages and Disadvantages of Rebound Hammer Test:
| Advantages | Disadvantages |
|---|---|
| Non-destructive testing method | Results influenced by various factors |
| Quick and easy to perform | Variability in correlation curves |
| Portable and widely available | Limited accuracy, especially for high-strength concrete |
| Provides an estimate of concrete strength | Calibration required for specific conditions |
| Suitable for both laboratory and field testing | Not suitable for certain concrete types (e.g., no-fines concrete) |
| Can assess in-place uniformity of concrete | Overestimates strength on troweled surfaces |
| Useful for identifying deteriorated or poor-quality concrete | Underestimates strength on wet surfaces |
| Cost-effective compared to some other testing methods | Requires a clean, dust-free concrete surface |
| Can be used on various concrete elements | Age and curing conditions affect results |
| Provides a rapid indication of concrete quality | Limited accuracy for very high-strength concrete |
| Minimal preparation required | Affected by carbonation on concrete surfaces |
Keep in mind that while the rebound hammer test offers several advantages, it also has limitations and requires careful consideration of influencing factors for accurate results.