How to communicate with the relay?
1. General Requirements:
Install MiCOM S1 Agile software.
Serial Cable RS232 required for Connection.
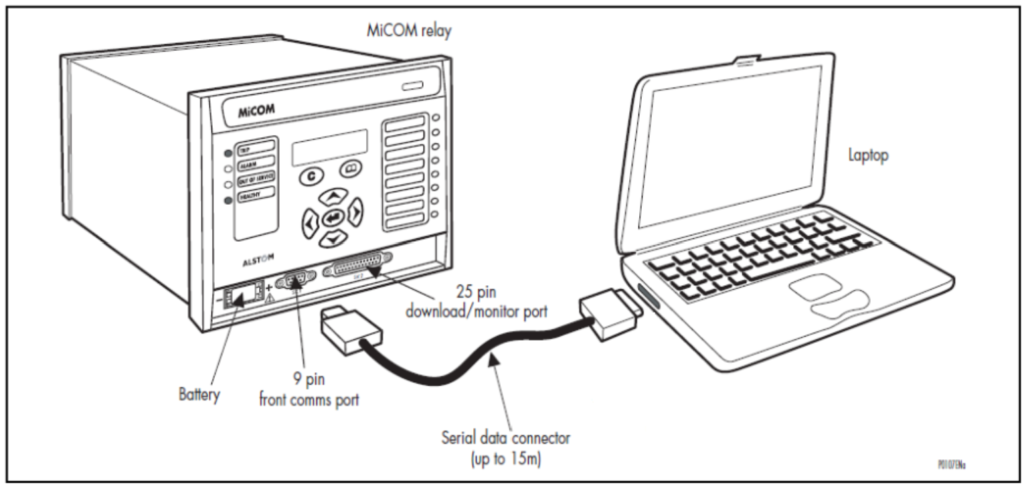
2. Communication Steps:
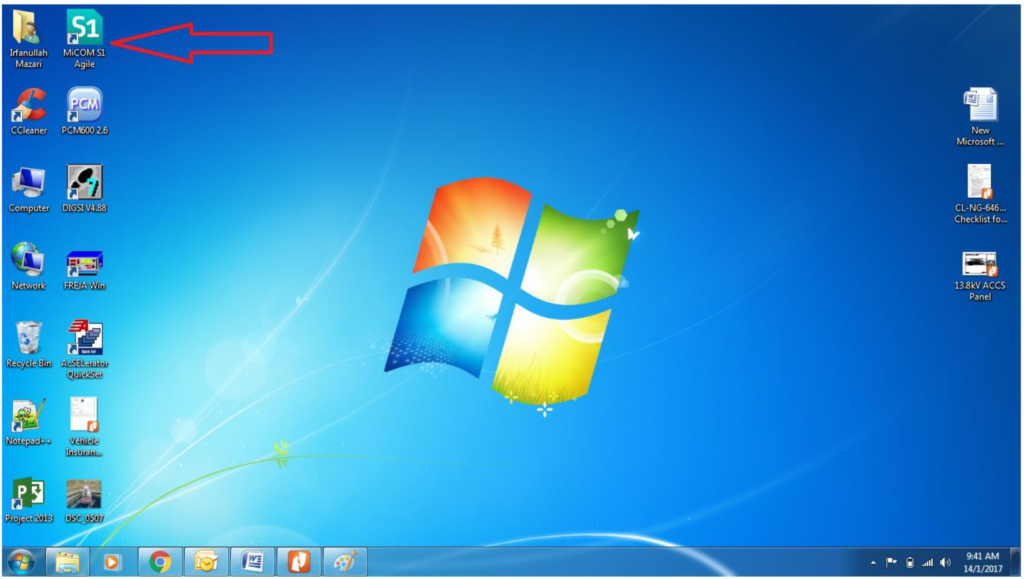
Open MiCOM S1 Agile software.
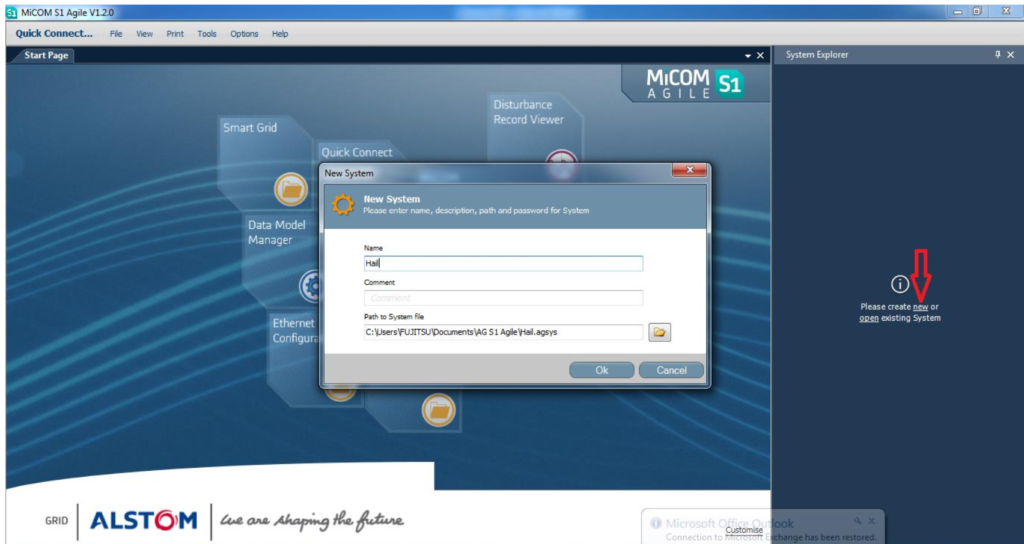
Create the new System.
Right click on New System, Select New Substation.
Right click on Substation Name, Select Voltage Level
Right click on Voltage Level, Select Bay Name.
Right Click on Bay Name, Select New Device.
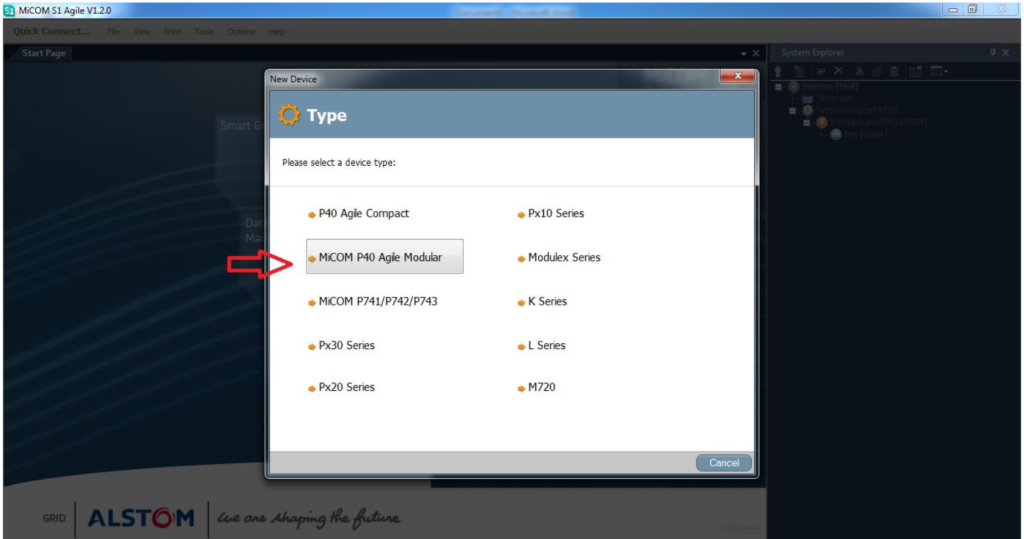
Or single click on Quick Connection.
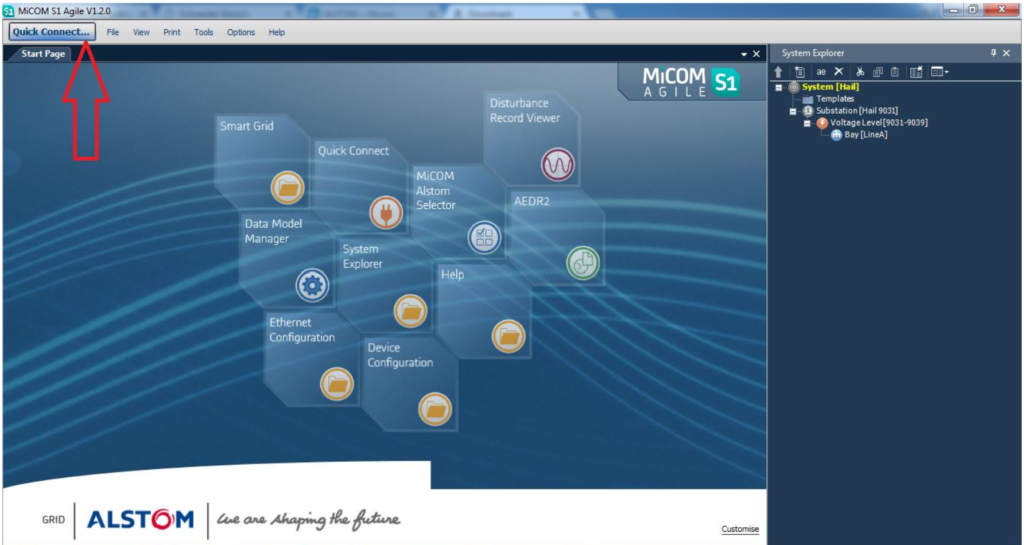
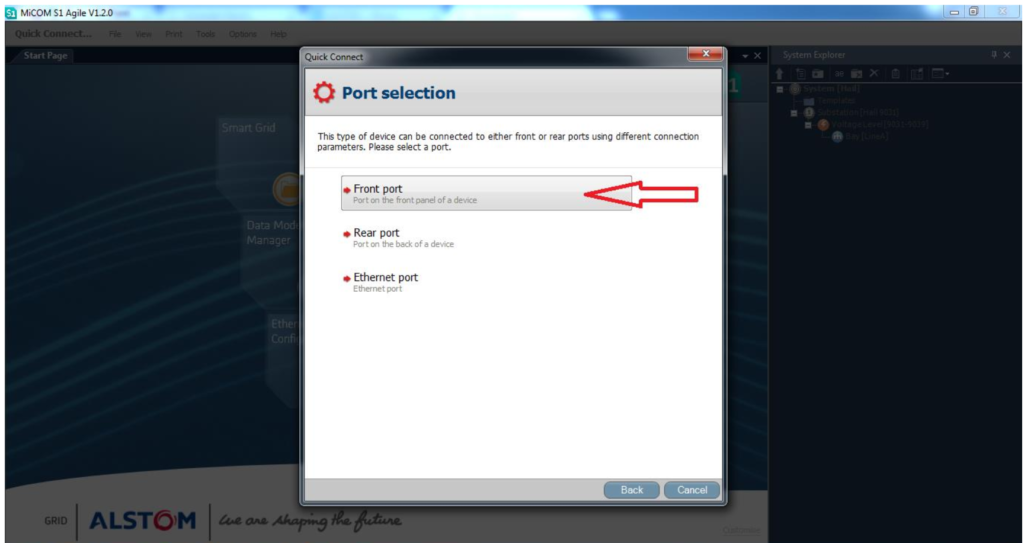
Click on Front Port.
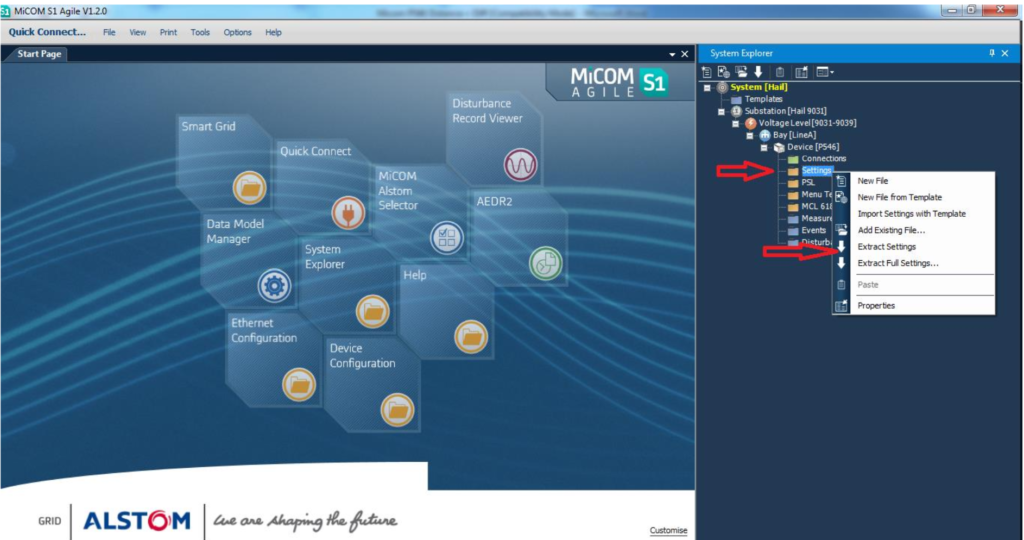
After Connection Established, than Right click on setting, select Extract Setting. And right click on PSL, Select Extract.
Double Click on Setting File “000” and apply setting as per requirement.
Double Click on PSL, and Configured Binary Input and binary Output as per requirement.
How to test Differential?
If there is no communication, than Differential will be blocked, so to avoid absence of fiber
optic communication then Go to Relay Manu → Select Commissioning test → Test Loop Back
Test Loop Back: Disabled, Internal and External. Select Internal.
1. Enable the Setting.
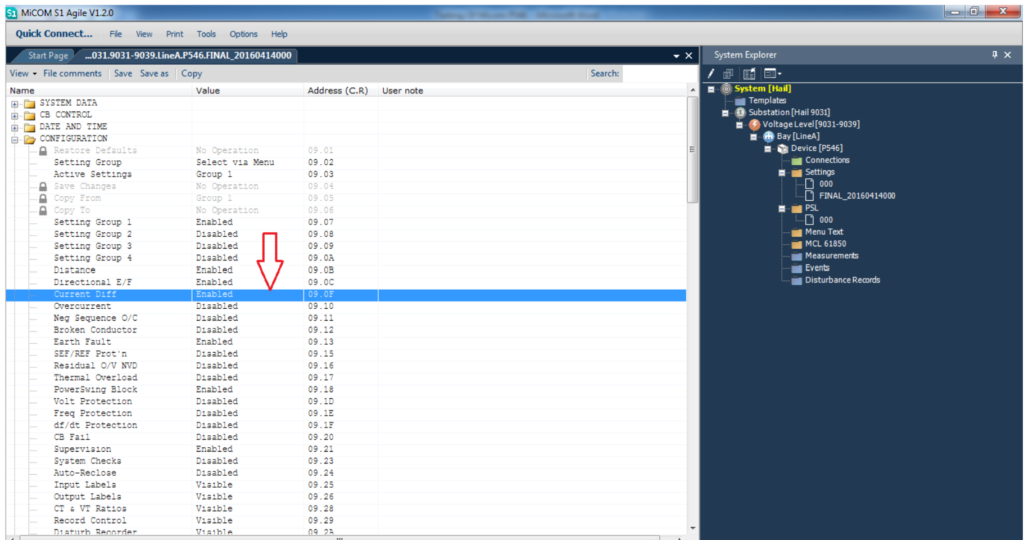
a. Apply the Setting as per Requirement.
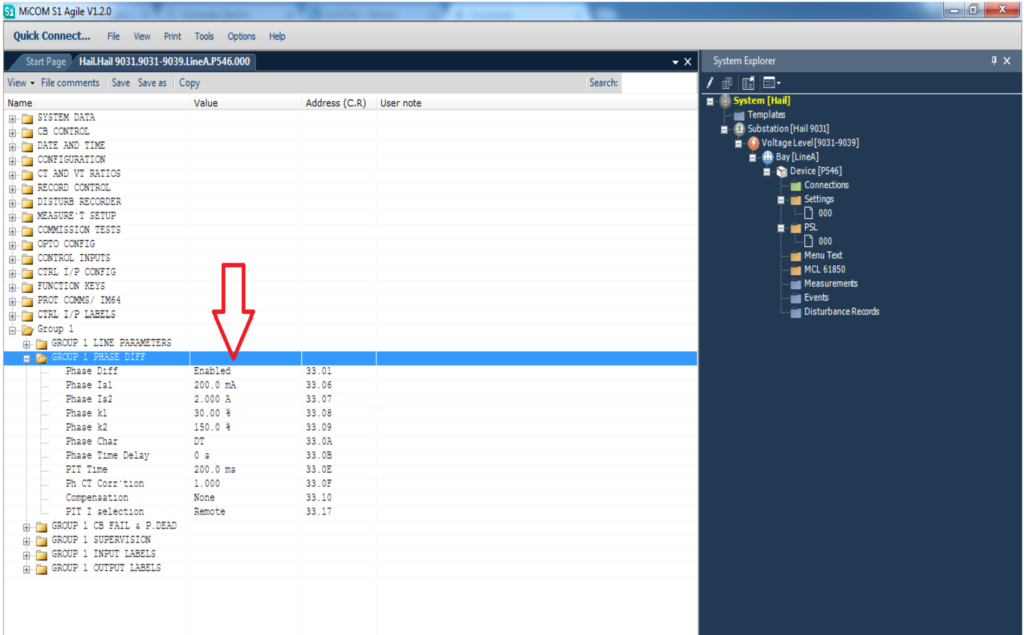
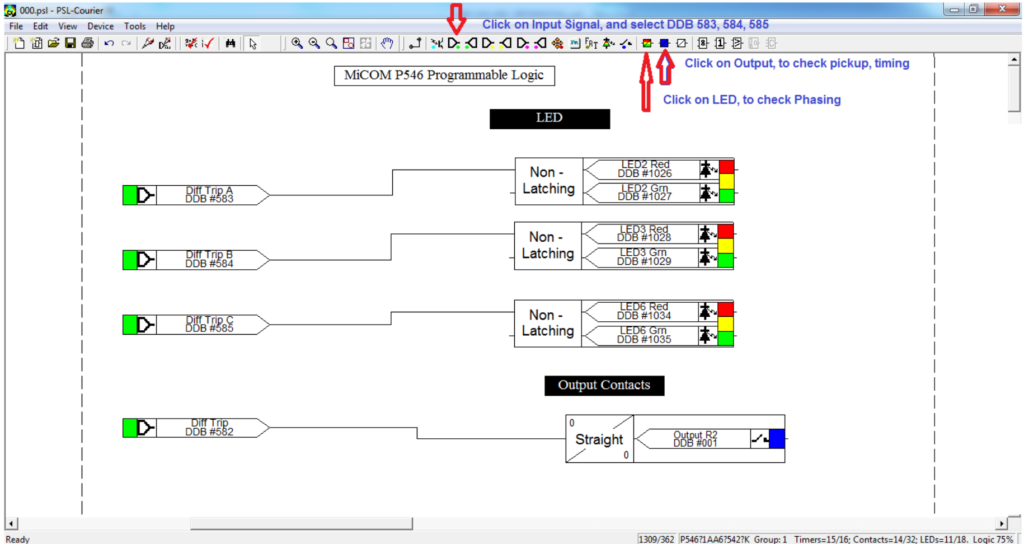
b. Adjust PSL, Select DDB 583,584,585 for Phasing from Input single in PSL logic and for DDB 582 configure any output for Timing Test.
Relay settings.
| Item | Description | Setting |
| 1 | IS1 | 0.20 A |
| 2 | Is2 | 2.0 A |
| 3 | K1 | 30 % |
| 4 | K2 | 150 % |
| 5 | T | 0 Sec |
Testing Procedure:
In Freja First page, inject as showing in table for phase segregation and check the related
LED. Than for timing select Freja 2nd page and connect a binary output to get the timing.
| 63.39 | 63.39 | 63.39 |
| 0° | 240° | 120° |
| 0 | 0 | 0 |
| 0° | 240° | 120° |
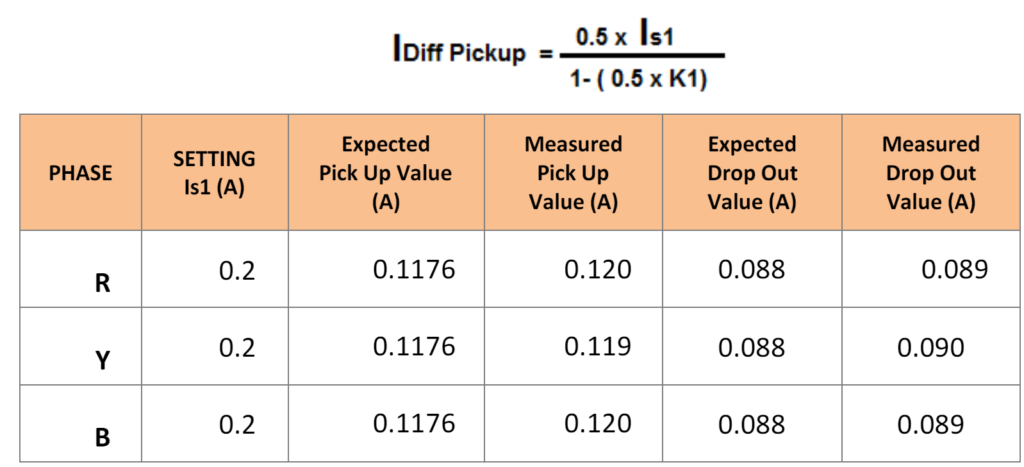
For Pickup Increase the Phase A gradually and check the LED, Repeat for Phase B and C also. For Timing, Go to Freja 2nd page, and inject the current values two times more than the Differential setting and noted down the Tripping Timing. Following Formula will be used to calculate Idiff.
BIAS CHARACTERISTIC TESTING.
Lower Slope:
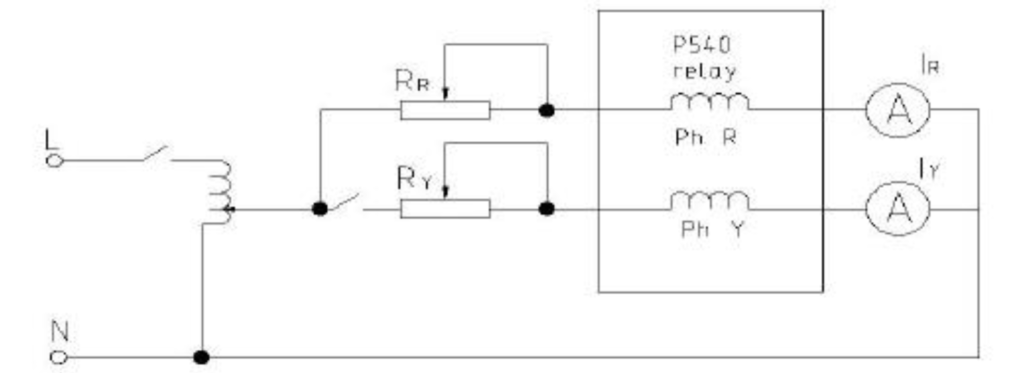
A current is injected into the R phase which is used as the bias current and another current is injected into the Y phase which is used as differential current. Inject a bias current of 1A in the R phase. The relay will trip and any contacts associated with the R phase will operate. Slowly increase the current in the Y phase until phase Y trips. Record the phase Y current and check that it corresponds to the following equation;
Id Calculated = 0.5 * (Is1 +I bias K1) A
Where; IS1; The Basic Diff Current Setting.
K1; the Lower Percentage Bias Setting.
Set; IS2 = 4 In
To check more than one point at the same slope, Change the bias current value and the
equation above can be used, and also for other differential settings ” Different slopes, Is1 ”.
Apply the above procedure for each phase.

Upper Slope:
Repeat the test and check the result with the following equation;
Id Calculated = 0.5 X [(I bias X K2) – {(K2 – K1) X IS2} + IS1] A
Is2; The Bias Current Threshold Setting.
K2; The High Percentage Bias Setting.
IS1 & K1 are Fixed; IS1 = 0.2 A , K1 = 30 %

How to test Distance?
In MiCOM relay, there are Four Zones. Zone 1, 2 and 3 are forward Zones, and Zone-4 is
Reversed Zone.
- Enable The Setting.
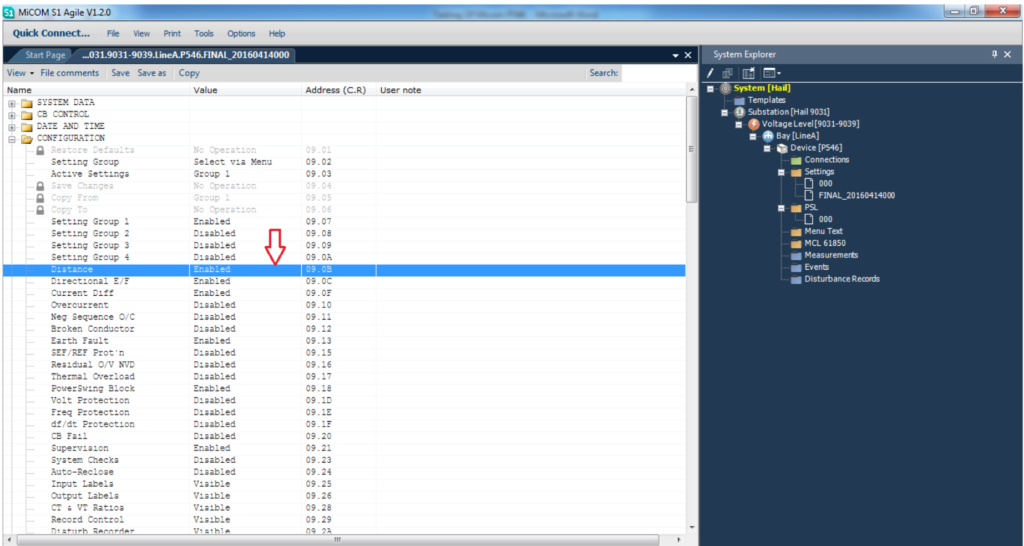
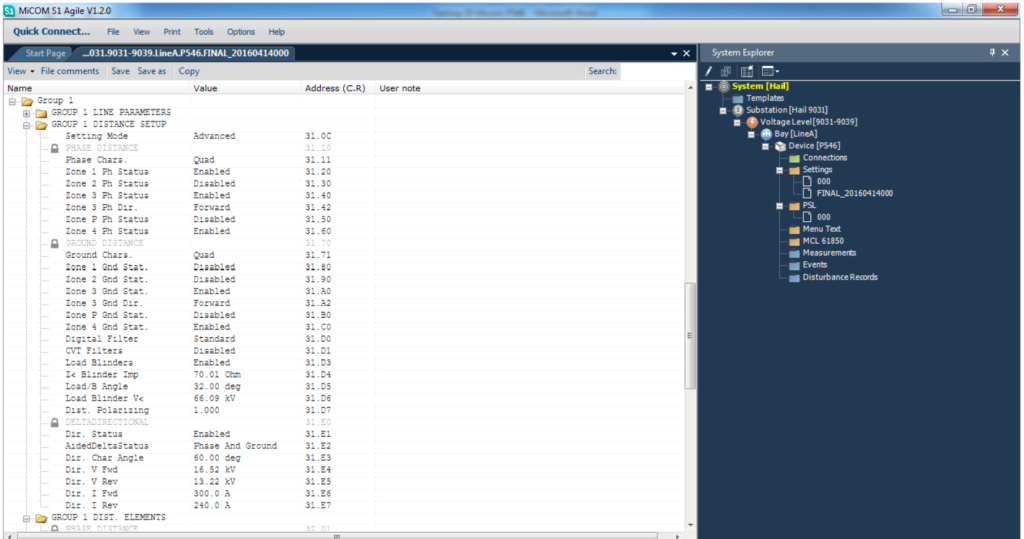
2. Apply setting as per requirement.
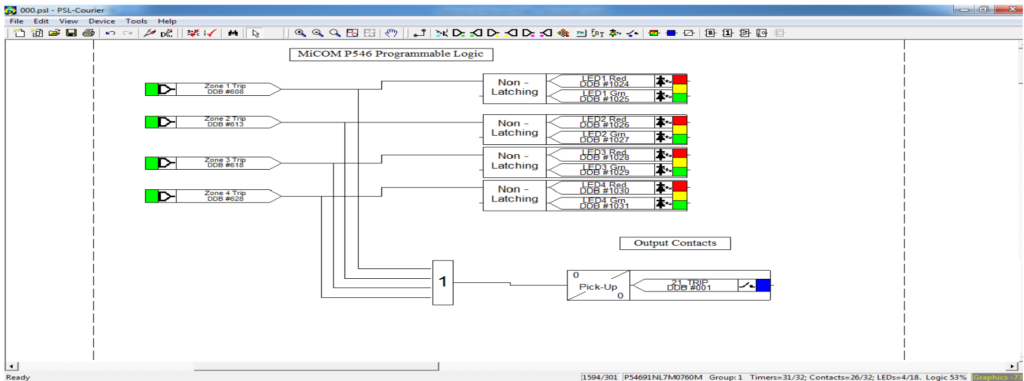
- Adjust The PSL, Select DDB 609 to 632 for Phasing from different zones, through Input single in PSL logic and select DDB 608 for zone-1 Timing, DDB 613 for Zone-2 Timing, DDB 615 for Zone-3 Timing and DDB 628 for Zone-4 timing, configure any output for Timing Test.
How to Draw Zones?
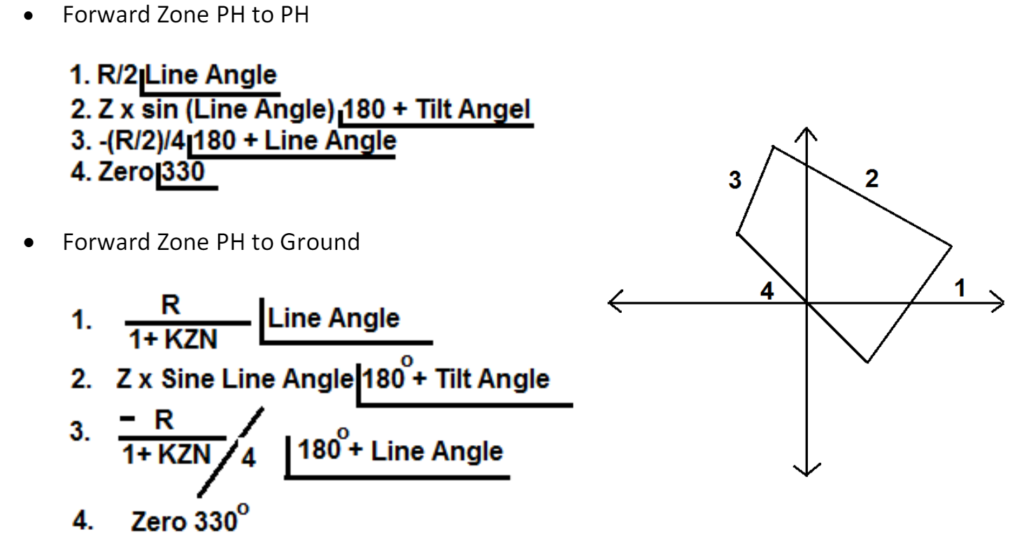
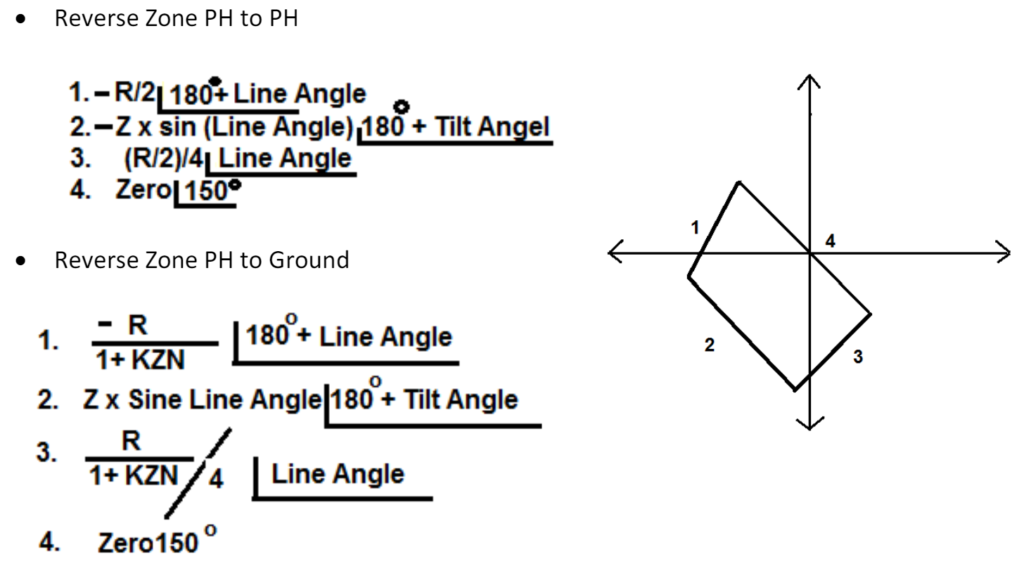
How to Draw Graph in Freja Win?
Open Freja Win Software, First check Freja is Online with Laptop. Then Click on Distance.
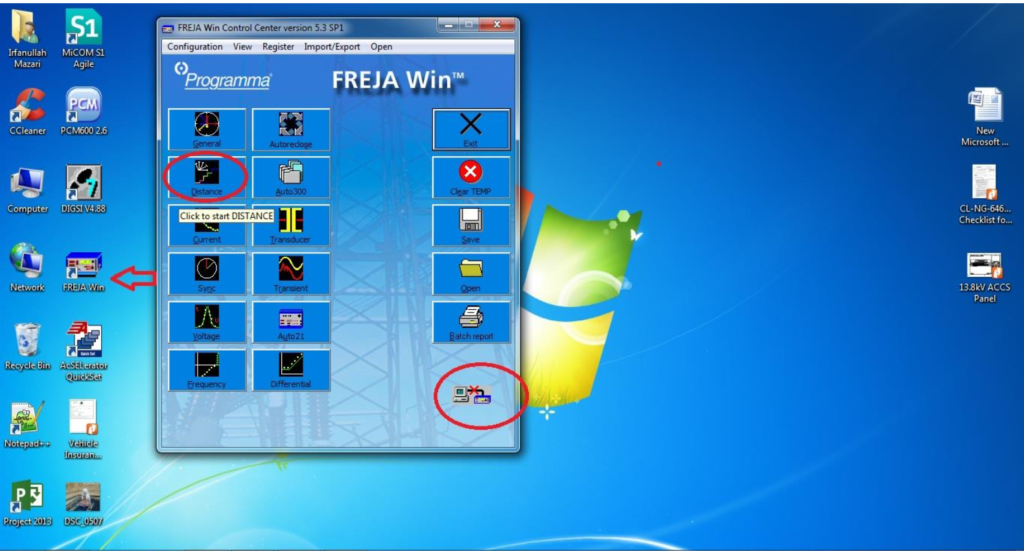
Enter All The required information, then click on Proceed. Click on New Test.

Click on RX Ramp, than Select Edit/Create Graph.

Following window will open; create a graph as discussed above.
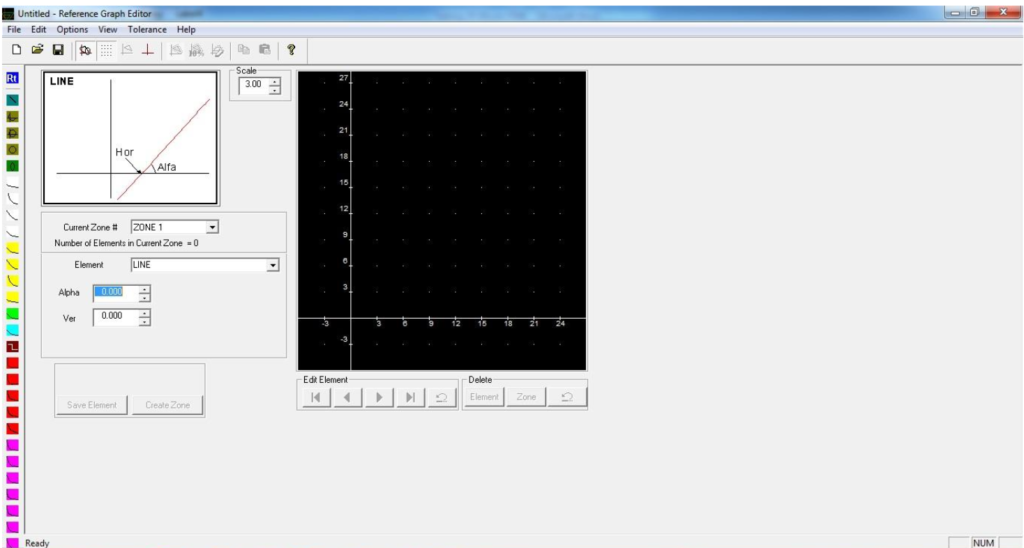
Once all lines finished. Click Create Zone, and Save Element.
Select RX Ramp, and add ramps.
Distance communication Scheme Check.
POR Scheme:
Select POR Scheme from setting as shown in Fig.

Testing Procedure:
Send Logic is Z2 and Trip Logic is Z2 + CR, Inject Z2 fault with carrier, it will trip instantaneously and without carrier it will delay trip.
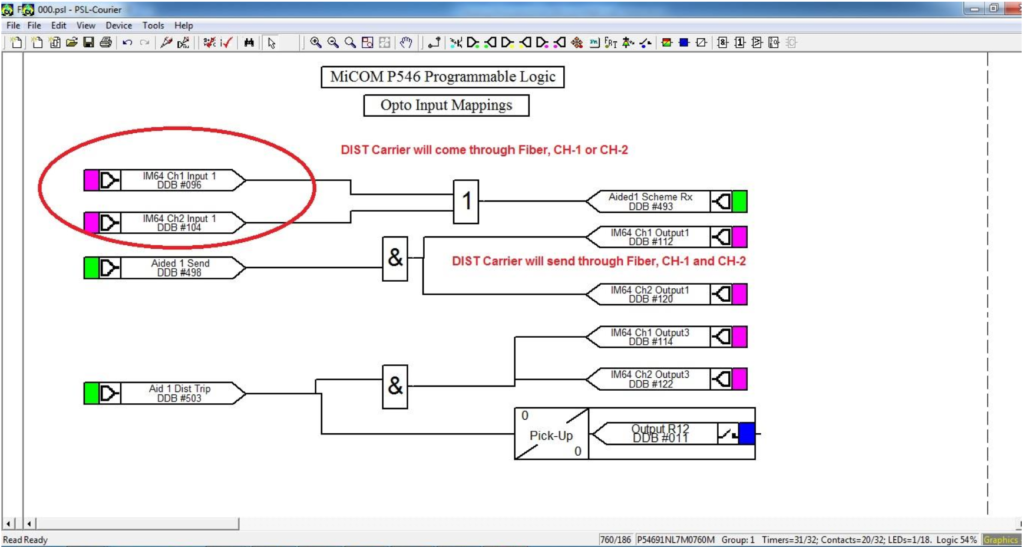
Configure one input for Aid 1 Receive, if there is PSE Panel, carrier will come through PSE Panels, as shown below.
But if the Communication is through Fiber, than PSL logic will be as shown below.
PUR Scheme:
Select PUR scheme from setting. Testing Procedure will be same, the only difference is. Send Logic is Z1 and Trip Logic is Z2 + CR, Inject Z2 fault with carrier, it will trip instantaneously and without carrier it will delay trip.
Blocking Scheme:
Select Blocking scheme from setting. Testing Procedure will be same, the only difference is. Send Logic will be reverse zone. Trip Logic is Z2 with no carrier.
Inject Z2 fault without carrier, it will trip instantaneously and with carrier it will delay
trip.
SOTF:
SOTF means that, when there is a Fault in the line, Fault can be in Z1, Z2 and Z3, the relay
should trip instantaneously. There are two kinds of Detection for SOTF.
- External Close Command.
- Dead Line detection.
Test Procedure:
Enable the function.
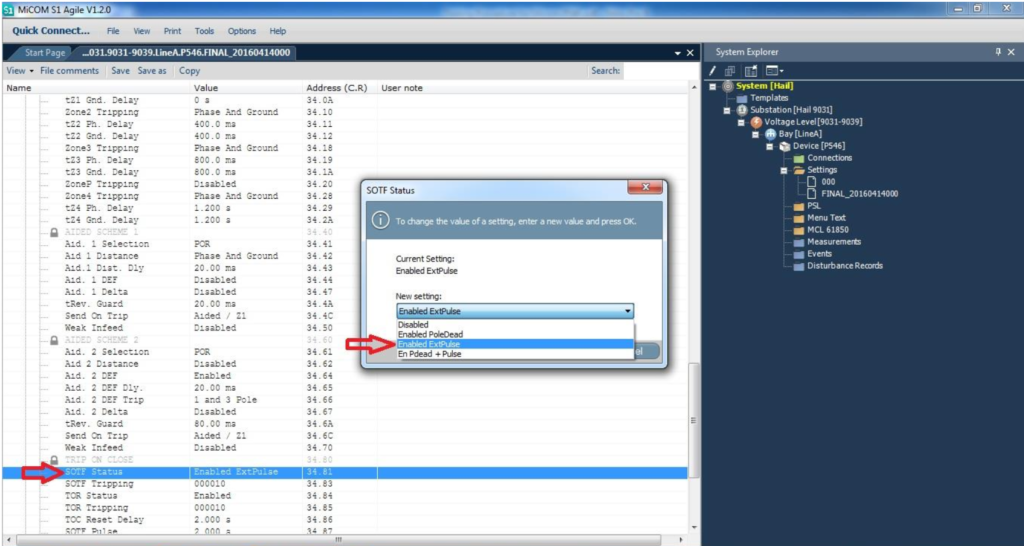
Select the Zone, which need to trip with SOTF.

Adjust PSL, Select any Binary input from CB Closed command and connect it with the output signal DDB 488, SET SOTF. And connect input signal DDB 709, 710,711 and 712 ( SOTF Trip) and connect it with any Binary output.
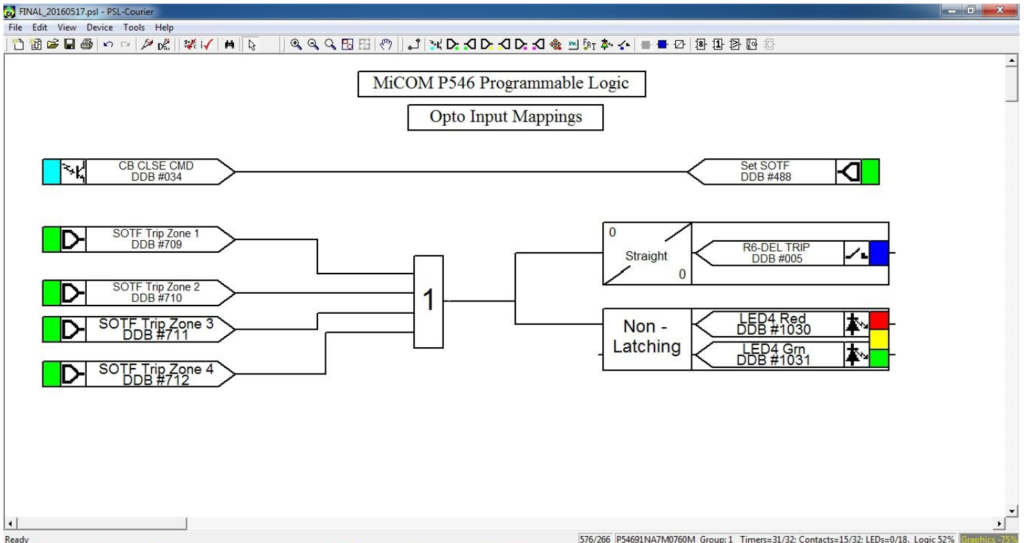
Testing procedure:
Freja 2nd Page, inject fault in any zone, during starting Feja, give a binary input to the relay that is CB Manual Close. Once relay receive BI, and same time relay noticed there is fault in zone 2, or zone 3. It will trip instantaneously. There are two ways to give BI to the relay, first give direct positive to the BI, or connect one single pole MCB, and thorough MCB you can give voltage to the Binary Input.
For Dead Line Detection, in Freja First page we will simulate pre fault stage as Voltage and Current both will be zero, and in 2nd page we will simulate z2 or z3 fault. For this that in PSL logic Manual Close command from CB is not required.
VTS Function:
Enable the function.

Loss of Single Phase:
- In PSL configuration assign (VT fail alarm ) to LED.
- Apply ( 3- ⱷ ) V & I with balanced angle and the current must be more than :
- (1) VTS I 2
- (2) I> current
- Start decreasing single phase at a time until LED pickup at fixed voltage (V2 = 10v) and take measurement when LED pick up and drop off .
- To test time delay apply 2 pages one healthy and the other with VTS condition and take time from the third page.

Loss of Two Phases:
Same procedure will repeat, but instead to single phase reducing, here we will reduce two phases together.
Loss of Three Phases:
Same procedure will repeat, but instead to single phase reducing, here we will reduce all three phases together.
ABSENCE OF ( 3-Phases) AT ENERGIZING:
Starting voltage should be inject below 30 V (Not Gradually) to simulate energizing under loss of voltage.
VT MCB check:
Switched off the MCB, and check the behavior.
Power Swing:
There are some cases similar to the Fault cases, but in actual its not a fault case. Enable
the PSB Function.

Types of Power Swing:
There are two kinds of Power swing.
- Power Swing Indication.
- Power Swing Blocking.
In Power Swing Indication, is to give indication of the detection of existing PSB in the
network without taken any action to block distance element.
In Power Swing Blocking, this selection of PSB divided into three different scheme:
a. Allow Trip:
This scheme give the ability to choose which zone allowed to trip during PSB in the
network.
b. Blocking :
This scheme gives the ability to choose which zone not allowed to trip continuously
during PSB in the network.
c. Delayed Unblocking:
This scheme give the ability to choose which zone allowed to trip with its own zone
time after preventing this zone from trip ( BLOCKED ) for a period of time equal to the
(PSB Unblocking Delay Time ) exist in address ( 3D.21 ) during PSB in the network.
Testing procedure:
Select PSB STAUTS address ( 3D.01 ) to be Blocking and all zones select Blocking.
take BO contact to sense ( any trip of all zones ) and take LED for the detection from
PSL
P.SWING DETECTOR address ( DDB- 1014 ) to detect PSB and LED for the Blocking
from PSL POWER SWING address ( DDB_ 1015 ).
Using Freja Win General Mode to make3 stages.
1st stage: Simulate by 3 phase current and voltage up to 1000 ms.
2nd stage: Simulate by 3 phase current and voltage , but the values should be in the
power swing reach.
3rd stage: Give Zone-1 Fault for 5000ms.
So, the relay action depends on the relay setting.
If we select, delay Blocking Mode, it will block the tripping of Z1, upto blocking delay
time, than will trip by Z1 time.
If we select the Blocking Mode, it will block the tripping until the Power swing
disappeared.
If we select the indication mode, than it will trip by Z1 time without any delay.
Same procedure will be repeat for Z2, Z3 and Z4.

How to test DEF?
Enable the setting.
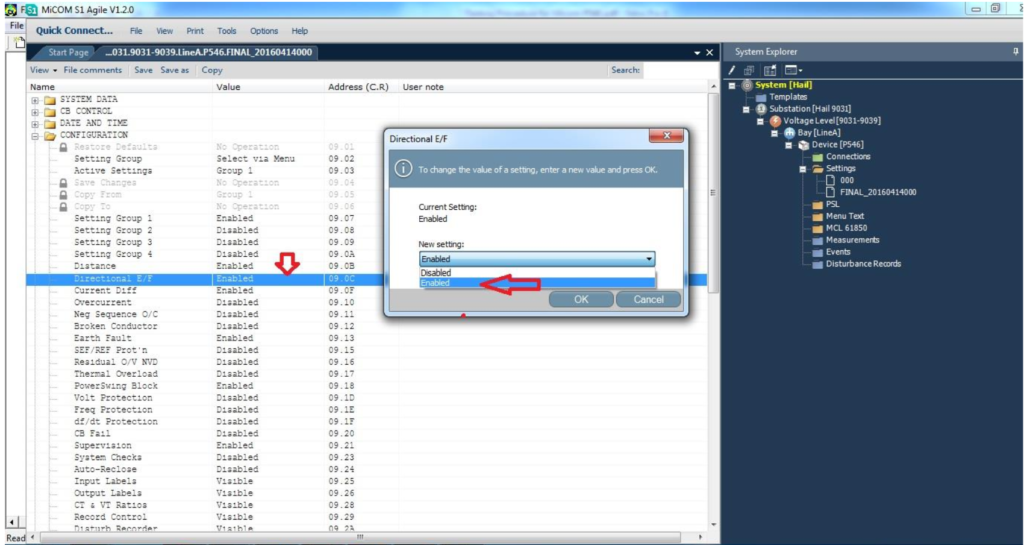
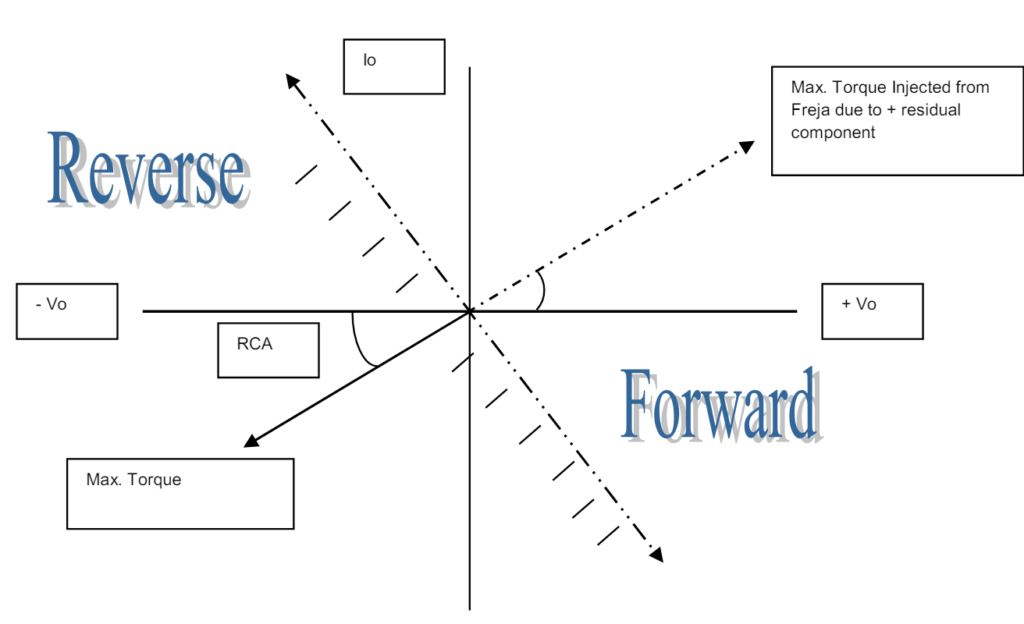
Enable the DEF Status, and DEF Polarizing as Zero Sequence.

For Directionality Test, applied voltage as following, and change the voltage angle.
For Forward Direction: 330 to 150.
For Reversed Direction: 150 to 330.
| 56.4 | 66.39 | 66.39 |
| 0 | 240 | 120 |
| 1 | 0 | 0 |
| 0 | 240 | 120 |
Adjust PSL as shown.

For POLARIZING VOLTAGE (3V0) Testing:
Applied three phase healthy voltage and single phase current, and reduce testing phase
voltage gradually until relay picked up.
| 66.39 | 66.39 | 66.39 |
| 0 | 240 | 120 |
| 1 | 0 | 0 |
| 0 | 240 | 120 |
3Io Testing:
Applied voltage as shown, and gradually increase the single phase current, until relay picked up.
| 56 | 66.39 | 66.39 |
| 0 | 240 | 120 |
| 0 | 0 | 0 |
| 0 | 240 | 120 |
DEF Communication Scheme Test:
POR Scheme:
Select POR scheme as shown in figure.

Send Logic is forward fault, and Trip Logic is forward fault + CR,
Inject forward fault with carrier, it will trip instantaneously and without carrier it
will delay trip.
Configure one input for Aid 2 Receive, if there is PSE Panel, carrier will come
through PSE Panels, as shown below.
If need to measure send time, than in PSL logic need to take a output contact
from aided 2 send DDB 514.
Freja First Page:
| 66.39 | 66.39 | 66.39 |
| 0 | 240 | 120 |
| 0 | 0 | 0 |
| 0 | 240 | 120 |
Freja 2nd Page:
| 55 | 66.39 | 66.39 |
| 0 | 240 | 120 |
| 0.5 | 0 | 0 |
| 0 | 240 | 120 |

But if the communication is through fiber than PSL logic will be.

Blocking Scheme:
Select Blocking scheme from setting. Testing Procedure will be same, the only difference
is. Send Logic will be reverse fault. Trip Logic will be forward fault without carrier Received.
Freja 1st Page:
| 66.39 | 66.39 | 66.39 |
| 0 | 240 | 120 |
| 0 | 0 | 0 |
| 0 | 240 | 120 |
Freja 2nd Page:
| 56 | 66.39 | 66.39 |
| 180 | 60 | 300 |
| 1 | 0 | 0 |
| 0 | 240 | 120 |
How to test Synch and Auto Recluser?
Synch Testing.
Enable the Setting.
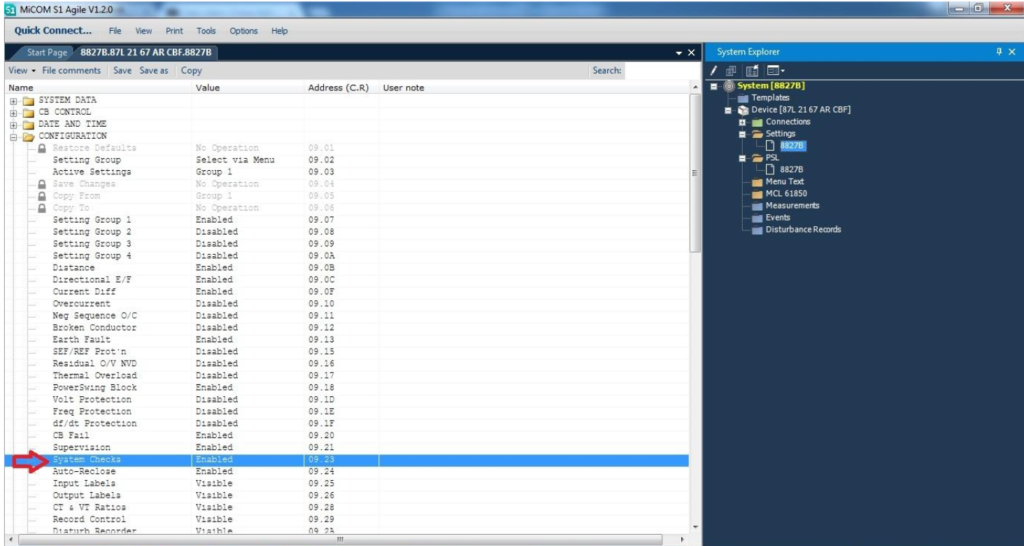
Check CT and VT ratio.

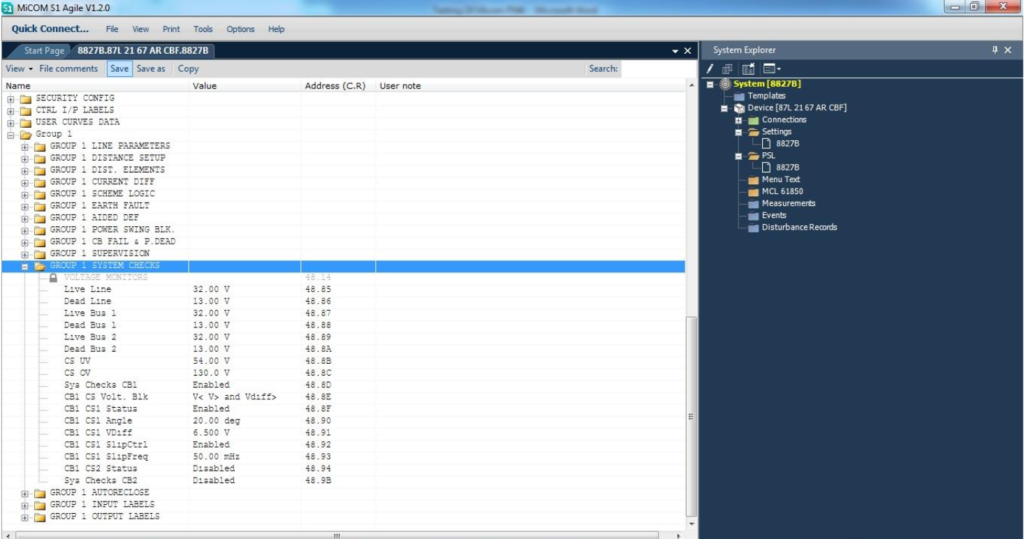
Apply setting as per requirement.
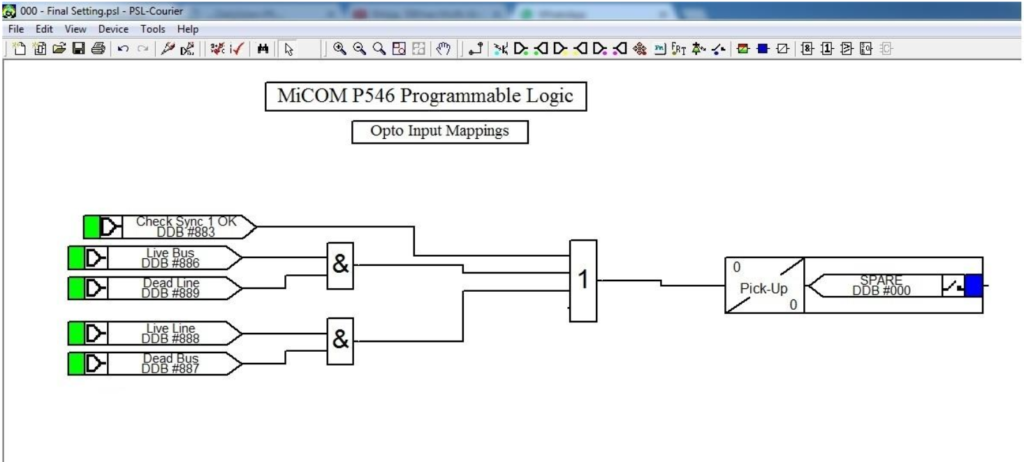
Adjust PSL.
Testing Procedure.
There are Four Types of Synch.
1) LIVE Line and DEAD BUS
2) LIVE BUS and DEAD LINE
3) DEAD BUS and DEAD LINE
4) LIVE LINE and LIVE BUS
ΔU Test (Voltage Difference Test )
α Test (Phase Angle difference Test )
S Test (Slip Frequency Test)
For ΔU Test In Freja First page,
Set f1 and f2=60Hz, Φ1 and Φ2 = 0, U1=66V, and gradually increase U2, until relay
operate. Noted down the difference. Then, U2= 66V, and gradually increase U1, until relay
operate.
For αTest In Freja First page,
Set f1 and f2=60Hz, and U1 and U2= 66 V, Φ1=0, and gradually increase Φ2, until relay
operate. For S Test open Freja Win, and select SYNCH.

Then, Select U & F Min-Max Window.

Connect LINE voltage connection to the red phase of Freja and connect BUS voltage Connection on Uref. We will keep BUS frequency constant and change the LINE frequency. Now make the frequency value of “AU” same as Uref value and decrease this value slowly until your O/P contact picks up. When we are checking BUS voltage connection, then connect BUS voltage connection to the red phase of Freja and connect LINE voltage connection on Uref. we will keep line frequency constant and change the BUS frequency.
Auto Recluser Testing.
Enable the Setting.
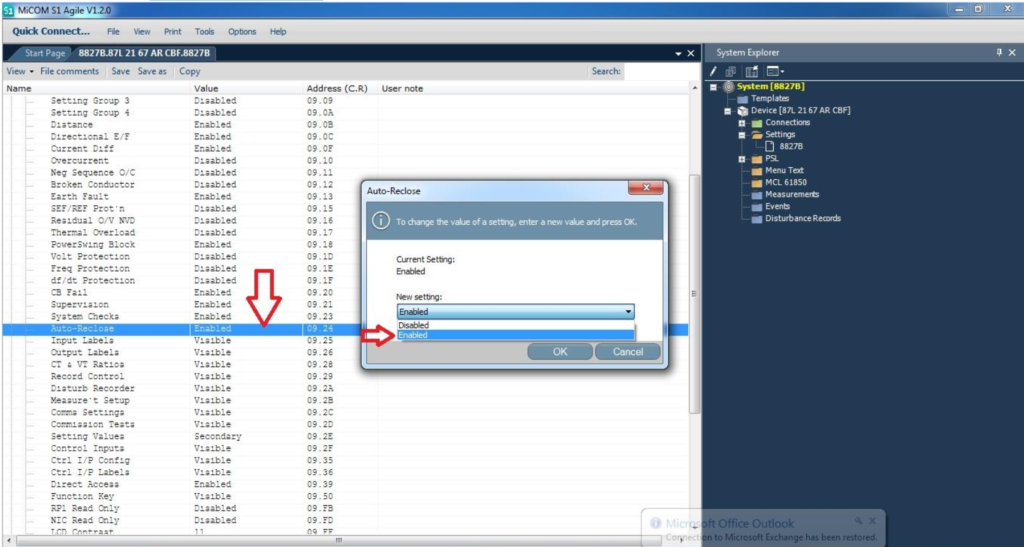
Apply setting as per requirement.
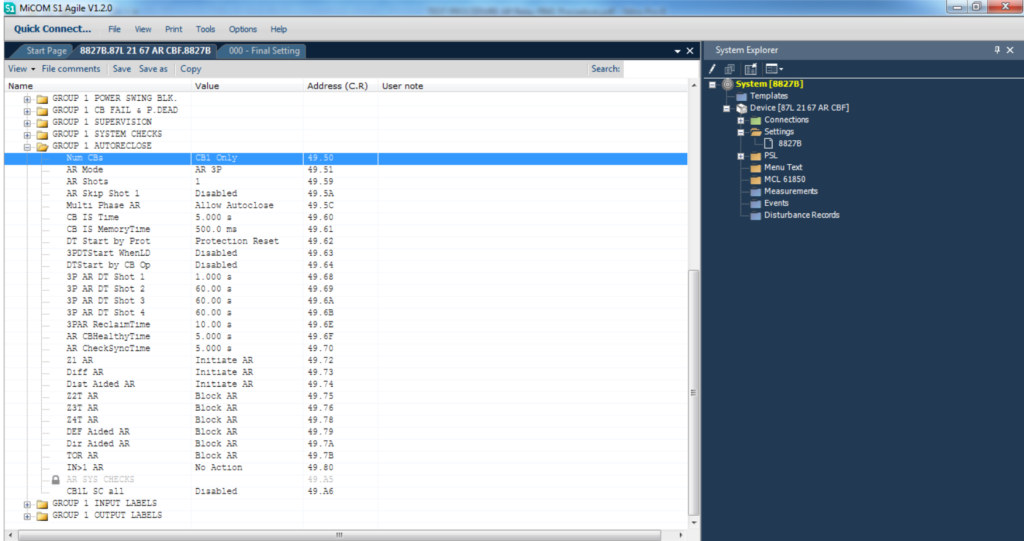
Adjust PSL.

4. Testing Procedure:

Dead Time: it is the time between CB open (AR INTIATION) and CB Reclose.
Reclaim Time: it is the time between CB close commands W/O another trip after this time the relay indicates AR Successful, during this time if another trip comes the relay will go to next shot if enable, otherwise it will be driven to lockout.
Lockout Cases:
a. If protection operates during the reclaim time, following the final reclose attempt,
the relay will be driven to lockout.
b. The relay will also cause an auto-reclose lockout if auto-reclose is in progress.
c. CB Unhealthy or fail in synchronizing.
d. At the end of reclaim time the breaker status is open.
According to the setting done in relay we have to make sequence in Freja300 General page
For example our settings in relay are as follows:
Dead time for 1st shot tD1 = 300ms
Dead time for 2nd shot tD2 = 3 sec
Dead time for 3rd shot tD3 = 3 sec
Dead time for 4th shot tD4 = 3 sec
Reclaim time = 180 sec.
First of all, we would activate two binary outputs from general configuration page of Freja Win (software). One for breaker status and another for AR initiation. Here for breaker status we have taken 52B auxiliary contact i.e. when binary output is open it will show breaker closed and when BO is closed then it will show breaker open. In first stage we should give breaker closed (BO1 open) status without initiation (BO2 open) for more than 5 seconds.
In second stage breaker closed (BO1 open) and AR initiation (BO2 closed) for 20 or 30 ms. In third stage breaker open (BO1 closed) and BO2 open for the time as long as tD1 setting time. After expiring the dead time 1, in fourth stage breaker closed (BO1 open) and BO2 open For complete four shots set the steps according to the settings.
Dead Times Test.
Dead time for first shot tD1.
Set the Binary Output list up to 4 numbers. Number of stage should be two. In first stage time should be equal to the time for how long breaker is closed i.e. 70-50ms in our example.
In second stage time should be more than tD1. Now start the test. The trip time will come in second page; this is the dead time for 1 shot (tD1).
Dead time for second shot tD2:
Set the Binary Output list up to 7 no. Number of stage should be three. Keep the timing of stage1 and stage2 same. In third stage time should be more than tD2 plus the time the breaker is in closed position after first shot.
Now start the test. Trip time will come in 3rd stage. Dead time 2 would be trip time in 3rd stage minus the time, breaker is in closed position after 1st shot.
tD2 = (Trip time in 3rdstage) – (The time, breaker is in closed state after 1st shot.
Dead time for third shot:
Set the Binary output list up to 10 no. Number of stage should be Four. Keep the time of stage1,2 and 3 same. In 4th stage time should be more than tD3 plus the time the breaker is in closed position after second shot.
Now start the test. Trip time will come in 4th stage Dead time 3 would be trip time in 4th stage minus the time, breaker is in closed position after 2nd shot.
tD3= (Trip time in 4th stage) – (The time, breaker is in closed state after 2nd shot.
Dead time for fourth shot:
Set the Binary output list up to 13 no. Number of stage should be five. Keep the time of stage1, 2, 3 and 4 same. In 5th stage time should be more than tD4 plus the time the breaker is in closed position after third shot.
Now start the test. Trip time will come in 5th stage. Dead time 4 would be trip time in 4th stage minus the time, breaker is in closed position after 3rd shot.
tD4= (Trip time in 5th stage) – (The time, breaker is in closed state after 3rd shot.
Reclaim time Test:
For reclaim time go to psl setting and select CB succ 3p AR and connect it to any relay output to stop the Freja as shown in below pic.
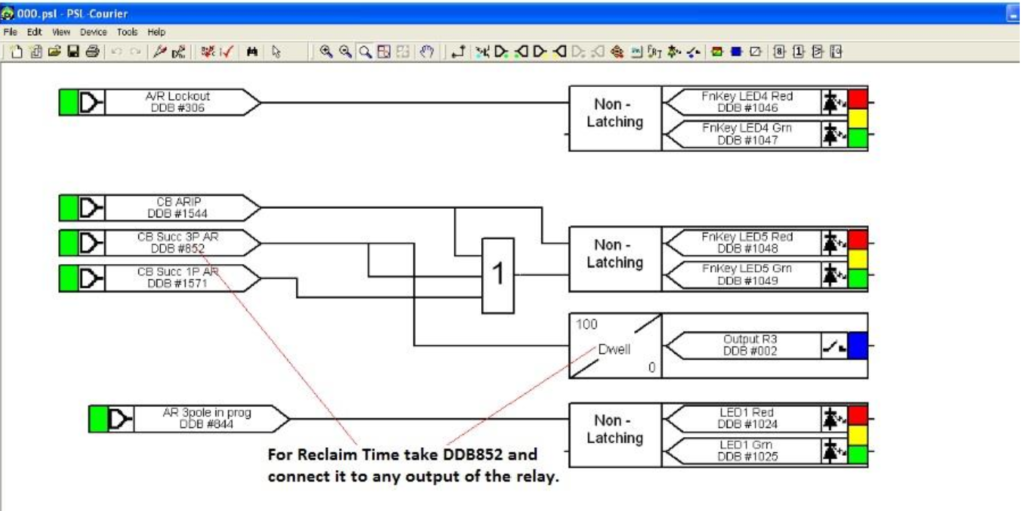
In Freja keep the binary output up to 13 no. Select the six numbers of stages. Keep all five stages unchanged in above testing. Time of sixth stage should be more than reclaim time setting.
First connect relay output 1 (which has assigned for AR close command) to the binary input 1st of the Freja as already connected in previous dead time test. Also take relay output 3 (which has assigned for AR successful close) and keep out of the Freja.
Now start the test, when test will come in 6th stage remove relay output 1 from binary input 1 of the Freja and connect relay output 3 to binary input 1 of the Freja. After expiring of reclaim time AR successful close will come and Freja will stop. Time of 6th page would be the reclaim time.