| 1. | SCOPE |
| 2.0 | REFERENCE |
| 3.0 | ABBREVIATIONS & DEFINITION |
| 4.0 | RESPONSIBILITY |
| 5.0 | GENERAL |
| 6.0 | EQUIMENT & TOOLS |
| 7.0 | PROCEDURE |
| 8.0 | TEST EXECUTION |
| 9.0 | DOCUMENTATION AND MATERIAL TRACEABILITY |
| 10.0 | ATTACHMENT |
RREINFORCEMENT PAD LEAK TEST PROCEDURE | METHOD STATEMENT
1. SCOPE
1.1 The Method Statement applies to all reinforcement/ encirclement pad welded directly to pipe.
2.0 REFERENCE
PROJECT QUALITY PLAN
ASME B31.3. Process piping. (2010)
Schedule Q Quality Requirements
SATR-A-2010 Leak Test Report (Rev.6)
SATR-A-2001 Pressure Test Report
SATIP-A-004-05 Leak Testing (per SAES-A-004)
SAIC-A-2004 Verify Pneumatic Test Medium (Nitrogen & Inert Gas) & Bubble Solution (for Leak Testing) (Rev6)
SAIC-L-2035 Cutting & Assembly Fit-up (Rev.6)
3. ABBREVIATIONS AND DEFINITIONS
- ASME – American Society of Mechanical Engineers.
- RFI – Request for Inspection.
- PID – Projects Inspection Division.
- NDT – Non Destructive Testing.
- PPE – Personnel Protective Equipment.
- WPS – Welding Procedure Specification.
- PQR – Procedure Qualification Record.
- HSE – Heath Safety and Environment.
4.0 RESPONSIBILITY
4.1 Construction Manager
The Construction Manager shall organize job execution in accordance with Project Specification, Drawings, Schedules, Method Statements, Quality and HSE Standards.
4.2 QA/QC Manager
Responsible for preparation and maintenance of Quality Plan, Preparation of internal audits schedule, implement of quality audits with respect to Quality Plan and Schedule Q. Evaluate and monitor the effectiveness of Project Quality Plan and Quality System within the scope of work.
4.3 Safety Officer
Should monitor the activity for pressure test, he should check if proper signage for safety have been put in place. He must warn the workers not to cross the barricaded area if testing is ongoing and he should check if proper PPE is provided.
4.4 Shop Foreman
He shall ensure that availability of fitters & Helpers for smoothly carrying out leak testing. He shall ensure that all the relevant inspection activity is being witnessed by the GIWI/JGC & PIO inspectors. He shall make all necessary provisions including any arrangement to initiate and perform Leak Test.
4.5 Piping QC Inspector
Raises RFI for witnessing the leak test. Perform all the inspections and per the approved ITP to ensure the compliance to the requirements of the IFC Drawings and ARAMCO standards. He shall also carry out preparation of Inspection Reports & witness Test on Reinforcement Pad.
4.6 Store keeper
Issuing Pressure gauge, Valves. Compressor, manifold, approved testing solution.
4.7 Supervisor
The Supervisor will follow the Project Quality Plan, Fabrication Schedule and proceed with the job execution in accordance with Procedures/ Work instruction covering the following:
> Material Control
> Material Traceability
Arrangement of necessary Manpower.
5. GENERAL
- The primary objective of the Project is timely completion in accordance with the highest standard of workmanship and Quality to help JGC/Daewoo in achieving successful operation of the facilities.
- GIWI has a material control Procedure and the same shall be implemented during the leak test on Pads.
- Whenever a document /drawing is revised the latest approved issued for construction documents, and drawings are being used.
- The measurement and testing equipment being used is certified, identified and calibrated as per procedure.
- The environmental condition are satisfactory, otherwise measures are being implemented to protect the work.
- The demobilization of resources shall begin as soon as the work fronts are completed.
- The area occupied for temporary construction facilities shall ultimately be cleared of all installations, debris to bring it into reasonably cleaned conditions as received by GIWI. All pressure gauges shall be calibrated every one month.
- All gauges shall have sticker on the gauge indicating the date calibrated and certification record number.
- Calibration shall be traceable to individual gages for verification.
- Records of Calibration shall be made available upon request.
6.0 EQUIPMENT & TOOLS
6.1 Manifold or fittings
6.2 Test Medium :- Air or Nitrogen (N2)
6.3 Test Pressure:- 0.36 bar (5 Psig)
6.4 Manually operated air pump, Air Compressor or Nitrogen bottle
6.5 Approved Leak Testing Solution
Note:- > Household soap or detergents are not permitted as substitutes for bubbles Testing Solutions.
► All pressure gauges shall be calibrated every month.
► All gauges shall have sticker on the gauge indicating the date calibrated and Certificates.
7. RREINFORCEMENT PAD LEAK TEST PROCEDURE
- All weld surfaces to be leak tested on the outside shall be cleaned free of paint, rust and scale.
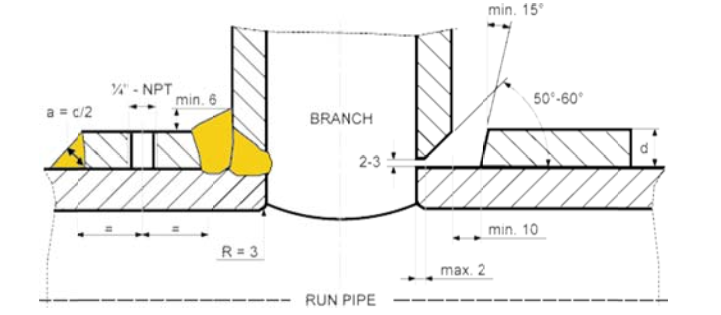
- Reinforcing Pad shall have tapped vent hole
- The test devices shall be installed at each weep hole (6mm NPT) on the reinforcement pad. The ball valve on the air pump or air compressor or Nitrogen bottle shall be gradually opened to reach 0.36 bar g and closed to keep the holding pressure at 0.36 bar g.
- Leakage shall be checked by putting approved testing solution on all exposed weld joints.
- Ensure an approved bubble forming solution is available in adequate quantity and compatible with surface metal test temperatures. Temperature of surface of part to be examined shall not be below 40F (4°C) or above 125°F (52°C).
- Care shall be used in applying the fluid, to prevent the formation of bubbles; the bubble forming solution shall be applied by spraying, brushing or flowing the solution onto the test area such that a thin film of solution covers the area.
- The surface shall be examined at the time of the solution application for the presence of large leaks, and after 2 minutes for the presence of small leaks.
- Carry out visual check for any bubbles appearing on the surface of weld, which is an indication of a possible leak. Recheck the area once again to confirm the removal of defect. After examination, release the pressure by closing the air supply to the manifold.
- In case of any leaks, the leaking area shall be marked, pressure shall be released and any repair of the area shall be carried out using appropriate approved welding procedure. All required NOT shall be carried out such as PT & MT. The repaired area of the weld joints shall be rechecked for leak tightness.
- In case of any leaks, the leaking area shall be marked, pressure shall be released and any repair of the area shall be carried out using appropriate approved welding procedure. The repaired area of the weld joints shall be rechecked for leak tightness.
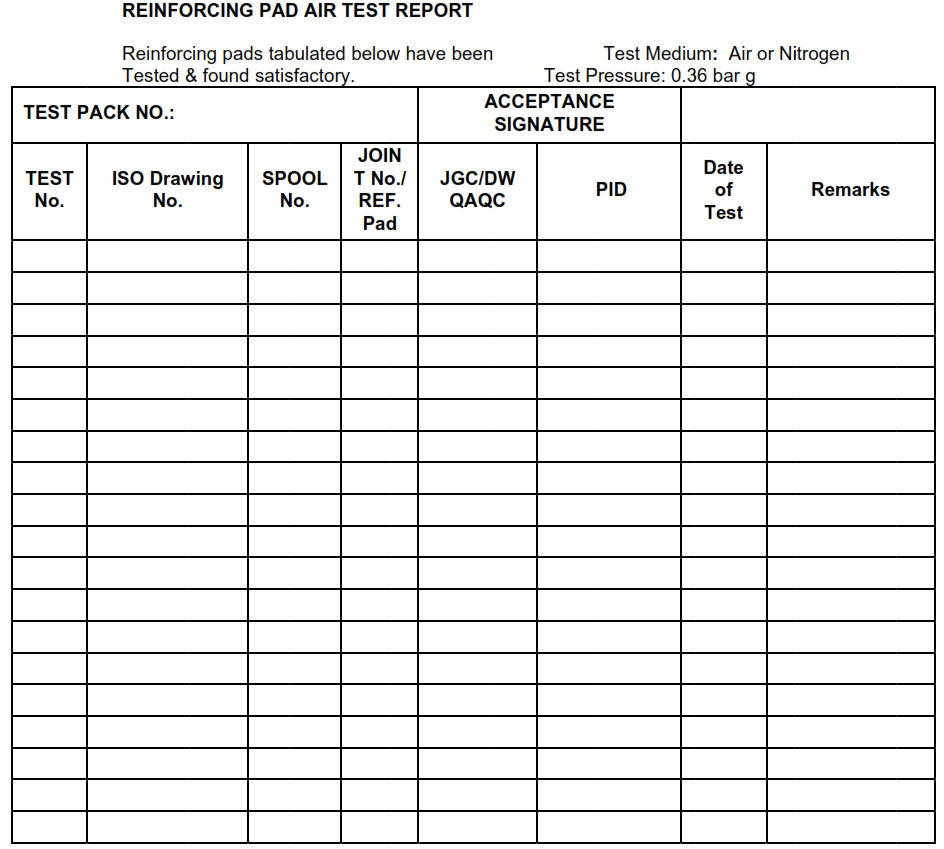
- After performing the air leak test, the test result shall be recorded in the (Attachment 1 – SATR A-2010) and signed by the GIWI Inspector and PIO who witnessed the test.
- After completion of the test the vent hole shall be plugged with grease or with plastic plugs approved by PIO.
TEST EXECUTION
- A leak test of 0-5 psig shall be applied to the reinforcing pads and maintaining to a period of 15 minutes minimum.
- Visually inspect pressure gauges to make sure no signs of pressure loss.
- Visually inspect the welding joints of reinforcement pad during application of leak testing solution If leakage exist then air bubble formation will take place.
- In any event if test fails, a new test shall be applied after repairs and corrections have been made. After leak testing the hole will be filled with grease.
9.0 DOCUMENTATION —
- Upon completion of Leaking testing, Inspection Report shall be prepared and attached with RFI by the GIWI QC Inspector.
- All activities for quality assurance shall be performed and controlled as verified by documentation.
10.0 ATTACHMENT:
ATTACHMENT 1 – REINFORCING PAD AIR TEST REPORT.

